INTERIOR PANELS / TRIM ROOF HEADLINING INSTALLATION
PROCEDURE

 63342A
1.INSTALL NO. 2 ROOF SILENCER
Apply adhesive agent to 2 new No. 2 roof silencers.
Install the 2 new No. 2 roof silencers as shown in the illustration.
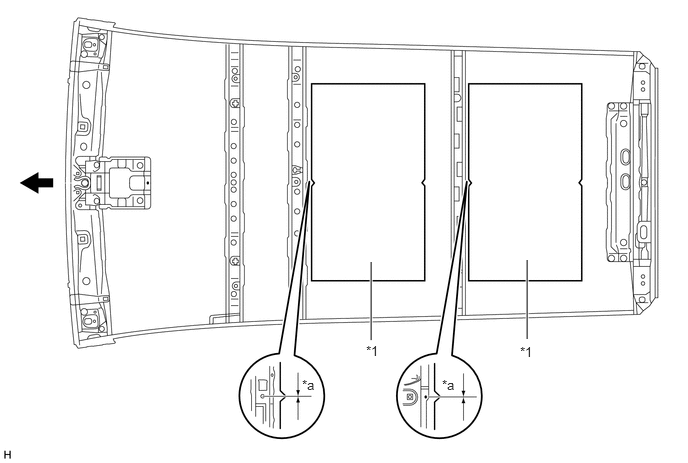
| *1 | No. 2 Roof Silencer | - | - |
| *a | Align | - | - |

|
Front Side | - | - |
63357B
2.INSTALL ROOF SILENCER
Apply adhesive agent to a new roof silencer.
Install the new roof silencer as shown in the illustration.
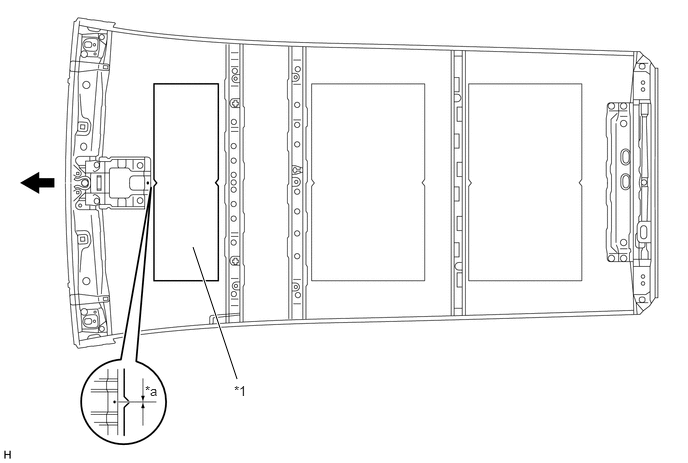
| *1 | Roof Silencer | - | - |
| *a | Align | - | - |
|
|
Front Side | - | - |
63352C
3.INSTALL ROOF HEADLINING END PAD (for Full-trim)
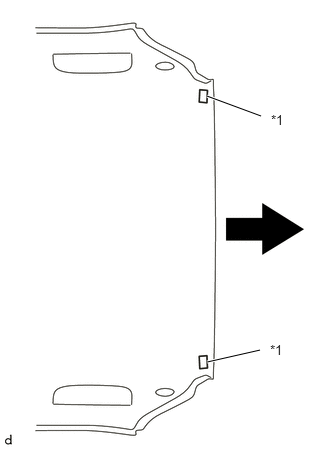
| *1 | Roof Headlining End Pad |
|
|
Rear Side |
Apply adhesive agent to 2 new roof headlining end pads.
Install the 2 new roof headlining end pads.
63356B
4.INSTALL ROOF HEADLINING PAD LH (w/ Glass Case)
Apply adhesive agent to 2 new roof headlining pads LH.
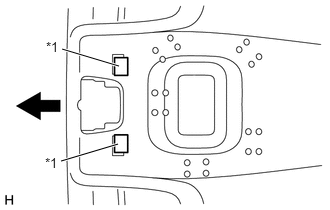
| *1 | Roof Headlining Pad LH |
|
|
Front Side |
Attach the 2 new roof headlining pads LH.
85370E
5.INSTALL REAR NO. 2 WASHER HOSE ASSEMBLY (w/ Rear Wiper)
- HINT:
-
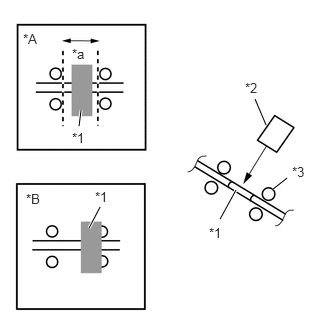 2.292,2.281 2.458,1.979 true 2.844,1.969 2.99,1.854 true 2.656,1.031 2.771,1.302 true 0.823,1.313 0.844,1.146 true 0.927,2.375 1.042,2.156 true 0.24,0.323 0.552,0.479 0.313,0.156 10 false *A 0.271,1.99 0.583,2.146 0.313,0.156 10 false *B 3.042,1.708 3.354,1.865 0.313,0.156 10 false *3 2.552,0.833 2.865,0.99 0.313,0.156 10 false *2 2.177,2.344 2.49,2.5 0.313,0.156 10 false *1 0.75,0.479 1.063,0.635 0.313,0.156 10 false *a 0.99,1.969 1.302,2.125 0.313,0.156 10 false *1 0.75,1.354 1.063,1.51 0.313,0.156 10 false *1
*A Good taping *B NG taping *a White tape should be in this portion *1 White Tape *2 Harness Fixing Tape *3 Marking
-
Arrange white tape on marking as shown in the illustration.
Install the rear No. 2 washer hose assembly as shown in the illustration.
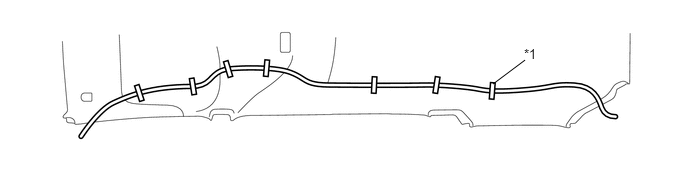
| *1 | Adhesive Tape | - | - |
82171
6.INSTALL NO. 1 ROOF WIRE
- HINT:
-
2.292,2.281 2.458,1.979 true 2.844,1.969 2.99,1.854 true 2.656,1.031 2.771,1.302 true 0.823,1.313 0.844,1.146 true 0.927,2.375 1.042,2.156 true 0.24,0.323 0.552,0.479 0.313,0.156 10 false *A 0.271,1.99 0.583,2.146 0.313,0.156 10 false *B 3.042,1.708 3.354,1.865 0.313,0.156 10 false *3 2.552,0.833 2.865,0.99 0.313,0.156 10 false *2 2.177,2.344 2.49,2.5 0.313,0.156 10 false *1 0.75,0.479 1.063,0.635 0.313,0.156 10 false *a 0.99,1.969 1.302,2.125 0.313,0.156 10 false *1 0.75,1.354 1.063,1.51 0.313,0.156 10 false *1
*A Good taping *B NG taping *a White tape should be in this portion *1 White Tape *2 Harness Fixing Tape *3 Marking
-
Arrange white tape on marking as shown in the illustration.
Install the No. 1 Roof Wire as shown in the illustration.
w/o Tire Pressure Warining System, w/o Glass Case
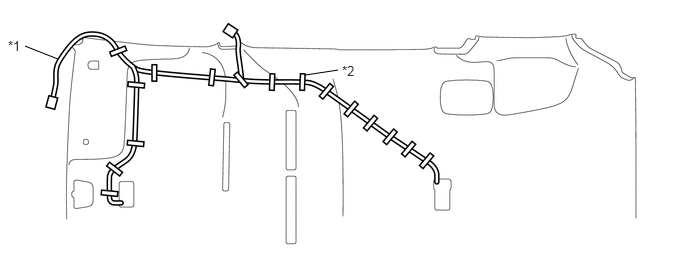
| *1 | Roof Wiring Harness | *2 | Adhesive Tape |
w/ Tire Pressure Warining System, w/o Glass Case
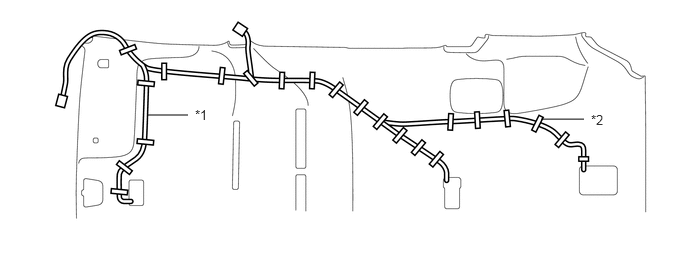
| *1 | Roof Wiring Harness | *2 | Adhesive Tape |
w/o Tire Pressure Warining System, w/ Glass Case
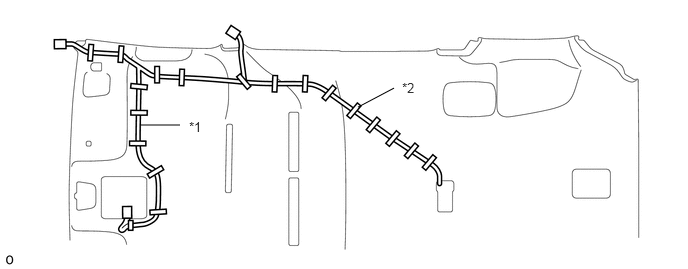
| *1 | Roof Wiring Harness | *2 | Adhesive Tape |
w/ Tire Pressure Warining System, w/ Glass Case
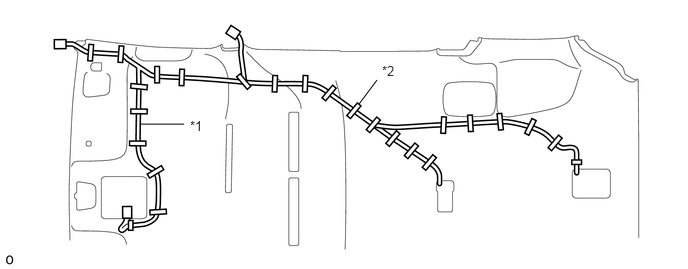
| *1 | Roof Wiring Harness | *2 | Adhesive Tape |
63310
7.INSTALL ROOF HEADLINING ASSEMBLY
Put the roof headlining in the vehicle through the back door.
- NOTICE:
-
Do not damage the roof headlining assembly or body interior.
Connect the rear washer hose (w/ Rear Wiper).
w/o Rear Air Conditioning System:
Install the 15 clips (w/ 1 assist grip) or 9 clips (w/ 3 assist grips).
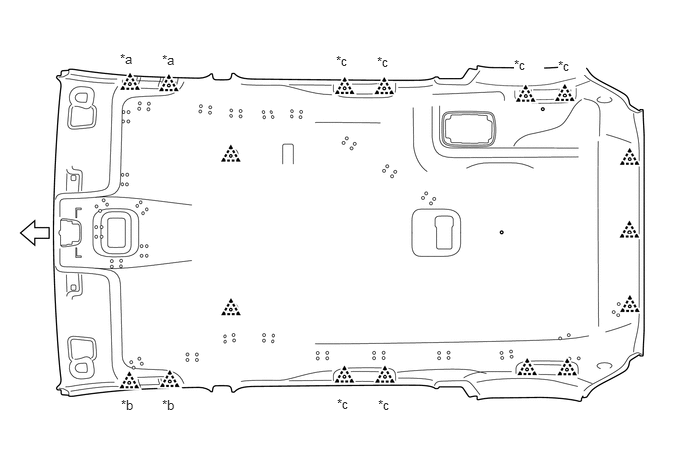
| *a | for RHD | *b | for LHD |
| *c | w/ 1 assist grip | - | - |

|
Front Side | - | - |
w/ Rear Air Conditioning System:
Install the 11 clips.
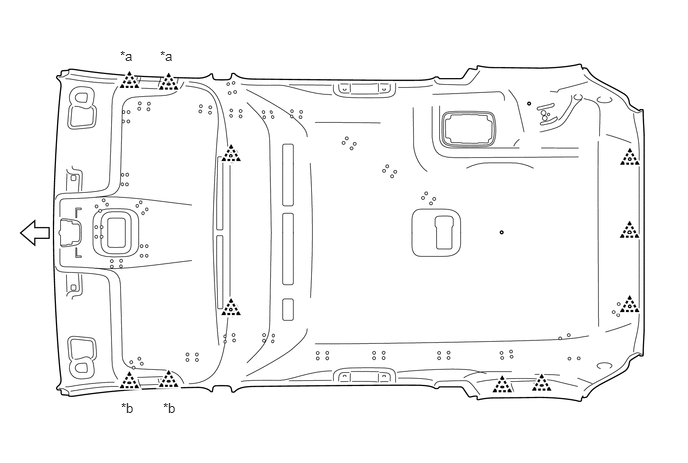
| *a | for RHD | *b | for LHD |
|
|
Front Side | - | - |
Connect the connector and engage the 4 clamps.
w/ Rear Wiper:
Connect the rear window washer hose and engage the 3 clamps.
Connect the connector. (w/ Tire Pressure Warining System)
8.INSTALL ASSIST GRIP ASSEMBLY
- HINT:
-
Use the same procedures for all the assist grip assemblies.
Install the assist grip assembly with the 2 screws.
Engage the 2 claws to close the 2 covers.
62961C
9.INSTALL ROOM VENT GRILLE (w/ Rear Air Conditioning System)
Engage the 8 claws to install the room vent grille.
10.INSTALL NO. 1 AIR OUTLET GRILLE SUB-ASSEMBLY (w/ Rear Air Conditioning System)
Connect the connector.
Engage the 10 claws to install the No. 1 air outlet grille sub-assembly.
74348
11.INSTALL VISOR HOLDER
Engage the 2 claws to install the visor holder.
- HINT:
-
Use the same procedure for both sides.
74320
12.INSTALL VISOR ASSEMBLY LH
Install the visor assembly LH with the screw.
Engage the visor shaft into the visor holder.
74310
13.INSTALL VISOR ASSEMBLY RH
- HINT:
-
Use the same procedure as for the LH side.
87827
14.INSTALL INNER REAR VIEW MIRROR ABSORBER
Install the inner rear view mirror absorber.
87810
15.INSTALL INNER REAR VIEW MIRROR
87834
16.INSTALL INNER REAR VIEW MIRROR STAY HOLDER COVER
81240D
17.INSTALL NO. 2 ROOM LIGHT ASSEMBLY
81260A
18.INSTALL MAP LIGHT ASSEMBLY (w/ Glass Case)
81260A
19.INSTALL MAP LIGHT ASSEMBLY (w/o Glass Case)
58519C
20.INSTALL REAR WHEEL HOUSE CARPET RH (for Semi-trim)
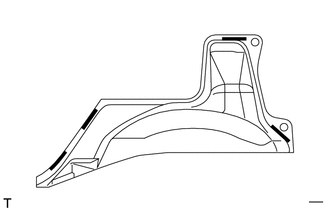

|
Double Sided Tape |
Apply 4 new pieces of double sided tape as shown in the illustration.
Install the rear wheel house carpet RH with the 2 clips.
58529C
21.INSTALL REAR WHEEL HOUSE CARPET LH (for Semi-trim)
- HINT:
-
Use the same procedure as for the RH side.
62510P
22.INSTALL FRONT QUARTER TRIM PANEL ASSEMBLY RH (for Semi-trim)
Engage the 15 clips to install the front quarter trim panel assembly RH.
62520P
23.INSTALL FRONT QUARTER TRIM PANEL ASSEMBLY LH (for Semi-trim)
Engage the 13 clips to install the front quarter trim panel assembly LH.
62472D
24.INSTALL REAR PILLAR UPPER GARNISH LH (for Full-trim)
Engage the 3 clips, claw and hook to install the rear pillar upper garnish LH.
62471D
25.INSTALL REAR PILLAR UPPER GARNISH RH (for Full-trim)
- HINT:
-
Use the same procedure as for the LH side.
62639
26.INSTALL REAR QUARTER FRONT TRIM GARNISH LH (for Full-trim)
Engage the 2 clips and claw to install the rear quarter front trim garnish LH.
62638
27.INSTALL REAR QUARTER FRONT TRIM GARNISH RH (for Full-trim)
- HINT:
-
Use the same procedure as for the LH side.
64740C
28.INSTALL DECK TRIM SIDE PANEL ASSEMBLY LH (for Full-trim)
Engage the 8 clips and 6 claws to install the deck trim side panel assembly LH.
64730B
29.INSTALL DECK TRIM SIDE PANEL ASSEMBLY RH (for Full-trim)
- HINT:
-
Use the same procedure as for the LH side.
73137A
30.INSTALL UPPER SHOULDER BELT ANCHOR COVER (w/ Rear No. 1 Outer Seat Belt)
Engage the guide, 3 clips and 6 claws to install the upper shoulder belt anchor cover.
73570
31.INSTALL REAR NO. 2 OUTER SEAT BELT ASSEMBLY LH (w/ Rear No. 2 Outer Seat Belt)
Install the shoulder anchor with the bolt.
- Torque:
- 41 N*m (418 kgf*cm, 30 ft.*lbf)
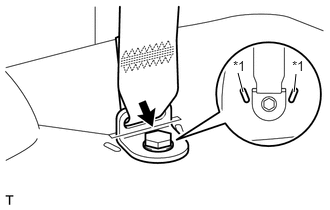
| *1 | Locating Marks |
Install the floor anchor plate with the bolt.
- Torque:
- 41 N*m (418 kgf*cm, 30 ft.*lbf)
- NOTICE:
-
Do not place the floor anchor plate over the 2 locating marks of the floor panel.
73560
32.INSTALL REAR NO. 2 OUTER SEAT BELT ASSEMBLY RH (w/ Rear No. 2 Outer Seat Belt)
- HINT:
-
Use the same procedure as for the LH side.
73370C
33.INSTALL REAR NO. 1 OUTER SEAT BELT ASSEMBLY LH (w/ Rear No. 1 Outer Seat Belt)
Install the shoulder anchor with the bolt.
- Torque:
- 41 N*m (418 kgf*cm, 30 ft.*lbf)
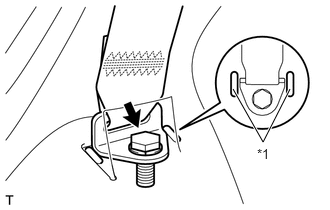
| *1 | Locating Marks |
Install the floor anchor plate with the bolt.
- Torque:
- 41 N*m (418 kgf*cm, 30 ft.*lbf)
- NOTICE:
-
Do not place the floor anchor plate over the 2 locating marks of the floor panel.
73360C
34.INSTALL REAR NO. 1 OUTER SEAT BELT ASSEMBLY RH (w/ Rear No. 1 Outer Seat Belt)
- HINT:
-
Use the same procedure as for the LH side.
73237B
35.INSTALL SHOULDER BELT ANCHOR COVER
- HINT:
-
Use the same procedure for all the shoulder belt anchor covers.
Engage the 2 claws to install the shoulder anchor cover.
67935
36.INSTALL BACK DOOR SCUFF PLATE
Engage the 4 clips to install the back door scuff plate.
67881A
37.INSTALL BACK DOOR WEATHERSTRIP
Align both ends of the back door weatherstrip within the back door striker mounted point and install the back door weatherstrip.
62412B
38.INSTALL CENTER PILLAR UPPER GARNISH LH
Engage the clip and guide to install the center pillar upper garnish LH.
62411B
39.INSTALL CENTER PILLAR UPPER GARNISH RH
- HINT:
-
Use the same procedure as for the LH side.
73220
40.INSTALL FRONT SEAT OUTER BELT ASSEMBLY LH
Install the front seat outer belt assembly LH with the bolt.
- Torque:
- 41 N*m (418 kgf*cm, 30 ft.*lbf)
Engage the 2 claws to close the shoulder belt anchor cover.
73210
41.INSTALL FRONT SEAT OUTER BELT ASSEMBLY RH
- HINT:
-
Use the same procedure as for the LH side.
62212
42.INSTALL FRONT PILLAR GARNISH LH (for 6 Speakers)
62211
43.INSTALL FRONT PILLAR GARNISH RH (for 6 Speakers)
- HINT:
-
Use the same procedure as for the LH side.
62212
44.INSTALL FRONT PILLAR GARNISH LH (for 4 Speakers)
- HINT:
-
Use the same procedure as for the front pillar garnish LH (for 6 Speakers).
62211
45.INSTALL FRONT PILLAR GARNISH RH (for 4 Speakers)
- HINT:
-
Use the same procedure as for the LH side.
62334A
46.INSTALL REAR DOOR OPENING TRIM LH (for Full-trim)
Install the rear door opening trim LH.
62333A
47.INSTALL REAR DOOR OPENING TRIM RH (for Full-trim)
- HINT:
-
Use the same procedure as for the LH side.
62334A
48.INSTALL REAR DOOR OPENING TRIM LH (for Semi-trim)
- HINT:
-
Use the same procedure as for the rear door opening trim LH (for full-trim).
62333A
49.INSTALL REAR DOOR OPENING TRIM RH (for Semi-trim)
- HINT:
-
Use the same procedure as for the LH side.
62312B
50.INSTALL FRONT DOOR OPENING TRIM WEATHERSTRIP LH
Install the front door opening trim weatherstrip LH.
62311B
51.INSTALL FRONT DOOR OPENING TRIM WEATHERSTRIP RH
- HINT:
-
Use the same procedure as for the LH side.
62414A
52.INSTALL CENTER PILLAR LOWER GARNISH LH
Install the center pillar lower garnish LH.
62413A
53.INSTALL CENTER PILLAR LOWER GARNISH RH
- HINT:
-
Use the same procedure as for the LH side.
67918D
54.INSTALL REAR DOOR SCUFF PLATE LH
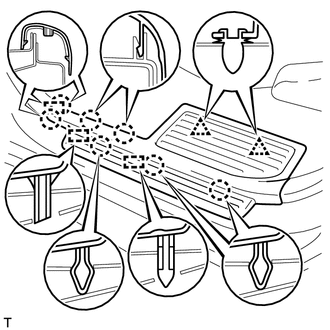
Align the 3 bosses of the rear door scuff plate LH with the holes in the body.
Engage the 2 clips and 7 claws to install the rear door scuff plate LH.
67917C
55.INSTALL REAR DOOR SCUFF PLATE RH
- HINT:
-
Use the same procedure as for the LH side.
67914B
56.INSTALL FRONT DOOR SCUFF PLATE LH
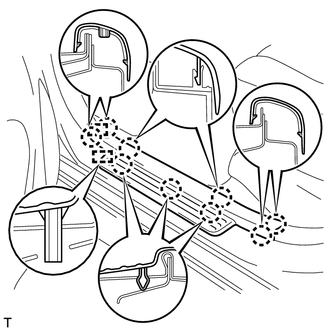
Align the 2 bosses of the front door scuff plate LH with the holes in the body.
Engage the 9 claws to install the front door scuff plate LH.
67913B
57.INSTALL FRONT DOOR SCUFF PLATE RH
- HINT:
-
Use the same procedure as for the LH side.