PARK ASSIST / MONITORING TOYOTA PARKING ASSIST-SENSOR SYSTEM Clearance Warning Buzzer Circuit
DESCRIPTION
This circuit consists of the No. 1 clearance warning buzzer, No. 2 clearance warning buzzer and clearance warning ECU assembly. An ECU-excited type buzzer is used. The ECU operates the buzzers using a sound pattern that changes depending on the distance to the obstacle.
WIRING DIAGRAM
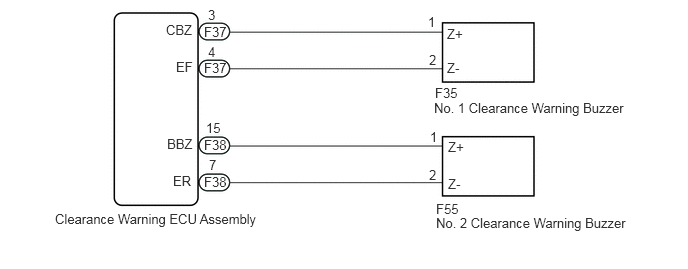
CAUTION / NOTICE / HINT
- NOTICE:
-
Depending on the parts that are replaced during vehicle inspection or maintenance, performing initialization may be needed. Refer to Calibration.
-
Click hereAudio / Visual / Telematics>PARK ASSIST / MONITORING>TOYOTA PARKING ASSIST-SENSOR SYSTEM>CALIBRATION
PROCEDURE
Check the operation of the No. 1 and No. 2 clearance warning buzzers.
- Result:
Result Proceed to Buzzer does not sound when an obstacle is detected in front or at the rear of the vehicle. A Buzzer does not sound only when an obstacle is detected in front of the vehicle. B Buzzer does not sound only when an obstacle is detected at the rear of the vehicle. C
A
B
C
Connect the GTS to the DLC3.
Turn the power switch on (IG).
Turn the GTS on.
Enter the following menus: Body Electrical / IPA/ICS/Clearance Sonar / Active Test.
Check that the front buzzer operates by performing the Active Test.
- Body Electrical > IPA/ICS/Clearance Sonar > Active Test
-
Tester Display Measurement Item Control Range Diagnostic Note Front Buzzer No. 1 clearance warning buzzer Stop or Operate Confirm that the vehicle is stopped and the power switch is on (IG)
- Body Electrical > IPA/ICS/Clearance Sonar > Active Test
-
Tester Display Front Buzzer - 50004 170 1
- OK:
The No. 1 clearance warning buzzer sounds.
- Result:
Proceed to OK NG
OK
NG
Disconnect the F37 clearance warning ECU assembly connector.
Disconnect the F35 No. 1 clearance warning buzzer connector.
Measure the resistance according to the value(s) in the table below.
- Standard Resistance:
Tester Connection Condition Specified Condition F37-3 (CBZ) - F35-1 (Z+) Always Below 1 Ω F37-4 (EF) - F35-2 (Z-) Always Below 1 Ω F37-3 (CBZ) or F35-1 (Z+) - Body ground Always 10 kΩ or higher F37-4 (EF) or F35-2 (Z-) - Body ground Always 10 kΩ or higher
- Result:
Proceed to OK NG
OK
NG
Replace the No. 1 clearance warning buzzer with a new or known good one.
Click hereAudio / Visual / Telematics>PARK ASSIST / MONITORING>CLEARANCE WARNING BUZZER>REMOVAL
- Result:
Proceed to NEXT
NEXT
Connect the GTS to the DLC3.
Turn the power switch on (IG).
Turn the GTS on.
Enter the following menus: Body Electrical / IPA/ICS / Clearance Sonar / Active Test.
Check that the front buzzer operates by performing the Active Test.
- Body Electrical > IPA/ICS/Clearance Sonar > Active Test
-
Tester Display Measurement Item Control Range Diagnostic Note Front Buzzer No. 1 clearance warning buzzer Stop or Operate Confirm that the vehicle is stopped and the power switch is on (IG)
- Body Electrical > IPA/ICS/Clearance Sonar > Active Test
-
Tester Display Front Buzzer - 50004 170 1
- OK:
The No. 1 clearance warning buzzer sounds.
- Result:
Proceed to OK NG
OK
NG
Connect the GTS to the DLC3.
Turn the power switch on (IG).
Turn the GTS on.
Enter the following menus: Body Electrical / IPA/ICS / Clearance Sonar / Active Test.
Check that the rear buzzer operates by performing the Active Test.
- Body Electrical > IPA/ICS/Clearance Sonar > Active Test
-
Tester Display Measurement Item Control Range Diagnostic Note Rear Buzzer No. 2 clearance warning buzzer Stop or Operate Confirm that the vehicle is stopped and the power switch is on (IG)
- Body Electrical > IPA/ICS/Clearance Sonar > Active Test
-
Tester Display Rear Buzzer - 50004 170 2
- OK:
The No. 2 clearance warning buzzer sounds.
- Result:
Proceed to OK NG
OK
NG
Disconnect the F38 clearance warning ECU assembly connector.
Disconnect the F55 No. 2 clearance warning buzzer connector.
Measure the resistance according to the value(s) in the table below.
- Standard Resistance:
Tester Connection Condition Specified Condition F38-15 (BBZ) - F55-1 (Z+) Always Below 1 Ω F38-7 (ER) - F55-2 (Z-) Always Below 1 Ω F38-15 (BBZ) or F55-1 (Z+) - Body ground Always 10 kΩ or higher F38-7 (ER) or F55-2 (Z-) - Body ground Always 10 kΩ or higher
- Result:
Proceed to OK NG
OK
NG
Replace the No. 2 clearance warning buzzer with a new or known good one.
Click hereAudio / Visual / Telematics>PARK ASSIST / MONITORING>CLEARANCE WARNING BUZZER>REMOVAL
- Result:
Proceed to NEXT
NEXT
Connect the GTS to the DLC3.
Turn the power switch on (IG).
Turn the GTS on.
Enter the following menus: Body Electrical / IPA/ICS / Clearance Sonar / Active Test.
Check that the rear buzzer operates by performing the Active Test.
- Body Electrical > IPA/ICS/Clearance Sonar > Active Test
-
Tester Display Measurement Item Control Range Diagnostic Note Rear Buzzer No. 2 clearance warning buzzer Stop or Operate Confirm that the vehicle is stopped and the power switch is on (IG)
- Body Electrical > IPA/ICS/Clearance Sonar > Active Test
-
Tester Display Rear Buzzer - 50004 170 2
- OK:
The No. 2 clearance warning buzzer sounds.
- Result:
Proceed to OK NG
OK
NG