SEAT BELT SEAT BELT WARNING SYSTEM Rear Seat Belt Warning Light Malfunction
DESCRIPTION
The combination meter assembly detects whether either rear door is open or closed based on the condition of the left and right courtesy light switches. The combination meter assembly detects the rear seat belt state. The rear seat belt warning lights on the clock assembly illuminate or turn off in accordance with the rear door state, vehicle speed and rear seat belt state.
WIRING DIAGRAM
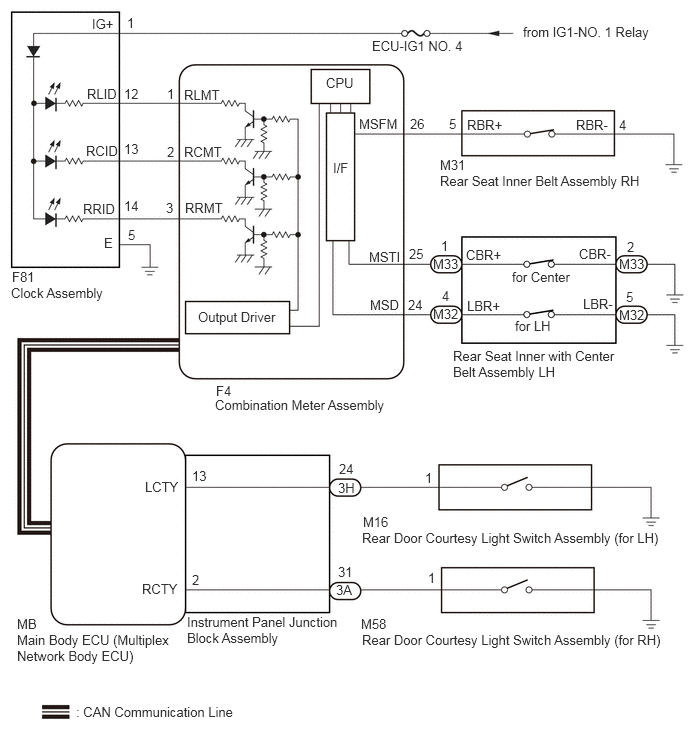
CAUTION / NOTICE / HINT
- NOTICE:
- ·
The seat belt warning system uses the CAN communication system. First, confirm that there is no malfunction in the CAN communication system. Refer to the How to Proceed with Troubleshooting procedure.
Click hereVehicle Interior>SEAT BELT>SEAT BELT WARNING SYSTEM>HOW TO PROCEED WITH TROUBLESHOOTING
·When replacing the combination meter assembly, always replace it with a new one. If a combination meter assembly which was installed to another vehicle is used, the information stored in it will not match the information from the vehicle and a DTC may be stored.
PROCEDURE
Connect the GTS to the DLC3.
Turn the power switch on (IG).
Turn the GTS on.
Enter the following menus: Body Electrical / Main Body / Data List.
Read the Data List according to the display on the GTS.
- Body Electrical > Main Body > Data List
-
Tester Display Measurement Item Range Normal Condition Diagnostic Note RR Door Courtesy SW Rear door courtesy light switch RH ON or OFF ON: Rear door RH open
OFF: Rear door RH closed- RL Door Courtesy SW Rear door courtesy light switch LH ON or OFF ON: Rear door LH open
OFF: Rear door LH closed-
- Body Electrical > Main Body > Data List
-
Tester Display RR Door Courtesy SW RL Door Courtesy SW - 50003 123 24,25
- OK:
ON or OFF appears on the GTS screen according to the rear door condition.
- Result:
Proceed to OK NG
OK
NG
Connect the GTS to the DLC3.
Turn the power switch on (IG).
Turn the GTS on.
Enter the following menus: Body Electrical / Combination Meter / Data List.
Read the Data List according to the display on the GTS.
- Body Electrical > Combination Meter > Data List
-
Tester Display Measurement Item Range Normal Condition Diagnostic Note 2nd-Row Seatbelt Buckle (R) Rear RH seat belt buckle switch signal ON or OFF ON: Rear RH seat belt not fastened
OFF: Rear RH seat belt fastened- 2nd-Row Seatbelt Buckle (L) Rear LH seat belt buckle switch signal ON or OFF ON: Rear LH seat belt not fastened
OFF: Rear LH seat belt fastened- 2nd-Row Seatbelt Buckle (C) Rear center seat belt buckle switch signal ON or OFF ON: Rear center seat belt not fastened
OFF: Rear center seat belt fastened-
- Body Electrical > Combination Meter > Data List
-
Tester Display 2nd-Row Seatbelt Buckle (R) 2nd-Row Seatbelt Buckle (L) 2nd-Row Seatbelt Buckle (C) - 50003 122 74,75,76
- OK:
The GTS display changes correctly in response to the rear door condition.
- Result:
Result Proceed to ON or OFF is displayed on the GTS screen according to the rear seat belt condition A ON or OFF is not displayed normally on the GTS screen according to the rear LH seat belt condition B ON or OFF is not displayed normally on the GTS screen according to the rear center seat belt condition B ON or OFF is not displayed normally on the GTS screen according to the rear RH seat belt condition C
A
B
C
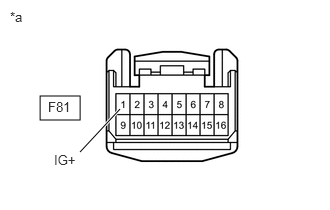
| *a | Front view of wire harness connector
(to Clock Assembly) |
Disconnect the clock assembly connector.
Measure the voltage according to the value(s) in the table below.
- Standard Voltage:
Tester Connection Switch Condition Specified Condition F81-1 (IG+) - Body ground Power switch on (IG) 11 to 14 V Power switch off Below 1 V
- Result:
Proceed to OK NG
OK
NG
Remove the clock assembly.
Click hereVehicle Interior>SEAT BELT>SEAT BELT WARNING LIGHT>REMOVAL
Inspect the clock assembly.
Click hereVehicle Interior>SEAT BELT>SEAT BELT WARNING LIGHT>INSPECTION
- Result:
Proceed to OK NG
OK
NG
Disconnect the F81 clock assembly connector.
Disconnect the F4 combination meter assembly connector.
Measure the resistance according to the value(s) in the table below.
- Standard Resistance:
Tester Connection Condition Specified Condition F81-12 (RLID) - F4-1 (RLMT) Always Below 1 Ω F81-13 (RCID) - F4-2 (RCMT) Always Below 1 Ω F81-14 (RRID) - F4-3 (RRMT) Always Below 1 Ω F81-12 (RLID) or F4-1 (RLMT) - Body ground Always 10 kΩ or higher F81-13 (RCID) or F4-2 (RCMT) - Body ground Always 10 kΩ or higher F81-14 (RRID) or F4-3 (RRMT) - Body ground Always 10 kΩ or higher
- Result:
Proceed to OK NG
OK
NG
Remove the rear seat inner with center belt assembly LH.
Click hereVehicle Interior>SEAT BELT>REAR SEAT INNER BELT ASSEMBLY(for LH Side)>REMOVAL
Inspect the rear seat inner with center belt assembly LH.
Click hereVehicle Interior>SEAT BELT>REAR SEAT INNER BELT ASSEMBLY(for LH Side)>INSPECTION
- Result:
Proceed to OK NG
OK
NG
Disconnect the M32 and M33 rear seat inner with center belt assembly LH connectors.
Disconnect the F4 combination meter assembly connector.
Measure the resistance according to the value(s) in the table below.
- Standard Resistance:
Tester Connection Condition Specified Condition M32-4 (LBR+) - F4-24 (MSD) Always Below 1 Ω M33-1 (CBR+) - F4-25 (MSTI) Always Below 1 Ω M32-5 (LBR-) - Body ground Always Below 1 Ω M33-2 (CBR-) - Body ground Always Below 1 Ω M32-4 (LBR+) or F4-24 (MSD) - Body ground Always 10 kΩ or higher M33-1 (CBR+) or F4-25 (MSTI) - Body ground Always 10 kΩ or higher
- Result:
Proceed to OK NG
OK
NG
Remove the rear seat inner belt assembly RH.
Click hereVehicle Interior>SEAT BELT>REAR SEAT INNER BELT ASSEMBLY(for RH Side)>REMOVAL
Inspect the rear seat inner belt assembly RH.
Click hereVehicle Interior>SEAT BELT>REAR SEAT INNER BELT ASSEMBLY(for RH Side)>INSPECTION
- Result:
Proceed to OK NG
OK
NG
Disconnect the M31 rear seat inner belt assembly RH connector.
Disconnect the F4 combination meter assembly connector.
Measure the resistance according to the value(s) in the table below.
- Standard Resistance:
Tester Connection Condition Specified Condition M31-5 (RBR+) - F4-26 (MSFM) Always Below 1 Ω M31-4 (RBR-) - Body ground Always Below 1 Ω M31-5 (RBR+) or F4-26 (MSFM) - Body ground Always 10 kΩ or higher
- Result:
Proceed to OK NG
OK
NG