EXTERIOR PANELS / TRIM BACK DOOR OUTSIDE GARNISH REASSEMBLY
PROCEDURE

 75431A
1.INSTALL NO. 1 BACK DOOR EMBLEM
75443
2.INSTALL NO. 3 BACK DOOR NAME PLATE
75442A
3.INSTALL NO. 2 BACK DOOR NAME PLATE
75441E
4.INSTALL NO. 1 BACK DOOR NAME PLATE
76819
5.INSTALL BACK DOOR OUTSIDE GARNISH SEAL
- HINT:
- ·
Using the same procedure, install every back door outside garnish seal.
·When installing the back door outside garnish seal, heat the back door outside garnish using a heat light.
- Heating Temperature:
Item Temperature Back Door Outside Garnish 20 to 30°C (68 to 86°F)
- CAUTION:
- ·
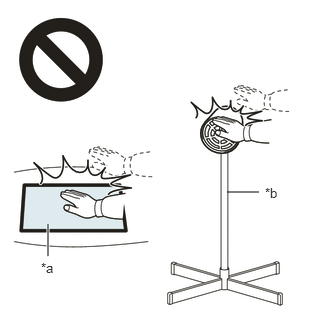 2.365,2 2.698,2 false 0.5,2.333 0.5,2.667 true 0.427,2.708 0.74,2.865 0.313,0.156 10 false *a 2.76,1.927 3.073,2.083 0.313,0.156 10 false *b
*a Heated Part *b Heat Light
Do not touch the heat light and heated parts, touching the heat light may result in burns.
·Touching heated parts for a long time may result in burns.
- NOTICE:
-
Do not heat the back door outside garnish excessively.
Clean the back door outside garnish surface.
Using a heat light, heat the back door outside garnish surface.
Remove the double-sided tape from the back door outside garnish.
Wipe off any tape adhesive residue with cleaner.
Using a heat light, heat the back door outside garnish.
Remove the release paper from a new back door outside garnish seal.
- HINT:
-
After removing the release paper, keep the exposed adhesive free from foreign matter.
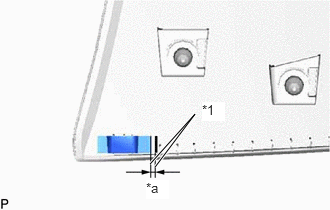
| *1 | Mark-off Line |
| *a | 1.5 mm (0.05905 in.) |
Install the back door outside garnish seal as shown in the illustration.
- HINT:
-
Align the back door outside garnish seal with the mark-off line of the back door outside garnish.
76822
6.INSTALL BACK DOOR GARNISH MOULDING LOWER PROTECTOR
- HINT:
- ·
Using the same procedure, install every back door garnish moulding lower protector.
·When installing the back door garnish moulding lower protector, heat the back door outside garnish using a heat light.
- Heating Temperature:
Item Temperature Back Door Outside Garnish 20 to 30°C (68 to 86°F)
- CAUTION:
- ·
2.365,2 2.698,2 false 0.5,2.333 0.5,2.667 true 0.427,2.708 0.74,2.865 0.313,0.156 10 false *a 2.76,1.927 3.073,2.083 0.313,0.156 10 false *b
*a Heated Part *b Heat Light
Do not touch the heat light and heated parts, touching the heat light may result in burns.
·Touching heated parts for a long time may result in burns.
- NOTICE:
-
Do not heat the back door outside garnish excessively.
Clean the back door outside garnish surface.
Using a heat light, heat the back door outside garnish surface.
Remove the double-sided tape from the back door outside garnish.
Wipe off any tape adhesive residue with cleaner.
Using a heat light, heat the back door outside garnish.
Remove the release paper from a new back door garnish moulding lower protector.
- HINT:
-
After removing the release paper, keep the exposed adhesive free from foreign matter.
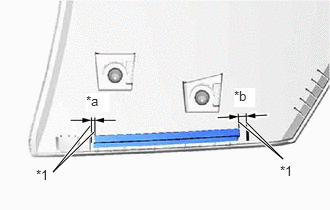
| *1 | Mark-off Line |
| *a | 1.0 mm (0.0393 in.) |
| *b | 5.0 mm (0.196 in.) |
Install the back door garnish moulding lower protector as shown in the illustration.
- HINT:
-
Align the back door garnish moulding lower protector with the mark-off line of the back door outside garnish.
7.INSTALL NO. 2 BACK DOOR OUTSIDE GARNISH PROTECTOR
- HINT:
- ·
Using the same procedure, install every No. 2 back door outside garnish protector.
·When installing the No. 2 back door outside garnish protector, heat the back door outside garnish using a heat light.
- Heating Temperature:
Item Temperature Back Door Outside Garnish 20 to 30°C (68 to 86°F)
- CAUTION:
- ·
2.365,2 2.698,2 false 0.5,2.333 0.5,2.667 true 0.427,2.708 0.74,2.865 0.313,0.156 10 false *a 2.76,1.927 3.073,2.083 0.313,0.156 10 false *b
*a Heated Part *b Heat Light
Do not touch the heat light and heated parts, touching the heat light may result in burns.
·Touching heated parts for a long time may result in burns.
- NOTICE:
-
Do not heat the back door outside garnish excessively.
Clean the back door outside garnish surface.
Using a heat light, heat the back door outside garnish surface.
Remove the double-sided tape from the back door outside garnish.
Wipe off any tape adhesive residue with cleaner.
Using a heat light, heat the back door outside garnish.
Remove the release paper from a new No. 2 back door outside garnish protector.
- HINT:
-
After removing the release paper, keep the exposed adhesive free from foreign matter.
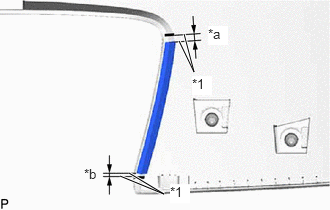
| *1 | Mark-off Line |
| *a | 5.0 mm (0.196 in.) |
| *b | 1.0 mm (0.0393 in.) |
Install the No. 2 back door outside garnish protector as shown in the illustration.
- HINT:
-
Align the No. 2 back door outside garnish protector with the mark-off line of the back door outside garnish.
76818
8.INSTALL BACK DOOR OUTSIDE GARNISH PAD
- HINT:
- ·
Using the same procedure, install every back door outside garnish pad.
·When installing the back door outside garnish pad, heat the back door outside garnish using a heat light.
- Heating Temperature:
Item Temperature Back Door Outside Garnish 20 to 30°C (68 to 86°F)
- CAUTION:
- ·
2.365,2 2.698,2 false 0.5,2.333 0.5,2.667 true 0.427,2.708 0.74,2.865 0.313,0.156 10 false *a 2.76,1.927 3.073,2.083 0.313,0.156 10 false *b
*a Heated Part *b Heat Light
Do not touch the heat light and heated parts, touching the heat light may result in burns.
·Touching heated parts for a long time may result in burns.
- NOTICE:
-
Do not heat the back door outside garnish excessively.
Clean the back door outside garnish surface.
Using a heat light, heat the back door outside garnish surface.
Remove the double-sided tape from the back door outside garnish.
Wipe off any tape adhesive residue with cleaner.
Using a heat light, heat the back door outside garnish.
Remove the release paper from a new back door outside garnish pad.
- HINT:
-
After removing the release paper, keep the exposed adhesive free from foreign matter.
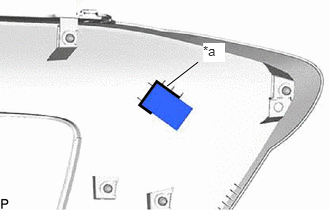
| *a | Line |
Install the back door outside garnish pad as shown in the illustration.
- HINT:
-
Install each back door outside garnish pad along the line on the back door outside garnish.
76825D
9.INSTALL NO. 1 BACK DOOR OUTSIDE GARNISH PROTECTOR
- HINT:
- ·
Using the same procedure, install every No. 1 back door outside garnish protector.
·When installing the No. 1 back door outside garnish protector, heat the back door outside garnish using a heat light.
- Heating Temperature:
Item Temperature Back Door Outside Garnish 20 to 30°C (68 to 86°F)
- CAUTION:
- ·
2.365,2 2.698,2 false 0.5,2.333 0.5,2.667 true 0.427,2.708 0.74,2.865 0.313,0.156 10 false *a 2.76,1.927 3.073,2.083 0.313,0.156 10 false *b
*a Heated Part *b Heat Light
Do not touch the heat light and heated parts, touching the heat light may result in burns.
·Touching heated parts for a long time may result in burns.
- NOTICE:
-
Do not heat the back door outside garnish excessively.
Clean the back door outside garnish surface.
Using a heat light, heat the back door outside garnish surface.
Remove the double-sided tape from the back door outside garnish.
Wipe off any tape adhesive residue with cleaner.
Using a heat light, heat the back door outside garnish.
Remove the release paper from a new No. 1 back door outside garnish protector.
- HINT:
-
After removing the release paper, keep the exposed adhesive free from foreign matter.
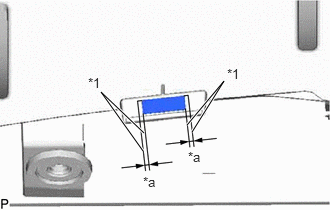
| *1 | Mark-off Line |
| *a | 1.5 mm (0.05905 in.) |
Install the No. 1 back door outside garnish protector as shown in the illustration.
- HINT:
-
Align the No. 1 back door outside garnish protector with the mark-off line of the back door outside garnish.
76824
10.INSTALL BACK DOOR GARNISH MOULDING PROTECTOR LH
- HINT:
-
When installing the back door garnish moulding protector LH, heat the back door outside garnish and No. 2 back door outside garnish using a heat light.
- Heating Temperature:
Item Temperature Back Door Outside Garnish and No. 2 Back Door Outside Garnish 20 to 30°C (68 to 86°F)
- CAUTION:
- ·
2.365,2 2.698,2 false 0.5,2.333 0.5,2.667 true 0.427,2.708 0.74,2.865 0.313,0.156 10 false *a 2.76,1.927 3.073,2.083 0.313,0.156 10 false *b
*a Heated Part *b Heat Light
Do not touch the heat light and heated parts, touching the heat light may result in burns.
·Touching heated parts for a long time may result in burns.
- NOTICE:
-
Do not heat the back door outside garnish and No. 2 back door outside garnish excessively.
for Back Door Outside Garnish Side:
Clean the back door outside garnish surface.
Using a heat light, heat the back door outside garnish surface.
Remove the double-sided tape from the back door outside garnish.
Wipe off any tape adhesive residue with cleaner.
Using a heat light, heat the back door outside garnish.
Remove the release paper from a new back door garnish moulding protector LH.
- HINT:
-
After removing the release paper, keep the exposed adhesive free from foreign matter.
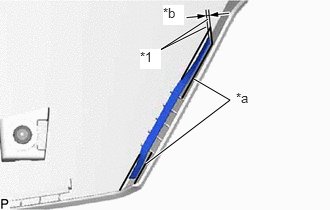
| *1 | Mark-off Line |
| *a | Line |
| *b | 1.0 mm (0.0393 in.) |
Install the back door garnish moulding protector LH as shown in the illustration.
- HINT:
-
Align the back door garnish moulding protector LH with the mark-off line of the back door outside garnish
for No. 2 Back Door Outside Garnish Side:
Clean the No. 2 back door outside garnish surface.
Using a heat light, heat the No. 2 back door outside garnish surface.
Remove the double-sided tape from the No. 2 back door outside garnish.
Wipe off any tape adhesive residue with cleaner.
Using a heat light, heat the No. 2 back door outside garnish.
Remove the release paper from a new back door garnish moulding protector LH.
- HINT:
-
After removing the release paper, keep the exposed adhesive free from foreign matter.
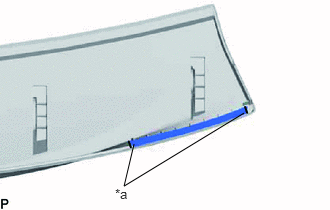
| *a | Line |
Install the back door garnish moulding protector LH as shown in the illustration.
- HINT:
-
Install each back door garnish moulding protector LH along the line on the No. 2 back door outside garnish.
76823
11.INSTALL BACK DOOR GARNISH MOULDING PROTECTOR RH
- HINT:
-
Use the same procedure as for the LH side.
76821
12.INSTALL BACK DOOR GARNISH MOULDING UPPER PROTECTOR
- HINT:
-
When installing the back door garnish moulding upper protector, heat the No. 2 back door outside garnish using a heat light.
- Heating Temperature:
Item Temperature No. 2 Back Door Outside Garnish 20 to 30°C (68 to 86°F)
- CAUTION:
- ·
2.365,2 2.698,2 false 0.5,2.333 0.5,2.667 true 0.427,2.708 0.74,2.865 0.313,0.156 10 false *a 2.76,1.927 3.073,2.083 0.313,0.156 10 false *b
*a Heated Part *b Heat Light
Do not touch the heat light and heated parts, touching the heat light may result in burns.
·Touching heated parts for a long time may result in burns.
- NOTICE:
-
Do not heat the No. 2 back door outside garnish excessively.
Clean the No. 2 back door outside garnish surface.
Using a heat light, heat the No. 2 back door outside garnish surface.
Remove the double-sided tape from the No. 2 back door outside garnish.
Wipe off any tape adhesive residue with cleaner.
Using a heat light, heat the No. 2 back door outside garnish.
Remove the release paper from a new back door garnish moulding upper protector.
- HINT:
-
After removing the release paper, keep the exposed adhesive free from foreign matter.
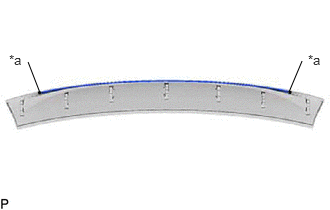
| *a | Line |
Install the back door garnish moulding upper protector as shown in the illustration.
- HINT:
-
Install each back door garnish moulding upper protector along the line on the No. 2 back door outside garnish.
76825
13.INSTALL BACK DOOR OUTSIDE GARNISH PROTECTOR
- HINT:
-
When installing the back door outside garnish protector, heat the No. 2 back door outside garnish using a heat light.
- Heating Temperature:
Item Temperature No. 2 Back Door Outside Garnish 20 to 30°C (68 to 86°F)
- CAUTION:
- ·
2.365,2 2.698,2 false 0.5,2.333 0.5,2.667 true 0.427,2.708 0.74,2.865 0.313,0.156 10 false *a 2.76,1.927 3.073,2.083 0.313,0.156 10 false *b
*a Heated Part *b Heat Light
Do not touch the heat light and heated parts, touching the heat light may result in burns.
·Touching heated parts for a long time may result in burns.
- NOTICE:
-
Do not heat the No. 2 back door outside garnish excessively.
Clean the No. 2 back door outside garnish surface.
Using a heat light, heat the No. 2 back door outside garnish surface.
Remove the double-sided tape from the No. 2 back door outside garnish.
Wipe off any tape adhesive residue with cleaner.
Using a heat light, heat the No. 2 back door outside garnish.
Remove the release paper from a new back door outside garnish protector.
- HINT:
-
After removing the release paper, keep the exposed adhesive free from foreign matter.
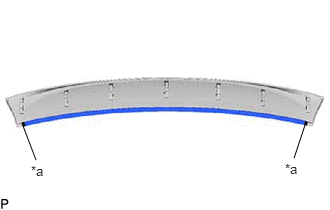
| *a | Line |
Install the back door outside garnish protector as shown in the illustration.
- HINT:
-
Install each back door outside garnish protector along the line on the No. 2 back door outside garnish.
76822B
14.INSTALL BACK DOOR GARNISH SIDE PROTECTOR LH
- HINT:
-
When installing the back door garnish side protector LH, heat the No. 2 back door outside garnish using a heat light.
- Heating Temperature:
Item Temperature Back Door Outside Garnish 20 to 30°C (68 to 86°F)
- CAUTION:
- ·
2.365,2 2.698,2 false 0.5,2.333 0.5,2.667 true 0.427,2.708 0.74,2.865 0.313,0.156 10 false *a 2.76,1.927 3.073,2.083 0.313,0.156 10 false *b
*a Heated Part *b Heat Light
Do not touch the heat light and heated parts, touching the heat light may result in burns.
·Touching heated parts for a long time may result in burns.
- NOTICE:
-
Do not heat the No. 2 back door outside garnish excessively.
Clean the No. 2 back door outside garnish surface.
Using a heat light, heat the No. 2 back door outside garnish surface.
Remove the double-sided tape from the No. 2 back door outside garnish.
Wipe off any tape adhesive residue with cleaner.
Using a heat light, heat the No. 2 back door outside garnish.
Remove the release paper from a new back door garnish side protector LH.
- HINT:
-
After removing the release paper, keep the exposed adhesive free from foreign matter.
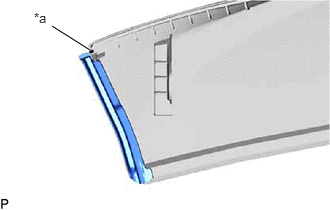
| *a | Line |
Install the back door garnish side protector LH as shown in the illustration.
- HINT:
-
Install each back door garnish side protector LH along the line on the No. 2 back door outside garnish.
76821B
15.INSTALL BACK DOOR GARNISH SIDE PROTECTOR RH
- HINT:
-
Use the same procedure as for the LH side.
76812A
16.INSTALL NO. 2 BACK DOOR OUTSIDE GARNISH
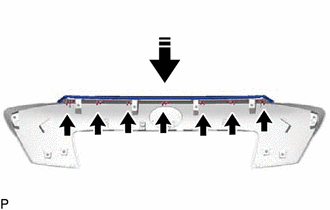

|
Install in this Direction |
Install the No. 2 back door outside garnish and 7 No. 1 outside moulding retainers as shown in the illustration.