PARKING BRAKE ELECTRIC PARKING BRAKE SYSTEM Electric Parking Brake System AUTO Function Circuit
DESCRIPTION
The parking brake ECU (brake actuator assembly) receives shift position information from the hybrid vehicle control ECU via CAN communication, and wheel speed signal and stop light switch signals from the skid control ECU assembly.
In addition, front seat inner belt information and driver seat door courtesy switch information is received from the main body ECU (multiplex network body ECU).
The electric parking brake system AUTO function (shift-linked function) automatically releases the parking brake when the following conditions are met: 1) Power switch is on (IG), 2) brake pedal is depressed, and 3) shift lever is moved out of P. When the shift lever is moved to P with these conditions met, the function automatically locks the parking brake.
The electric parking brake system AUTO (shift-linked function) automatically engages the parking brake when the shift lever is moved to P and disengages the parking brake when the shift lever is moved out of P when the power switch is on (IG) and the brake pedal is depressed.
WIRING DIAGRAM
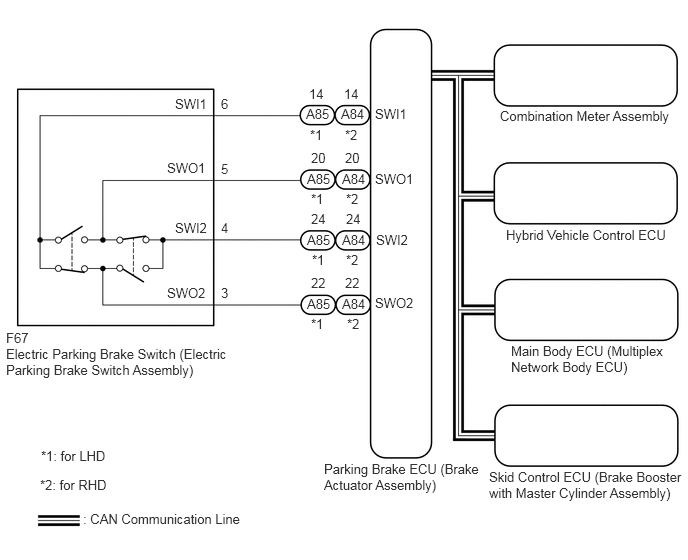
CAUTION / NOTICE / HINT
- NOTICE:
- ·
The electric parking brake may still operate up to 20 seconds after the power switch is turned off. Before disconnecting connectors or fuses, turn the power switch off and wait 20 seconds or more.
·When replacing the parking brake ECU (brake actuator assembly), operate the electric parking brake switch (electric parking brake switch assembly) as the parking brake indicator light blinks (red) when the power switch is first turned on (IG).
PROCEDURE
Check if CAN communication system DTCs are output.
Click herePower Source / Network>NETWORKING>CAN COMMUNICATION SYSTEM>DIAGNOSIS SYSTEM
- Result:
Result Proceed to DTCs are not output A DTCs are output B
A
B
Click herePower Source / Network>NETWORKING>CAN COMMUNICATION SYSTEM>HOW TO PROCEED WITH TROUBLESHOOTING
Turn the power switch off.
Connect the GTS to the DLC3.
Turn the power switch on (IG).
Turn the GTS on.
Enter the following menus: Chassis / Electric Parking Brake / Data List.
Read the Data List according to the display on the GTS.
- Chassis > Electric Parking Brake > Data List
-
Tester Display Measurement Item Range Normal Condition Diagnostic Note Auto Mode AUTO (shift-linked) mode permission status OFF or ON OFF: Manual mode
ON: AUTO (shift-linked) mode-
- Chassis > Electric Parking Brake > Data List
-
Tester Display Auto Mode - 50003 184 628
When switching the mode, check that the Data List display turns on and off.
- Result:
Result Proceed to The Data List display does not turn ON and OFF according to mode switching A The Data List display turns ON and OFF according to mode switching B
A
B
Inspect the electric parking brake switch (electric parking brake switch assembly).
Click hereBrake>PARKING BRAKE>ELECTRIC PARKING BRAKE SWITCH>INSPECTION
- Result:
Proceed to OK NG
OK
NG
Disconnect the F67 electric parking brake switch (electric parking brake switch assembly) connector.
Disconnect the A84*2 or A85*1 parking brake ECU (brake actuator assembly) connector.
*1: for LHD
*2: for RHD
Measure the resistance according to the value(s) in the table below.
- Standard Resistance:
for LHD Tester Connection Condition Specified Condition A85-14 (SWI1) - F67-6 (SWI1) Always Below 5 Ω A85-20 (SWO1) - F67-5 (SWO1) Always Below 5 Ω A85-14 (SWI1) or F67-6 (SWI1) - Body ground Always 10 kΩ or higher A85-20 (SWO1) or F67-5 (SWO1) - Body ground Always 10 kΩ or higher A85-24 (SWI2) - F67-4 (SWI2) Always Below 5 Ω A85-22 (SWO2) - F67-3 (SWO2) Always Below 5 Ω A85-24 (SWI2) or F67-4 (SWI2) - Body ground Always 10 kΩ or higher A85-22 (SWO2) or F67-3 (SWO2) - Body ground Always 10 kΩ or higher
for RHD Tester Connection Condition Specified Condition A84-14 (SWI1) - F67-6 (SWI1) Always Below 5 Ω A84-20 (SWO1) - F67-5 (SWO1) Always Below 5 Ω A84-14 (SWI1) or F67-6 (SWI1) - Body ground Always 10 kΩ or higher A84-20 (SWO1) or F67-5 (SWO1) - Body ground Always 10 kΩ or higher A84-24 (SWI2) - F67-4 (SWI2) Always Below 5 Ω A84-22 (SWO2) - F67-3 (SWO2) Always Below 5 Ω A84-24 (SWI2) or F67-4 (SWI2) - Body ground Always 10 kΩ or higher A84-22 (SWO2) or F67-3 (SWO2) - Body ground Always 10 kΩ or higher
- Result:
Proceed to OK NG
OK
NG
Turn the power switch off.
Connect the GTS to the DLC3.
Turn the power switch on (IG).
Turn the GTS on.
Enter the following menus: Chassis / Electric Parking Brake / Data List.
Read the Data List according to the display on the GTS.
- Chassis > Electric Parking Brake > Data List
-
Tester Display Measurement Item Range Normal Condition Diagnostic Note Shift Position Position of shift lever P, N, R, D or Unknown P: Shift lever in P
N: Shift lever in N
R: Shift lever in R
D: Shift lever in D or BWhen not normal, shift position signal system may be malfunctioning
- Chassis > Electric Parking Brake > Data List
-
Tester Display Shift Position - 50003 184 600
- OK:
On the GTS screen, P, N, R or D is displayed accordingly.
- Result:
Proceed to OK NG
OK
NG
Turn the power switch off.
Connect the GTS to the DLC3.
Turn the power switch on (IG).
Turn the GTS on.
Enter the following menus: Chassis / Electric Parking Brake / Data List.
Read the Data List according to the display on the GTS.
- Chassis > Electric Parking Brake > Data List
-
Tester Display Measurement Item Range Normal Condition Diagnostic Note Stop Light Switch Stop light switch assembly input signal OFF or ON OFF: Brake pedal released
ON: Brake pedal depressed-
- Chassis > Electric Parking Brake > Data List
-
Tester Display Stop Light Switch - 50003 184 597
- OK:
On the GTS screen, ON or OFF is displayed accordingly.
- Result:
Proceed to OK NG
OK
NG
Turn the power switch off.
Connect the GTS to the DLC3.
Turn the power switch on (IG).
Turn the GTS on.
Enter the following menus: Body Electrical > Main Body > Data List
Read the Data List according to the display on the GTS.
- Body Electrical > Main Body > Data List
-
Tester Display Measurement Item Range Normal Condition Diagnostic Note FR Door Courtesy SW Front door courtesy light switch assembly RH (for RHD) ON or OFF ON: Front door RH open
OFF: Front door RH closedIf this item does not change according to the actual state of the driver door, there is a malfunction in the door courtesy light switch or related part. FL Door Courtesy SW Front door courtesy light switch assembly LH (for LHD) ON or OFF ON: Front door LH open
OFF: Front door LH closedIf this item does not change according to the actual state of the driver door, there is a malfunction in the door courtesy light switch or related part.
- Body Electrical > Main Body > Data List
-
Tester Display FR Door Courtesy SW FL Door Courtesy SW - 50003 123 197,199
- OK:
The Data List item changes in accordance with the opening and closing of the driver door.
- Result:
Proceed to OK NG
OK
NG
Turn the power switch off.
Connect the GTS to the DLC3.
Turn the power switch on (IG).
Turn the GTS on.
Enter the following menus: Body Electrical > Main Body > Data List
Read the Data List according to the display on the GTS.
- Body Electrical > Main Body > Data List
-
Tester Display Measurement Item Range Normal Condition Diagnostic Note D Seat Buckle SW Driver seat belt buckle switch OFF or ON ON: Driver seat belt unfastened
OFF: Driver seat belt fastened-
- Body Electrical > Main Body > Data List
-
Tester Display D Seat Buckle SW - 50003 123 14
- OK:
ON or OFF is displayed on the GTS according to the driver seat belt condition.
- Result:
Result Proceed to OK (for LHD) A OK (for RHD) B NG C
A
B
C