M20A-FXS HYBRID / BATTERY CONTROL HYBRID CONTROL SYSTEM P314A31 Motor Electronics Coolant Pump "A" No Signal
DESCRIPTION
Refer to the description for DTC P0C7396.
Click hereEngine / Hybrid System>M20A-FXS (HYBRID / BATTERY CONTROL)>HYBRID CONTROL SYSTEM>P0C7396
The inverter water pump assembly sends the inverter water pump speed (measured value) signal to the hybrid vehicle control ECU.
| DTC No. | Detection Item | DTC Detection Condition | Trouble Area | MIL | Warning Indicate |
|---|---|---|---|---|---|
| P314A31 | Motor Electronics Coolant Pump "A" No Signal | The inverter water pump speed signal is not sent to the hybrid vehicle control ECU when the power switch is turned on (READY).*
(1 trip detection logic) |
·
Wire harness or connector ·
Hybrid vehicle control ECU ·
Inverter water pump assembly ·
INV W/PMP fuse ·
INV W/PMP NO.2 fuse ·
IGCT relay ·
INV W/PMP relay |
Comes on | Master Warning: Comes on |
A malfunction (open, short to +B or short to ground) in the speed signal line from the inverter water pump assembly to the hybrid vehicle control ECU is detected.
A malfunction in the inverter water pump assembly power source circuit is detected.
A malfunction in the +B line is detected.
A malfunction in hybrid vehicle control ECU power source circuit is detected.
| DTC No. | Data List |
|---|---|
| P314A31 | ·
Inverter Water Pump Revolution ·
Inverter Water Pump Duty Ratio ·
Ready Signal |
| DTC No. | Active Test |
|---|---|
| P314A31 | Activate the Inverter Water Pump |
CONFIRMATION DRIVING PATTERN
- HINT:
-
After repair has been completed, clear the DTC and then check that the vehicle has returned to normal by performing the following All Readiness check procedure.
-
Click hereEngine / Hybrid System>M20A-FXS (HYBRID / BATTERY CONTROL)>HYBRID CONTROL SYSTEM>UTILITY
Connect the GTS to the DLC3.
Turn the power switch on (IG) and turn the GTS on.
Clear the DTCs (even if no DTCs are stored, perform the clear DTC procedure).
Turn the power switch off and wait for 2 minutes or more.
Turn the power switch on (IG) and turn the GTS on.
Turn the power switch on (READY) and wait for 2 minutes or more.
Enter the following menus: Powertrain / Hybrid Control / Utility / All Readiness.
Check the DTC judgment result.
- HINT:
- ·
If the judgment result shows NORMAL, the system is normal.
·If the judgment result shows ABNORMAL, the system has a malfunction.
·If the judgment result shows INCOMPLETE or N/A, perform driving pattern again.
WIRING DIAGRAM
Refer to the wiring diagram for DTC P0C7396.
Click hereEngine / Hybrid System>M20A-FXS (HYBRID / BATTERY CONTROL)>HYBRID CONTROL SYSTEM>P0C7396
PROCEDURE
Click hereEngine / Hybrid System>M20A-FXS (HYBRID / BATTERY CONTROL)>HYBRID CONTROL SYSTEM>P06881F
- Result:
Proceed to NEXT
NEXT
- NOTICE:
- ·
Make sure that the HV coolant level is above the low line of the inverter reserve tank.
·Be sure to perform the inspection with the auxiliary battery voltage at 12 V or more.
·When the inverter water pump assembly signal line (SWP - IWP) is open or its connection is faulty, the inverter water pump assembly is operated forcibly.
- HINT:
-
When the auxiliary battery voltage is low, the inverter water pump assembly may not operate.
Connect the GTS to the DLC3.
Turn the power switch on (IG).
Enter the following menus: Powertrain / Hybrid Control / Active Test / Activate the Inverter Water Pump.
- Powertrain > Hybrid Control > Active Test
-
Tester Display Activate the Inverter Water Pump - 50004 397 1
Perform the "Activate the Inverter Water Pump" Active Test.
Touch the inverter water pump assembly and check that it is operating (vibrating).
- OK:
The inverter water pump is operating (vibrating).
- HINT:
-
Perform the Active Test with the inverter coolant temperature between -15 and 65°C (5 to 149°F).
Turn the power switch off.
- Result:
Proceed to OK NG
OK
NG
Click hereEngine / Hybrid System>M20A-FXS (HYBRID / BATTERY CONTROL)>HYBRID CONTROL SYSTEM>P056014
- Result:
Proceed to OK NG
OK
NG
Click hereEngine / Hybrid System>M20A-FXS (HYBRID / BATTERY CONTROL)>HYBRID CONTROL SYSTEM>Cooling System
- Result:
Proceed to OK NG
OK
NG
Disconnect the hybrid vehicle control ECU connector.
Disconnect the inverter water pump assembly connector.
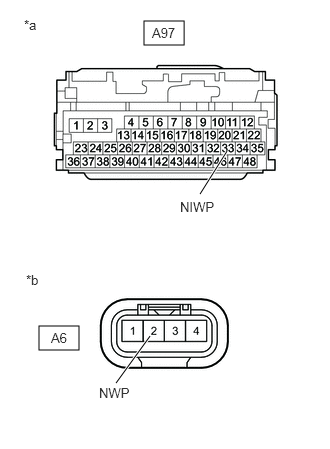
| *a | Front view of wire harness connector
(to Hybrid Vehicle Control ECU) |
| *b | Front view of wire harness connector
(to Inverter Water Pump Assembly) |
Measure the resistance according to the value(s) in the table below.
- Standard Resistance (Check for Open):
Tester Connection Condition Specified Condition A97-33 (NIWP) - A6-2 (NWP) Power switch off Below 1 Ω
- Standard Resistance (Check for Short):
Tester Connection Condition Specified Condition A97-33 (NIWP) or A6-2 (NWP) - Body ground and other terminals Power switch off 10 kΩ or higher
- HINT:
-
Check the condition (looseness, deterioration, etc.) of the wire to body ground for the inverter water pump assembly.
Reconnect the inverter water pump assembly connector.
Reconnect the hybrid vehicle control ECU connector.
- Result:
Proceed to OK NG
OK
NG
Disconnect the A6 inverter water pump assembly connector.
Turn the power switch on (IG).
Measure the voltage according to the value(s) in the table below.
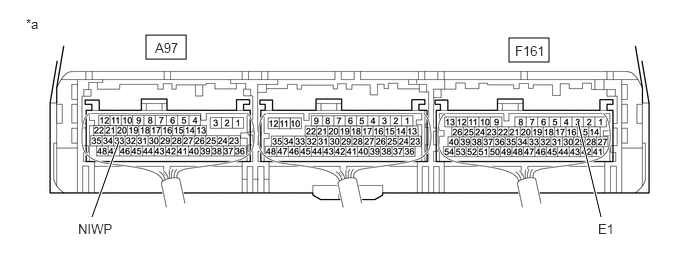
| *a | Component with harness connected
(Hybrid Vehicle Control ECU) |
- | - |
- Standard Voltage:
Tester Connection Condition Specified Condition A97-33 (NIWP) - F161-3 (E1) Power switch on (IG) 11 to 14 V
Turn the power switch off.
Reconnect the A6 inverter water pump assembly connector.
- Result:
Proceed to OK NG
OK
NG
Click hereEngine / Hybrid System>M20A-FXS (HYBRID / BATTERY CONTROL)>HYBRID VEHICLE CONTROL ECU>REMOVAL
Click hereEngine / Hybrid System>M20A-FXS (HYBRID / BATTERY CONTROL)>HYBRID CONTROL SYSTEM>P06881F
- Result:
Proceed to NEXT
NEXT
- NOTICE:
-
Be sure to perform the inspection with the auxiliary battery voltage at 12 V or more.
- HINT:
-
When the auxiliary battery voltage is low, the inverter water pump assembly may not operate.
Connect the GTS to the DLC3.
Turn the power switch on (IG).
Enter the following menus: Powertrain / Hybrid Control / Active Test / Activate the Inverter Water Pump.
- Powertrain > Hybrid Control > Active Test
-
Tester Display Activate the Inverter Water Pump - 50004 397 1
Perform the "Activate the Inverter Water Pump" Active Test.
Connect an oscilloscope between the hybrid vehicle control ECU terminals specified in the table below, and measure the waveform.
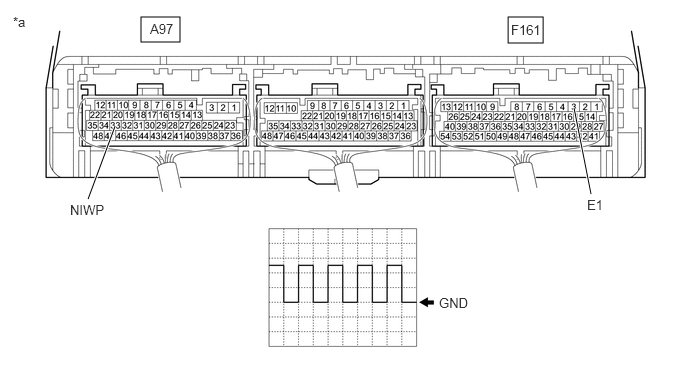
| *a | Component with harness connected
(Hybrid Vehicle Control ECU) |
- | - |
| Item | Content |
|---|---|
| Terminal | A97-33 (NIWP) - F161-3 (E1) |
| Equipment Setting | 5 V/DIV., 5 ms./DIV. |
| Condition | Power switch on (IG), during Active Test |
- OK:
The period of the wavelength is 13 msec or less.
Turn the power switch off.
- Result:
Proceed to OK NG
OK
Click hereEngine / Hybrid System>M20A-FXS (HYBRID / BATTERY CONTROL)>HYBRID VEHICLE CONTROL ECU>REMOVAL
NG
Click hereEngine / Hybrid System>M20A-FXS (HYBRID / BATTERY CONTROL)>HYBRID CONTROL SYSTEM>Cooling System
- Result:
Proceed to OK NG
OK
NG
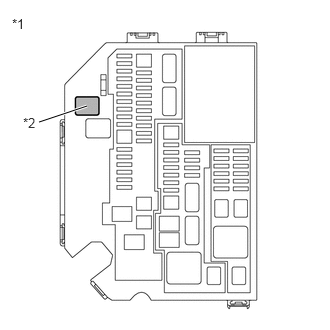
| *1 | No. 1 Engine Room Relay Block |
| *2 | INV W/PMP Relay |
Check installation condition of the INV W/P relay.
- OK:
INV W/PMP relay is installed correctly.
- Result:
Proceed to OK NG
OK
NG
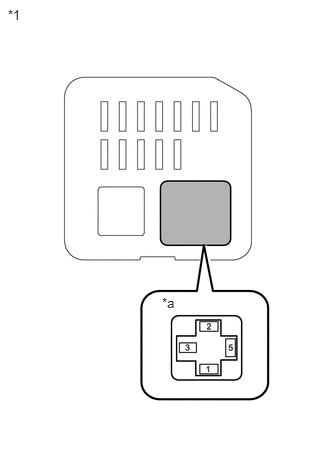
| *1 | No. 5 Relay Block Assembly |
| *a | IGCT Relay Holder |
Remove the IGCT relay from the No. 5 relay block assembly.
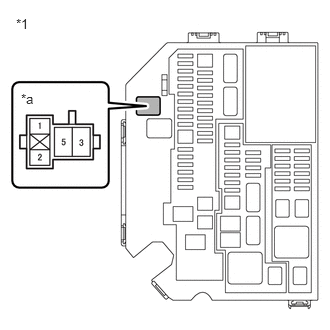
| *1 | No. 1 Engine Room Relay Block |
| *a | INV W/P Relay Holder |
Remove the INV W/PMP relay from the No. 1 engine room relay block.
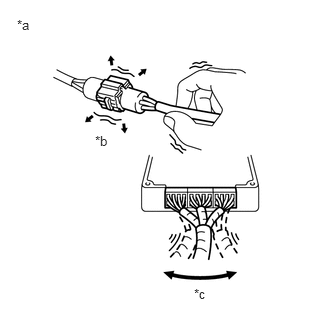
| *a | Example |
| *b | Shake Slightly |
| *c | Vibrate Slightly |
Measure the resistance according to the value(s) in the table below.
- Standard Resistance:
Tester Connection Switch Condition Specified Condition 5 (IGCT relay holder) - 1 (INV W/PMP relay holder) Power switch off Below 1 Ω
- NOTICE:
-
Do not apply excessive force when using the probes of the tester to perform the inspection. If excessive force is used, the terminals will be damaged.
- HINT:
- ·
Connectors
Slightly shake the connector vertically and horizontally.
·Wire Harness
Slightly shake the wire harness vertically and horizontally.
The connector joint and fulcrum of the vibration are the major areas that should be checked thoroughly.
·No. 5 Relay Block Assembly
Apply slight vibration with a finger to the No. 5 relay block assembly and check whether a malfunction occurs.
·No. 1 Engine Room Relay Block
Apply slight vibration with a finger to the No. 1 engine room relay block and check whether a malfunction occurs.
·INV W/PMP NO. 2 fuse
Apply slight vibration with a finger to the INV W/PMP NO. 2 fuse and check whether a malfunction occurs.
Install the IGCT relay and INV W/PMP relay.
- Result:
Proceed to OK NG
OK
NG
| *1 | No. 1 Engine Room Relay Block |
| *2 | INV W/PMP Relay |
Remove the INV W/PMP relay from the No. 1 engine room relay block.
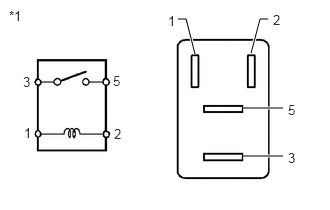
| *1 | INV W/PMP Relay |
Measure the resistance according to the value(s) in the table below.
- Standard Resistance:
Tester Connection Condition Specified Condition 3 - 5 Auxiliary battery voltage not applied between terminals 1 and 2 10 kΩ or higher Auxiliary battery voltage applied between terminals 1 and 2 Below 1 Ω
Install the INV W/PMP relay.
- Result:
Proceed to OK NG
OK
NG
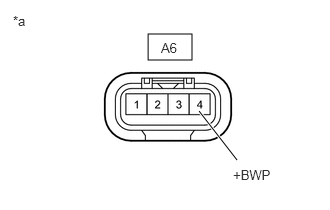
| *a | Front view of wire harness connector
(to Inverter Water Pump Assembly) |
| *a | Example |
| *b | Shake Slightly |
| *c | Vibrate Slightly |
Disconnect the inverter water pump assembly connector.
Measure the voltage according to the value(s) in the table below.
- Standard Voltage:
Tester Connection Switch Condition Specified Condition A6-4 (+BWP) - Body ground Power switch on (IG) 11 to 14 V
- NOTICE:
- ·
If the power switch is turned on (IG) with the connectors disconnected, other DTCs will be stored. Be sure to clear the DTCs after the inspection.
·Do not apply excessive force when using the probes of the tester to perform the inspection. If excessive force is used, the terminals will be damaged.
- HINT:
- ·
Connectors
Slightly shake the connector vertically and horizontally.
·Wire Harness
Slightly shake the wire harness vertically and horizontally.
The connector joint and fulcrum of the vibration are the major areas that should be checked thoroughly.
·No. 1 Engine Room Relay
Apply slight vibration with a finger to the No. 1 engine room relay block and check whether a malfunction occurs.
·INV W/PMP fuse
Apply slight vibration with a finger to the INV W/PMP fuse and check whether a malfunction occurs.
·INV W/PMP Relay
Apply slight vibration with a finger to the INV W/PMP relay and check whether a malfunction occurs.
Reconnect the inverter water pump assembly connector.
- Result:
Proceed to OK NG
OK
NG
Disconnect the inverter water pump assembly connector.
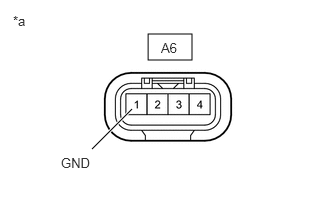
| *a | Front view of wire harness connector
(to Inverter Water Pump Assembly) |
Measure the resistance according to the value(s) in the table below.
- Standard Resistance:
Tester Connection Switch Condition Specified Condition A6-1 (GND) - Body ground Power switch off Below 1 Ω
Reconnect the inverter water pump assembly connector.
- Result:
Proceed to OK NG
OK
NG
Click hereEngine / Hybrid System>M20A-FXS (HYBRID / BATTERY CONTROL)>WATER PUMP WITH MOTOR>REMOVAL
- Result:
Proceed to NEXT
NEXT
After replacing the inverter water pump assembly, add HV coolant and perform air bleeding.
Click hereGeneral>MAINTENANCE>M20A-FXS COOLANT (for Inverter)>REPLACEMENT
- Result:
Proceed to NEXT
NEXT
| *1 | No. 1 Engine Room Relay Block |
| *2 | INV W/PMP Relay |
Remove the INV W/PMP relay from the No. 1 engine room relay block.
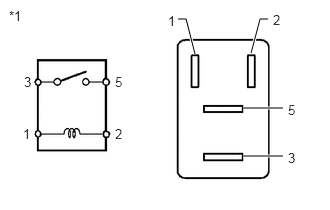
| *1 | INV W/PMP Relay |
Measure the resistance according to the value(s) in the table below.
- Standard Resistance:
Tester Connection Condition Specified Condition 3 - 5 Auxiliary battery voltage not applied between terminals 1 and 2 10 kΩ or higher Auxiliary battery voltage applied between terminals 1 and 2 Below 1 Ω
Install the INV W/PMP relay.
- Result:
Proceed to OK NG
OK
NG
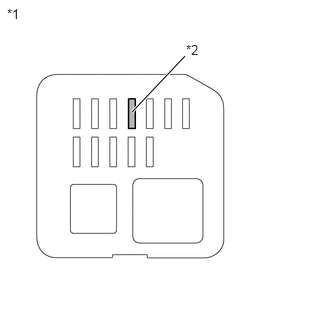
| *1 | No. 5 Relay Block Assembly |
| *2 | INV W/PMP NO. 2 Fuse |
Check installation condition of the INV W/PMP NO. 2 fuse.
- OK:
INV W/PMP NO. 2 fuse is installed correctly.
- Result:
Proceed to OK NG
OK
NG
| *1 | No. 5 Relay Block Assembly |
| *2 | INV W/PMP NO. 2 Fuse |
Remove the INV W/PMP NO. 2 fuse from the No. 5 relay block assembly.
Measure the resistance according to the value(s) in the table below.
- Standard Resistance:
Tester Connection Condition Specified Condition INV W/PMP NO. 2 fuse Always Below 1 Ω
Install the INV W/PMP NO. 2 fuse.
- Result:
Proceed to OK NG
OK
NG
Check the terminals of the INV W/PMP relay holder.
- OK:
The terminals of the INV W/PMP relay holder are not bent, loose or corroded.
- Result:
Proceed to OK NG
| *1 | No. 1 Engine Room Relay Block |
| *2 | INV W/PMP Relay |
OK
NG
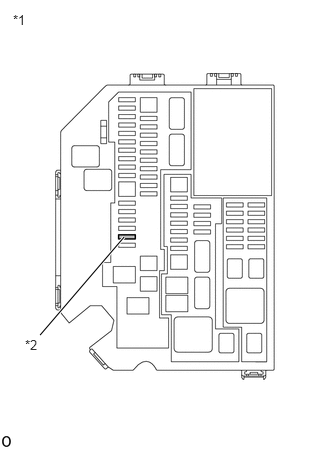
| *1 | No. 1 Engine Room Relay Block |
| *2 | INV W/PMP Fuse |
Check installation condition of the INV W/PMP fuse.
- OK:
INV W/PMP fuse is installed correctly.
- Result:
Proceed to OK NG
OK
NG
| *1 | No. 1 Engine Room Relay Block |
| *2 | INV W/PMP Relay |
Remove the INV W/PMP relay from the No. 1 engine room relay block.
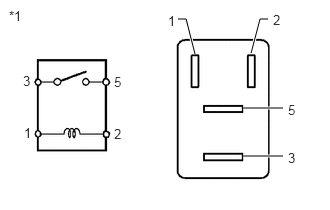
| *1 | INV W/PMP Relay |
Measure the resistance according to the value(s) in the table below.
- Standard Resistance:
Tester Connection Condition Specified Condition 3 - 5 Auxiliary battery voltage not applied between terminals 1 and 2 10 kΩ or higher Auxiliary battery voltage applied between terminals 1 and 2 Below 1 Ω
Install the INV W/PMP relay.
- Result:
Proceed to OK NG
OK
NG
Remove the INV W/PMP relay and INV W/PMP fuse from the No. 1 engine room relay block.
Disconnect the inverter water pump assembly connector.
Measure the resistance according to the value(s) in the table below.
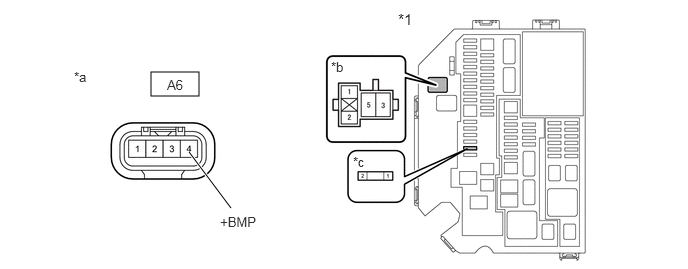
| *1 | No. 1 Engine Room Relay Block | - | - |
| *a | Front view of wire harness connector
(to Inverter Water Pump Assembly) |
*b | INV W/PMP Relay Holder |
| *c | INV W/PMP Fuse Holder | - | - |
- Standard Resistance:
Tester Connection Condition Specified Condition A6-4 (+BWP) - 3 (INV W/PMP relay holder) Power switch off Below 1 Ω 2 (INV W/PMP fuse holder) or A6-4 (+BWP) - Body ground and other terminals Power switch off 10 kΩ or higher
- NOTICE:
-
Do not apply excessive force when using the probes of the tester to perform the inspection. If excessive force is used, the terminals will be damaged.
Reconnect the inverter water pump assembly connector.
Install the INV W/PMP relay and INV W/PMP fuse.
- Result:
Proceed to OK NG
OK
NG
| *1 | No. 1 Engine Room Relay Block |
| *2 | INV W/PMP Fuse |
Remove the INV W/PMP fuse from the No. 1 engine room relay block.
Measure the resistance according to the value(s) in the table below.
- Standard Resistance:
Tester Connection Condition Specified Condition INV W/PMP fuse Always Below 1 Ω
Install the INV W/PMP fuse.
- Result:
Proceed to OK NG
OK
NG
| *1 | No. 1 Engine Room Relay Block |
| *2 | INV W/PMP Relay |
Remove the INV W/PMP relay from the No. 1 engine room relay block.
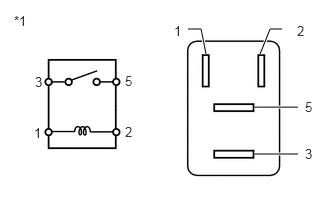
| *1 | INV W/PMP Relay |
Measure the resistance according to the value(s) in the table below.
- Standard Resistance:
Tester Connection Condition Specified Condition 3 - 5 Auxiliary battery voltage not applied between terminals 1 and 2 10 kΩ or higher Auxiliary battery voltage applied between terminals 1 and 2 Below 1 Ω
Install the INV W/PMP relay.
- Result:
Proceed to OK NG
OK
NG
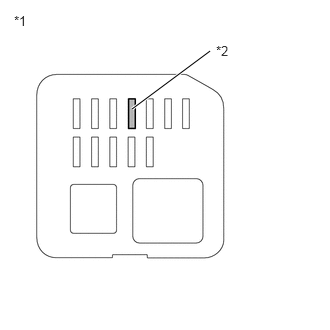
| *1 | No. 5 Relay Block Assembly |
| *2 | INV W/PMP NO. 2 Fuse |
Check the terminals of the INV W/PMP NO. 2 fuse holder.
- OK:
The terminals of the INV W/PMP NO. 2 fuse holder are not bent, loose or corroded.
- Result:
Proceed to OK NG
OK
NG
Repair or replace the terminals of the INV W/PMP relay holder.
- Result:
Proceed to NEXT
NEXT
Click hereEngine / Hybrid System>M20A-FXS (HYBRID / BATTERY CONTROL)>WATER PUMP WITH MOTOR>REMOVAL
- Result:
Proceed to NEXT
NEXT
After replacing the inverter water pump assembly, add HV coolant and perform air bleeding.
Click hereGeneral>MAINTENANCE>M20A-FXS COOLANT (for Inverter)>REPLACEMENT
- Result:
Proceed to NEXT
NEXT
Replace INV W/PMP relay.
- Result:
Proceed to NEXT
NEXT
Repair or replace harness or connector. (INV W/PMP NO. 2 fuse holder terminals)
- Result:
Proceed to NEXT
NEXT
| *1 | No. 1 Engine Room Relay Block |
| *2 | INV W/PMP Relay |
Check the terminals of the INV W/PMP relay holder.
- OK:
The terminals of the INV W/PMP relay holder are not bent, loose or corroded.
- Result:
Proceed to OK NG
OK
NG
| *1 | No. 5 Relay Block Assembly |
| *2 | INV W/PMP NO. 2 Fuse |
Remove the INV W/PMP NO. 2 fuse from the No. 5 relay block assembly.
Measure the resistance according to the value(s) in the table below.
- Standard Resistance:
Tester Connection Condition Specified Condition INV W/PMP NO. 2 fuse Always Below 1 Ω
Install the INV W/PMP NO. 2 fuse.
- Result:
Proceed to OK NG
OK
NG
| *1 | No. 5 Relay Block Assembly |
| *2 | INV W/PMP NO. 2 Fuse |
Remove the INV W/PMP NO. 2 fuse from the No. 5 relay block assembly.
Measure the resistance according to the value(s) in the table below.
- Standard Resistance:
Tester Connection Condition Specified Condition INV W/PMP NO. 2 fuse Always Below 1 Ω
Install the INV W/PMP NO. 2 fuse.
- Result:
Proceed to OK NG
OK
NG
Repair or replace the terminals of the INV W/PMP relay holder.
- Result:
Proceed to NEXT
NEXT
Replace INV W/PMP relay.
- Result:
Proceed to NEXT
NEXT
Repair or replace the terminals of the INV W/PMP relay holder.
- Result:
Proceed to NEXT
NEXT
Replace INV W/PMP relay.
- Result:
Proceed to NEXT
NEXT