NAVIGATION / MULTI INFO DISPLAY NAVIGATION ECU INSTALLATION
CAUTION / NOTICE / HINT
- HINT:
- ·
Use the same procedure for RHD and LHD vehicles.
·The procedure listed below is for LHD vehicles.
PROCEDURE

 86844A
1.INSTALL NO. 2 NAVIGATION ECU BRACKET (for TMMT Made)
Engage the guide to temporarily install the No. 2 navigation ECU bracket.
Install the No. 2 navigation ECU bracket with the 2 bolts to the navigation ECU.
86844A
2.INSTALL NO. 1 NAVIGATION ECU BRACKET (for TMMT Made)
Engage the guide to temporarily install the No. 1 navigation ECU bracket.
Install the No. 1 navigation ECU bracket with the 2 bolts to the navigation ECU.
86457A
3.INSTALL NO. 2 MULTI-MEDIA MODULE BRACKET (for TMC Made)
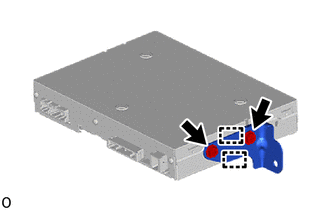
Engage the guides to temporarily install the No. 2 multi-media module bracket.
Install the No. 2 multi-media module bracket with the 2 bolts to the navigation ECU.
86457
4.INSTALL NO. 1 MULTI-MEDIA MODULE BRACKET (for TMC Made)
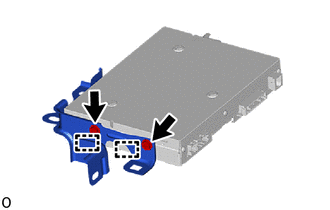
Engage the guides to temporarily install the No. 1 multi-media module bracket.
Install the No. 1 multi-media module bracket with the 2 bolts to the navigation ECU.
86101M
5.INSTALL ANTENNA CORD SUB-ASSEMBLY (for TMC Made)
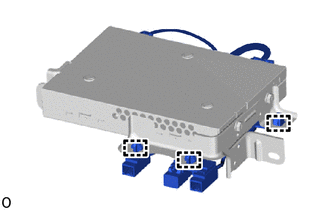
Engage the clamps to install the antenna cord sub-assembly.
Connect the 2 connectors.
86841
6.INSTALL NAVIGATION ECU WITH BRACKET (for TMMT Made)
Install the navigation ECU with bracket with the 2 nuts.
- Torque:
- 12 N*m (122 kgf*cm, 9 ft.*lbf)
Connect the 3 connectors.
86841
7.INSTALL NAVIGATION ECU WITH BRACKET (for TMC Made)
Connect the connector.
Install the navigation ECU with bracket with the 2 nuts.
- Torque:
- 12 N*m (122 kgf*cm, 9 ft.*lbf)
Connect the 3 connectors.
55406B
8.INSTALL INSTRUMENT CLUSTER FINISH LOWER CENTER PANEL SUB-ASSEMBLY
55440D
9.INSTALL INSTRUMENT PANEL BOX ASSEMBLY
55434B
10.INSTALL INSTRUMENT PANEL LOWER CENTER FINISH PANEL
55606
11.INSTALL NO. 1 INSTRUMENT PANEL UNDER COVER SUB-ASSEMBLY
62112
12.INSTALL COWL SIDE TRIM BOARD LH
67914
13.INSTALL FRONT DOOR SCUFF PLATE LH
55470
14.INSTALL INSTRUMENT CLUSTER FINISH PANEL GARNISH ASSEMBLY
15.CONNECT CABLE TO NEGATIVE AUXILIARY BATTERY TERMINAL
for M20A-FXS:
Click hereGeneral>MAINTENANCE>M20A-FXS AUXILIARY BATTERY>INSTALLATION
for 2ZR-FXE:
Click hereGeneral>MAINTENANCE>2ZR-FXE AUXILIARY BATTERY>INSTALLATION
- NOTICE:
-
When disconnecting the cable, some systems need to be initialized after the cable is reconnected.
-
Click hereGeneral>INTRODUCTION>REPAIR INSTRUCTION>INITIALIZATION