SUPPLEMENTAL RESTRAINT SYSTEMS AIRBAG SYSTEM SRS Warning Light Remains ON
DESCRIPTION
The SRS warning light is located in the combination meter assembly.
When the SRS is normal, the SRS warning light comes on for approximately 6 seconds after the power switch is turned from off to on (IG), and then goes off automatically.
If there is a malfunction in the SRS, the SRS warning light comes on to inform the driver of a problem.
If a malfunction occurs in the airbag sensor assembly, combination meter assembly or wire harness connected to the airbag sensor assembly or combination meter assembly, the SRS warning light comes on.
The SRS is equipped with a voltage-increase circuit (DC-DC converter) in the airbag sensor assembly in case the source voltage drops.
When the auxiliary battery voltage drops, the voltage-increase circuit (DC-DC converter) functions to increase the voltage of the SRS to normal voltage. In addition, when the voltage drops, the SRS warning light will illuminate.
A malfunction in this circuit is not stored in the airbag sensor assembly. The SRS warning light automatically goes off when the source voltage returns to normal.
The signal to illuminate the SRS warning light is transmitted from the airbag sensor assembly to the combination meter assembly via CAN communication.
WIRING DIAGRAM
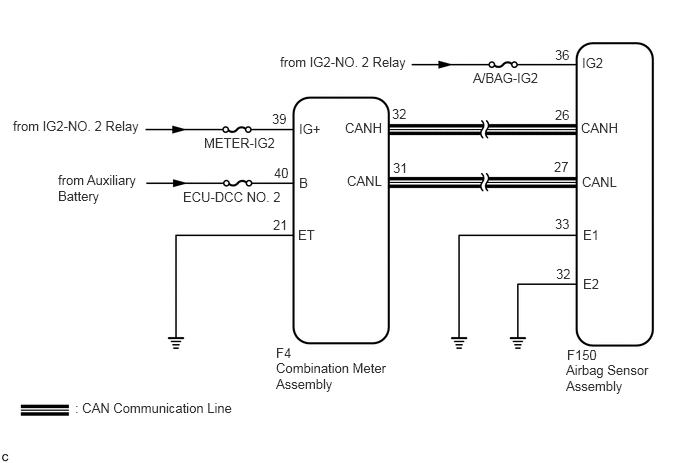
CAUTION / NOTICE / HINT
- NOTICE:
- ·
After turning the power switch off, waiting time may be required before disconnecting the cable from the negative (-) auxiliary battery terminal. Therefore, make sure to read the disconnecting the cable from the negative (-) auxiliary battery terminal notices before proceeding with work.
Click hereGeneral>INTRODUCTION>REPAIR INSTRUCTION>PRECAUTION
·Inspect the fuses for circuits related to this system before performing the following procedure.
·When replacing the combination meter assembly, always replace it with a new one. If a combination meter assembly which was installed to another vehicle is used, the information stored in it will not match the information from the vehicle and a DTC may be stored.
PROCEDURE
Turn the power switch on (IG) and check the SRS warning light condition.
- HINT:
-
The primary check is performed for approximately 6 seconds after the power switch is turned on (IG).
- Result:
Result Proceed to After the primary check period, the SRS warning light remains on. A After the primary check period, the SRS warning light goes off and comes on again. B
A
B
Measure the voltage of the auxiliary battery.
- Standard Voltage:
11 to 14 V
- Result:
Proceed to OK NG
OK
NG
Click herePower Source / Network>M20A-FXS (BATTERY / CHARGING)>CHARGING SYSTEM>ON-VEHICLE INSPECTION
Turn the power switch off.
Disconnect the cable from the negative (-) auxiliary battery terminal.
- CAUTION:
-
Wait at least 90 seconds after disconnecting the cable from the negative (-) auxiliary battery terminal to disable the SRS system.
Check that the connector is properly connected to the airbag sensor assembly.
- OK:
The connector is properly connected.
- HINT:
-
If the connector is not properly connected, reconnect the connector and proceed to the next inspection.
Disconnect the connector from the airbag sensor assembly.
Check that the terminals of the connector are not deformed or damaged.
- OK:
The terminals are not deformed or damaged.
- Result:
Proceed to OK NG
OK
NG
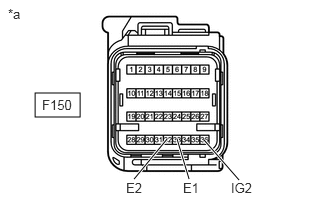
| *a | Front view of wire harness connector
(to Airbag Sensor Assembly) |
Connect the cable to the negative (-) auxiliary battery terminal.
Turn the power switch on (IG).
Operate all components of the electrical systems (defogger, wipers, headlights, heater blower, etc.).
Measure the voltage according to the value(s) in the table below.
- Standard Voltage:
Tester Connection Switch Condition Specified Condition F150-36 (IG2) - Body ground Power switch on (IG) 8 to 16 V
Turn the power switch off.
Measure the resistance according to the value(s) in the table below.
- Standard Resistance:
Tester Connection Condition Specified Condition F150-33 (E1) - Body ground Always Below 1 Ω F150-32 (E2) - Body ground Always Below 1 Ω
- Result:
Proceed to OK NG
OK
NG
Turn the power switch on (IG) and check the SRS warning light condition.
- OK:
After the primary check period, the SRS warning light turns off for approximately 10 seconds and then turns back on.
- HINT:
-
The primary check period is approximately 6 seconds after the power switch is turned on (IG).
- Result:
Proceed to OK NG
OK
NG
Using the GTS, check if the CAN communication system is functioning normally.
- OK:
CAN communication system is functioning normally.
- HINT:
-
Refer to CAN Bus Check in CAN Communication System.
-
Click herePower Source / Network>NETWORKING>CAN COMMUNICATION SYSTEM>DIAGNOSIS SYSTEM
- Result:
Proceed to OK NG
OK
NG
Click herePower Source / Network>NETWORKING>CAN COMMUNICATION SYSTEM>HOW TO PROCEED WITH TROUBLESHOOTING
Measure the voltage of the auxiliary battery.
- Standard Voltage:
11 to 14 V
- Result:
Proceed to OK NG
OK
NG
Click herePower Source / Network>M20A-FXS (BATTERY / CHARGING)>CHARGING SYSTEM>ON-VEHICLE INSPECTION
Turn the power switch off.
Disconnect the cable from the negative (-) auxiliary battery terminal.
- CAUTION:
-
Wait at least 90 seconds after disconnecting the cable from the negative (-) auxiliary battery terminal to disable the SRS system.
Check that the connector is properly connected to the airbag sensor assembly.
- OK:
The connector is properly connected.
- HINT:
-
If the connector is not properly connected, reconnect the connector and proceed to the next inspection.
Disconnect the connector from the airbag sensor assembly.
Check that the terminals of the connector are not deformed or damaged.
- OK:
The terminals are not deformed or damaged.
- Result:
Proceed to OK NG
OK
NG
| *a | Front view of wire harness connector
(to Airbag Sensor Assembly) |
Connect the cable to the negative (-) auxiliary battery terminal.
Turn the power switch on (IG).
Operate all components of the electrical systems (defogger, wipers, headlights, heater blower, etc.).
Measure the voltage according to the value(s) in the table below.
- Standard Voltage:
Tester Connection Switch Condition Specified Condition F150-36 (IG2) - Body ground Power switch on (IG) 8 to 16 V
Turn the power switch off.
Measure the resistance according to the value(s) in the table below.
- Standard Resistance:
Tester Connection Condition Specified Condition F150-33 (E1) - Body ground Always Below 1 Ω F150-32 (E2) - Body ground Always Below 1 Ω
- Result:
Proceed to OK NG
OK
NG
Disconnect the cable from the negative (-) auxiliary battery terminal.
- CAUTION:
-
Wait at least 90 seconds after disconnecting the cable from the negative (-) auxiliary battery terminal to disable the SRS system.
Check that the connector is properly connected to the combination meter assembly.
- OK:
The connector is properly connected.
- HINT:
-
If the connector is not properly connected, reconnect the connector and proceed to the next inspection.
Disconnect the connector from the combination meter assembly.
Check that the terminals of the connector are not deformed or damaged.
- OK:
The terminals are not deformed or damaged.
- Result:
Proceed to OK NG
OK
NG
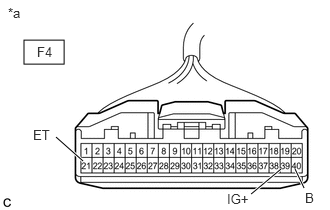
| *a | Front view of wire harness connector
(to Combination Meter Assembly) |
Connect the cable to the negative (-) auxiliary battery terminal.
Turn the power switch on (IG).
Measure the voltage according to the value(s) in the table below.
- Standard Voltage:
Tester Connection Switch Condition Specified Condition F4-39 (IG+) - Body ground Power switch on (IG) 11 to 14 V F4-40 (B) - Body ground Always 11 to 14 V
Turn the power switch off.
Measure the resistance according to the value(s) in the table below.
- Standard Resistance:
Tester Connection Condition Specified Condition F4-21 (ET) - Body ground Always Below 1 Ω
- Result:
Proceed to OK NG
OK
NG
Disconnect the cable from the negative (-) auxiliary battery terminal.
- CAUTION:
-
Wait at least 90 seconds after disconnecting the cable from the negative (-) auxiliary battery terminal to disable the SRS system.
Connect the connector to the combination meter assembly.
Connect the cable to the negative (-) auxiliary battery terminal.
Turn the power switch on (IG) and check the SRS warning light condition.
- OK:
After the primary check period, the SRS warning light turns off for approximately 10 seconds and then turns back on.
- HINT:
-
The primary check period is approximately 6 seconds after the power switch is turned on (IG).
- Result:
Proceed to OK NG
OK
NG