THEFT DETERRENT / KEYLESS ENTRY IMMOBILISER SYSTEM(w/ Entry and Start System) B278A Short to GND in Immobiliser System Power Source Circuit
DESCRIPTION
When there is a short to GND in the power supply for the transponder key amplifier of the engine switch, the certification ECU (smart key ECU assembly) stores this DTC.
| DTC No. | Detection Item | DTC Detection Condition | Trouble Area | Note |
|---|---|---|---|---|
| B278A | Short to GND in Immobiliser System Power Source Circuit | A short to GND in the power supply of the transponder key amplifier of the engine switch (VC5 - VC5) detected. (1 trip detection logic*1) | ·
Engine switch ·
Certification ECU (smart key ECU assembly) ·
Wire harness or connector |
DTC output confirmation operation:
With the shift lever in P*2 and the electrical key transmitter sub-assembly held near the engine switch, an engine start operation is performed by pressing and holding the engine switch when the transmitter battery is depleted. |
*1: Only output while a malfunction is present.
*2: for CVT
| Vehicle Condition when Malfunction Detected | Fail-safe Operation when Malfunction Detected |
|---|---|
| Engine cannot be started when transmitter battery is depleted by holding transmitter near engine switch and pressing and holding engine switch with shift lever in P*1 | - |
*1: for CVT
| DTC No. | Data List and Active Test |
|---|---|
| B278A | - |
WIRING DIAGRAM
Refer to B2784.
CAUTION / NOTICE / HINT
- NOTICE:
- ·
When using the GTS with the engine switch off, connect the GTS to the DLC3 and turn a courtesy light switch on and off at intervals of 1.5 seconds or less until communication between the GTS and the vehicle begins. Then select the vehicle type under manual mode and enter the following menus: Body Electrical / Entry&Start(CAN). While using the GTS, periodically turn a courtesy light switch on and off at intervals of 1.5 seconds or less to maintain communication between the GTS and the vehicle.
·Before replacing the certification ECU (smart key ECU assembly), refer to Service Bulletin.
·After performing repairs, confirm that no DTCs are output by performing "DTC Output Confirmation Operation".
PROCEDURE
Using an oscilloscope, check the waveform.
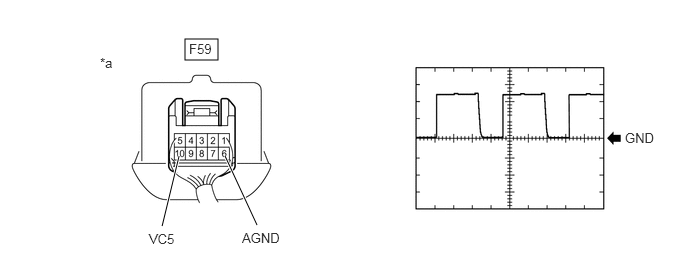
| *a | Component with harness connected
(Engine Switch) |
- | - |
- HINT:
-
Perform this inspection on the engine switch side.
- Measurement Condition:
Tester Connection Condition Tool Setting Specified Condition F59-10 (VC5) - F59-6 (AGND) Engine switch off, electrical key transmitter sub-assembly not in cabin, within 30 seconds of engine switch pressed 2 V/DIV., 200 ms./DIV. Pulse generation
- OK:
The waveform is similar to that shown in the illustration.
- Result:
Result Proceed to OK (for 8NR-FTS with LHD) A OK (for 8NR-FTS with RHD) B OK (for 3ZR-FAE) C NG D
A
B
C
D
Disconnect the F1 certification ECU (smart key ECU assembly) connector.
Disconnect the F59 engine switch connector.
Measure the resistance according to the value(s) in the table below.
- Standard Resistance:
Tester Connection Condition Specified Condition F1-7 (VC5) - F59-10 (VC5) Always Below 1 Ω F1-11 (AGND) - F59-6 (AGND) Always Below 1 Ω F1-7 (VC5) or F59-10 (VC5) - Body ground Always 10 kΩ or higher F1-11 (AGND) or F59-6 (AGND) - Body ground Always 10 kΩ or higher
- Result:
Proceed to OK NG
OK
NG
Reconnect the F1 certification ECU (smart key ECU assembly) connector.
Reconnect the F59 engine switch connector.
Measure the voltage according to the value(s) in the table below.
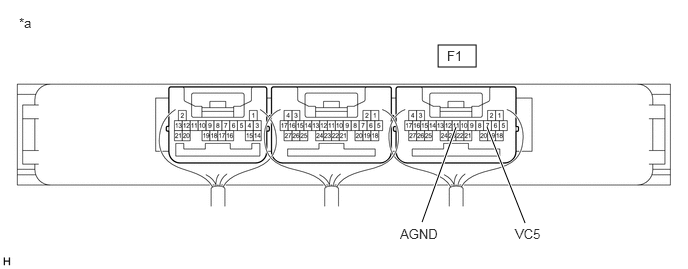
| *a | Component with harness connected
(Certification ECU (Smart Key ECU Assembly)) |
- | - |
- Standard Voltage:
Tester Connection Condition Specified Condition F1-7 (VC5) - F1-11 (AGND) Engine switch off, brake pedal*1 or clutch pedal*2 not depressed, 30 seconds or more after driver door opened and then closed Below 1 V
*1: for CVT
*2: for Manual Transaxle
- Result:
Result Proceed to OK (for 8NR-FTS with LHD) A OK (for 8NR-FTS with RHD) B OK (for 3ZR-FAE) C NG D
A
B
C
D