EC69 MANUAL TRANSMISSION / TRANSAXLE MANUAL TRANSAXLE ASSEMBLY(When Not Using the Engine Support Bridge) REMOVAL
CAUTION / NOTICE / HINT
The necessary procedures (adjustment, calibration, initialization, or registration) that must be performed after parts are removed, installed, or replaced during the manual transaxle assembly removal/installation are shown below.
| Replacement Part or Procedure | Necessary Procedure | Effect/Inoperative when not Performed | Link |
|---|---|---|---|
| Disconnect cable from negative battery terminal | Memorize steering angle neutral point | ·
Lane departure alert system (w/ Steering Control) ·
Simple intelligent parking assist system*1 ·
Toyota parking assist-sensor system (w/ Simple Intelligent Parking Assist System) ·
Pre-collision system |
( ) |
| Initialize back door lock | Power door lock control system | ()
|
|
| Drive the vehicle until stop and start control is permitted (approximately 5 to 60 minutes) | Stop and start system | ()
|
|
| Front wheel alignment adjustment | Perform the following procedures in the order shown:
1.
Clear zero point calibration data and store system information 2.
Perform yaw rate and acceleration sensor zero point calibration and store system information |
·
VSC disabled or malfunctions ·
DTCs are stored ·
Slip indicator light illuminates ·
ABS warning light illuminates |
()
|
*1: When performing learning using the GTS.
- CAUTION:
- ·
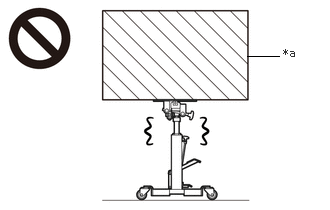 2.573,0.583 2.906,0.583 false 2.948,0.479 3.26,0.677 0.313,0.198 10 false *a
*a Heavy object exceeding the capacity of the transmission jack
Because the manual transaxle assembly is extremely heavy, make sure to follow the work procedures described in the repair manual.
·If work is not performed according to the procedures described in the repair manual, there is a danger that the transmission jack could drop and components could fall down.
- ·
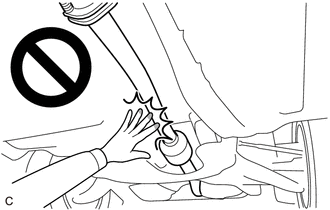
When the engine is hot, do not touch high-temperature areas such as the engine or exhaust pipe.
·Touching high-temperature areas such as the engine and exhaust pipe could result in burns.
- NOTICE:
-
When the manual transaxle assembly is removed, be sure to use a new clutch release cylinder with bearing assembly and new installation bolts. Removal of the manual transaxle assembly allows the compressed clutch release cylinder with bearing assembly to return to its original position. Dust from the moving section may damage the seal of the clutch release cylinder with bearing assembly, possibly causing clutch fluid leaks.
PROCEDURE

 1.REMOVE ENGINE ASSEMBLY WITH TRANSAXLE
2.INSTALL ENGINE HANGER
28100
3.REMOVE STARTER ASSEMBLY
11363A
4.REMOVE FLYWHEEL HOUSING SIDE COVER
5.DISCONNECT WIRE HARNESS
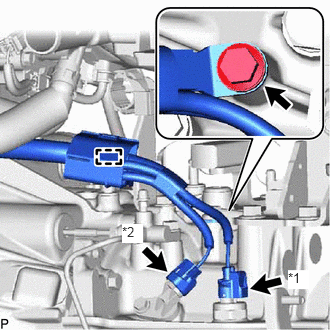
| *1 | Back-up Light Switch Assembly Connector |
| *2 | Transmission Revolution Sensor Connector |
Disconnect the back-up light switch assembly connector.
Disconnect the transmission revolution sensor connector.
Remove the bolt.
Disengage the clamp and separate the wire harness from the manual transaxle assembly.
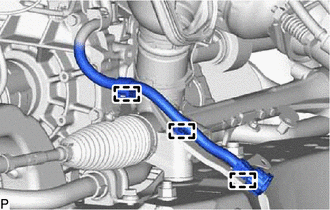
Disengage the 3 clamps and separate the heated oxygen sensor wire harness from the front suspension crossmember sub-assembly.
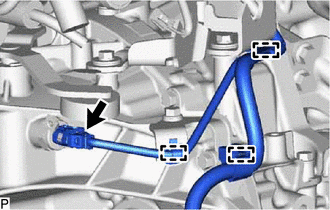
Disconnect the neutral position switch connector.
Disengage the 3 clamps and separate the wire harness from the manual transaxle assembly.
12321B
6.REMOVE DRIVE SHAFT HEAT INSULATOR SUB-ASSEMBLY
25591
7.REMOVE MANIFOLD SUPPORT BRACKET
8.REMOVE ENGINE ASSEMBLY
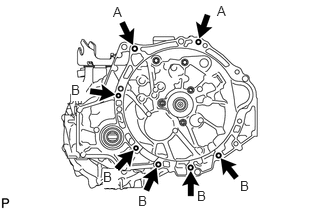
Remove the 7 bolts and engine assembly from the manual transaxle assembly.
- HINT:
- ·
Bolt (A): Remove from manual transaxle assembly side.
·Bolt (B): Remove from engine assembly side.
51201
9.REMOVE FRONT SUSPENSION CROSSMEMBER SUB-ASSEMBLY
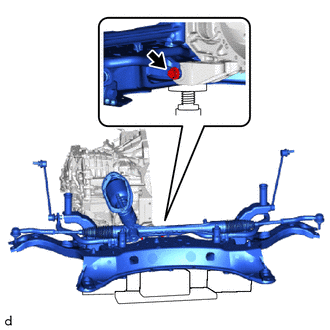
Remove the bolt and front suspension crossmember sub-assembly from the No. 2 engine moving control rod.
12364B
10.REMOVE NO. 2 ENGINE MOVING CONTROL ROD
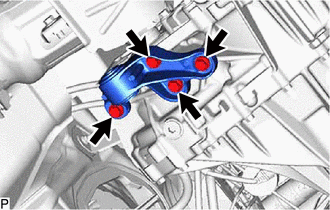
Remove the 4 bolts and No. 2 engine moving control rod from from the manual transmission case.
12325A
11.REMOVE ENGINE MOUNTING BRACKET LH
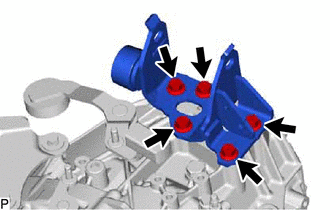
Remove the 5 bolts and engine mounting bracket LH from the manual transmission case.
31483E
12.REMOVE BLEEDER CLUTCH RELEASE TUBE
31484
13.REMOVE CLUTCH FLEXIBLE HOSE BRACKET
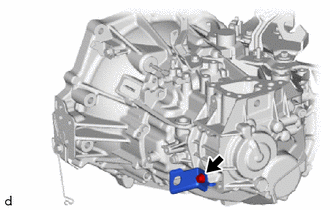
Remove the bolt and clutch flexible hose bracket from the manual transmission case.
31407B
14.REMOVE CLUTCH RELEASE BLEEDER SUB-ASSEMBLY
31400
15.REMOVE CLUTCH RELEASE CYLINDER WITH BEARING ASSEMBLY
31483
16.REMOVE CLUTCH RELEASE CYLINDER TO FLEXIBLE HOSE TUBE
87101A
17.REMOVE NO. 1 HEATER BRACKET SUB-ASSEMBLY
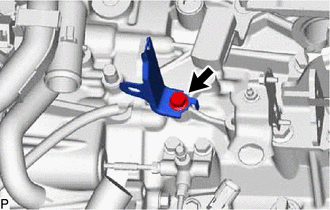
Remove the bolt and No. 1 heater bracket sub-assembly from the manual transmission case.
18.REMOVE WIRE HARNESS CLAMP BRACKET
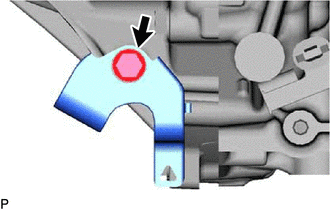
Remove the bolt and wire harness clamp bracket from the manual transmission case.
335A0
19.REMOVE CONTROL CABLE BRACKET ASSEMBLY
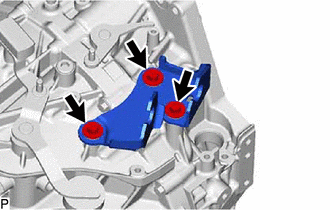
Remove the 3 bolts and control cable bracket assembly from the manual transmission case.
20.REMOVE SPEEDOMETER DRIVEN HOLE COVER SUB-ASSEMBLY
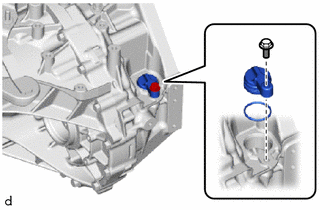
Remove the bolt and speedometer driven hole cover sub-assembly from the front transaxle case.
Remove the O-ring from the speedometer driven hole cover sub-assembly.