FRONT SUSPENSION FRONT SHOCK ABSORBER INSTALLATION
CAUTION / NOTICE / HINT
- HINT:
- ·
Use the same procedure for the RH side and LH side.
·The following procedure is for the LH side.
PROCEDURE

 1.INSTALL SST
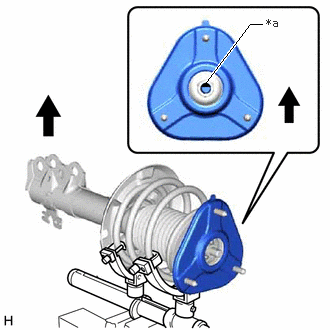
| *a | Cutout |

|
Outside of the Vehicle |
Align the cutout on end of the shock rod of the front shock absorber assembly with the installation position.
- NOTICE:
-
Be sure to install the part so that the cutout on the front suspension support sub-assembly and the cutout on the shock rod end are aligned.
Install SST (09727-58100) and SST (09727-58130/09727-58140) to the front shock absorber assembly.
- SST
- 09727-58010 (09727-58030)
09727-58100
09727-58130
09727-58140
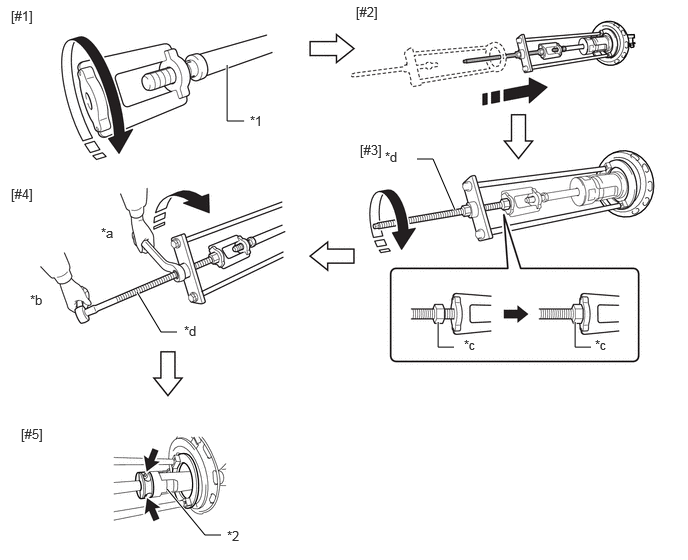
| *1 | Front Shock Absorber Assembly | *2 | Shock Absorber Outer Shell |
| *a | Turn | *b | Hold |
| *c | Fixing Nut | *d | Bolt |
- NOTICE:
-
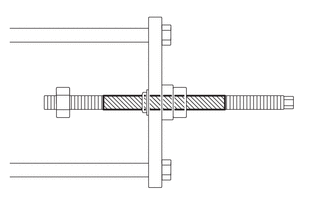 0,0 0,0 false

Application Area
-
Apply molybdenum grease to the bolt (area with diagonal lines) of SST (09727-58010).
Install SST (09727-58030) to the end of the shock rod of the front shock absorber assembly.[#1]
Install SST (09727-58010) to the front shock absorber assembly.[#2]
- NOTICE:
-
Take due care when installing SST (09727-58010) to ensure the shock rod is not damaged.
Secure the SST (09727-58010) bolt and SST (09727-58030) with the fixing nut.[#3]
After securing the SST (09727-58010) bolt, rotate the nut clockwise.[#4]
- HINT:
-
Extend the shock rod to its maximum length to install SST (09727-58100) and SST (09727-58130/09727-58140).
Using a piece of cloth, etc., clean the shock rod and remove any foreign matter and oil.
- NOTICE:
-
Thoroughly clean the shock rod to prevent damage to the shock rod due to contact of foreign matter.
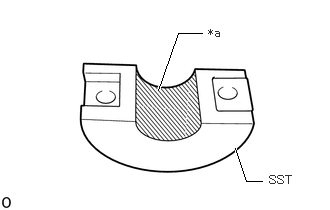
| *a | Installation Surface |
Clean the surface of SST (09727-58130/09727-58140) to which the front shock absorber assembly is installed and remove any foreign matter and oil.
- NOTICE:
-
Thoroughly clean the installation surface to prevent damage to the shock rod due to contact of foreign matter.
Using a long ball hexagon 5, install SST (09727-58100) and SST (09727-58130/09727-58140) to the shock rod.[#5]
- NOTICE:
-
Before installing, check the position of the cutout on end of the shock rod.
- HINT:
-
Install SST (09727-58100) and SST (09727-58130/09727-58140) to the base of the shock rod and check that SST (09727-58100) and SST (09727-58130/09727-58140) are securing the shock rod.
After securing the SST (09727-58010) bolt, rotate the nut counterclockwise.
Check that the shock rod and SST (09727-58030) have become free before releasing the fixing nut and removing SST (09727-58010) from the shock rod.
- NOTICE:
-
Take due care when removing SST (09727-58010) to ensure the shock rod is not damaged.
Remove SST (09727-58030) from the end of the shock rod.
Using a piece of cloth, etc., clean the end of the shock rod threads and remove any foreign matter and oil.
48158C
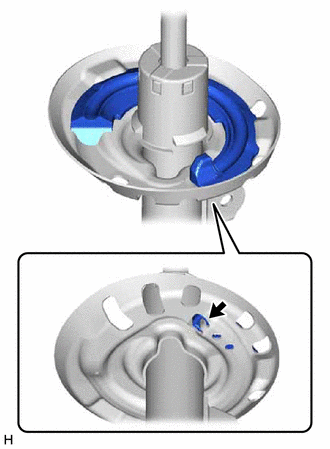
2.INSTALL FRONT LOWER COIL SPRING INSULATOR
|
|
Positioning Pin |
Install the front lower coil spring insulator to the front shock absorber assembly.
- NOTICE:
-
When installing the front lower coil spring insulator, insert the positioning pin of the spring seat into the hole of the front lower coil spring insulator.
48331C
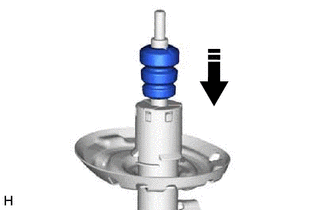
3.INSTALL FRONT SPRING BUMPER

|
Install in this direction |
Install the front spring bumper to the front shock absorber assembly as shown in the illustration.
- NOTICE:
- ·
Face the smaller diameter end of the front spring bumper downward.
·Do not apply lubricants to the front spring bumper.
·Do not apply lubricants to the front shock absorber assembly cap or rod.
·Do not clean the front spring bumper with water or solvent.
48132
4.INSTALL FRONT COIL SPRING
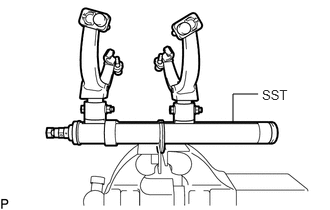
Secure SST in a vise.
- SST
- 09727-00051
09727-30022 (09727-00010, 09727-00031)
Attach the hooks of each SST arm across the diameter of the coil spring.
- CAUTION:
- ·
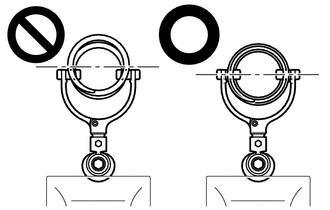
Make sure that the hooks are securely attached to the coil spring.
·If a hook disengages from the coil spring, the coil spring may fly out, resulting in injury.
·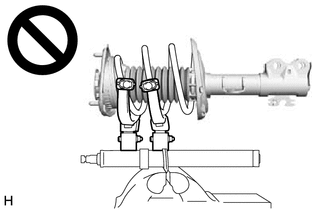
Make sure that the hooks of the upper and lower SST arms are attached to the coil spring so that the distance between the hooks is as large as possible.
·If a hook disengages from the coil spring, the coil spring may fly out, resulting in injury.
·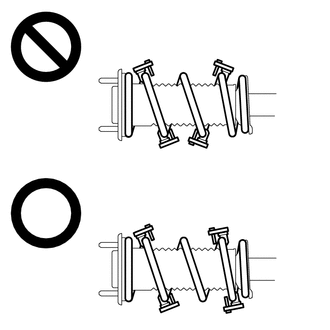
Make sure that the arms of SST are parallel and the number of coils between the arms is the same on each side.
·If a hook disengages from the coil spring, the coil spring may fly out, resulting in injury.
Install the stopper pins to the hooks of SST.
- CAUTION:
-
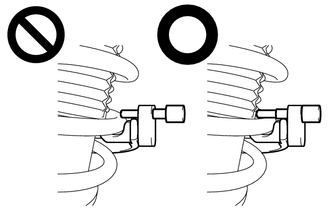
- ·
Make sure that the stopper pins are installed securely.
·If a hook disengages from the coil spring, the coil spring may fly out, resulting in injury.
Using SST, compress the coil spring.
- CAUTION:
- ·
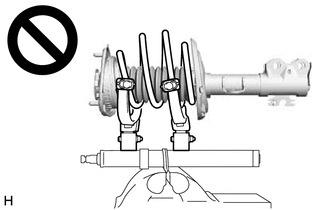
If the coil spring starts to bow out while using SST, stop immediately and reattach SST correctly.
·If a hook disengages from the coil spring, the coil spring may fly out, resulting in injury.
·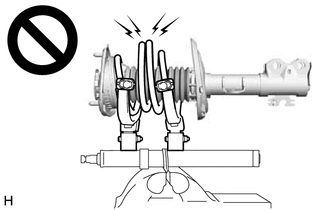
Do not compress the coil spring to the point where the coils touch each other.
·If a hook disengages from the coil spring, the coil spring may fly out, resulting in injury.
·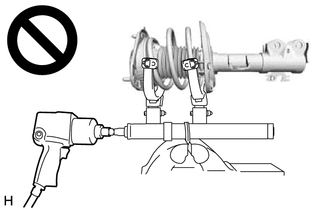
Do not use an impact wrench.
·If an impact wrench is used, the threads of SST may be damaged, or sudden compression of the coil spring may cause a hook to disengage and the coil spring to fly out, resulting in injury.
·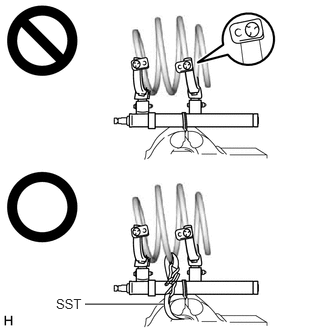 0.885,3.167 1.708,3.167 true 0.583,3.083 0.896,3.24 0.313,0.156 10 false SST
If a stopper pin touches the coil spring while using SST, remove the stopper pin and continue with the procedure.
·If a stopper pin is removed, install a coil spring stopper belt as shown in the illustration.
·If a hook disengages from the coil spring, the coil spring may fly out, resulting in injury.
- SST
- 09727-00110
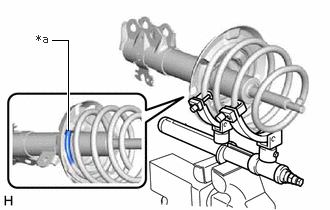
| *a | Depression |
Align the end of the front coil spring with the flange of the front lower coil spring insulator and install the front coil spring.
- NOTICE:
-
Make sure to fit the end of the front coil spring that has the larger diameter into the depression of the front lower coil spring insulator.
48045A
5.INSTALL FRONT SPRING SEAT SUB-ASSEMBLY WITH INSULATOR
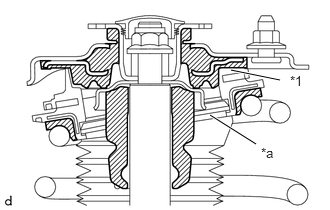
| *1 | Strut Mounting Bearing |
| *a | Top End of the Insulator (Shock Absorber Dust Cover) |
Install the front spring seat sub-assembly with insulator to the front shock absorber assembly.
- NOTICE:
-
Make sure that the top end of the insulator (shock absorber dust cover) and the strut mounting bearing are securely attached.
48609
6.INSTALL FRONT SUSPENSION SUPPORT SUB-ASSEMBLY
| *a | Cutout |
|
|
Outside of the Vehicle |
Install the front suspension support sub-assembly as shown in the illustration.
- NOTICE:
-
Be sure to install the part so that the cutout on the front suspension support sub-assembly and the cutout on the shock rod end are aligned.
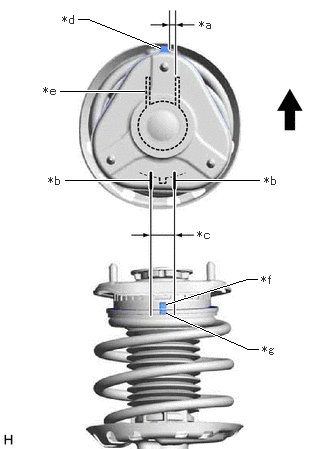
| *a | 0°+/- 5° |
| *b | Guide Line of Front Suspension Support Sub-assembly |
| *c | Area in Which Protrusions Must Be Aligned |
| *d | Protrusion of Front Suspension Support Sub-assembly |
| *e | Front Shock Absorber Lower Bracket |
| *f | Protrusion of Upper Case |
| *g | Protrusion of Lower Case |
|
|
Outside of the Vehicle |
Align the protrusion of the front suspension support sub-assembly with the front shock absorber lower bracket as shown in the illustration.
- NOTICE:
-
Make sure to install the front suspension support sub-assembly so that the protrusion of the front suspension support sub-assembly is aligned within +/- 5° of the center of the front shock absorber lower bracket.
Align the protrusions of the upper case and lower case of the strut mounting bearing as shown in the illustration.
- NOTICE:
-
Make sure to install the front spring seat sub-assembly with insulator so that the protrusion of the upper case of the strut mounting bearing overlaps with the protrusion of the lower case within the guide lines of the front suspension support sub-assembly.
7.INSTALL COLLAR
Install the collar to the front shock absorber assembly.
48609E
8.TEMPORARILY TIGHTEN FRONT SUPPORT TO FRONT SHOCK ABSORBER NUT
Temporarily tighten a new front support to front shock absorber nut.
Remove SST from the front coil spring.
- NOTICE:
-
Do not use an impact wrench. It will damage SST.
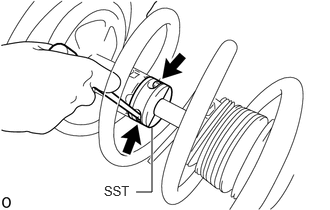
Fold back the front spring seat sub-assembly with insulator and then use a long ball hexagon 5 to remove SST (09727-58100) and SST (09727-58130/09727-58140) from the front shock absorber assembly.
- NOTICE:
- ·
Thoroughly remove SST (09727-58100) and SST (09727-58130/09727-58140).
·Check that the front spring seat sub-assembly with insulator is not excessively deformed or crushed.
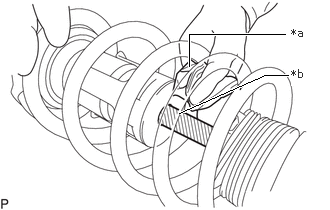
| *a | Cloth, etc. |
| *b | Shock Rod |
Using a piece of cloth, etc., clean the shock rod of the front shock absorber assembly and remove any foreign matter and oil.
- NOTICE:
-
Thoroughly clean the shock rod to prevent damage to the front shock absorber assembly due to contact of foreign matter.
48045A
9.CONNECT FRONT SPRING SEAT SUB-ASSEMBLY WITH INSULATOR
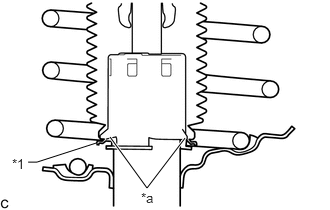
| *1 | Front Spring Seat Sub-assembly with Insulator |
| *a | Claw |
Connect the end of the insulator of the front spring seat sub-assembly with insulator with the claws of the front shock absorber assembly.
- NOTICE:
- ·
Make sure that the end of the insulator is securely attached to the claws of the front shock absorber assembly.
·Make sure there is no excessive damage to the bellows of the insulator.
·Do not allow oil, grease, etc., to contact the insulator.
·If oil or grease has adhered, wipe clean with a cloth. Do not use an alcohol based cleaner.
10.INSTALL FRONT SHOCK ABSORBER WITH COIL SPRING
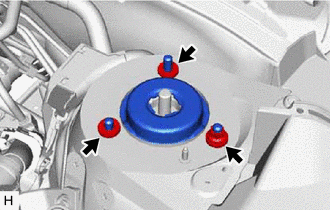
Install the front shock absorber with coil spring (upper side) with the nut and 2 spacers.
- Torque:
- 50 N*m (510 kgf*cm, 37 ft.*lbf)
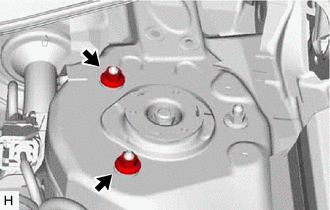
Temporarily install the 2 nuts to the front shock absorber assembly.
Install the front shock absorber with coil spring (lower side) to the steering knuckle with the 2 bolts and 2 nuts.
- Torque:
- 270 N*m (2753 kgf*cm, 199 ft.*lbf)
- NOTICE:
- ·
When installing the nuts, keep the bolts from rotating.
·Do not apply lubricants to the steering knuckle and shock absorber contact surfaces.
- HINT:
-
The bolts can be installed in either direction, however, make sure that they are both installed in the same direction.
89543
11.INSTALL FRONT SPEED SENSOR
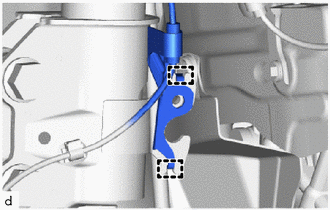
Engage the 2 hooks of front speed sensor to the front shock absorber assembly.
- NOTICE:
-
Do not twist the front speed sensor when installing it.
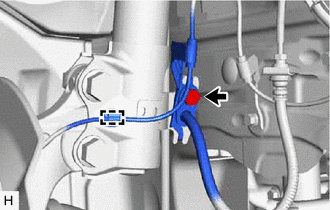
Install the front speed sensor and front flexible hose to the front shock absorber assembly with the bolt.
- Torque:
- 29 N*m (296 kgf*cm, 21 ft.*lbf)
Engage the clamp.
48810
12.INSTALL FRONT STABILIZER LINK ASSEMBLY
Install the front stabilizer link assembly to the front shock absorber assembly with the nut.
- Torque:
- 74 N*m (755 kgf*cm, 55 ft.*lbf)
- HINT:
-
If the ball joint turns together with the nut, use a 6 mm hexagon socket wrench to hold the stud bolt.
Install the cap.
48609E
13.FULLY TIGHTEN FRONT SUPPORT TO FRONT SHOCK ABSORBER NUT
Fully tighten the front support to front shock absorber nut.
- Torque:
- 47 N*m (479 kgf*cm, 35 ft.*lbf)
- NOTICE:
-
Perform this step only when the front shock absorber with coil spring has been disassembled.
Remove the 2 nuts from the front shock absorber assembly.
48684B
14.INSTALL FRONT SUSPENSION SUPPORT DUST COVER
Install the front suspension support dust cover.
55701J
15.INSTALL OUTER COWL TOP PANEL SUB-ASSEMBLY (for LHD)
Install the outer cowl top panel sub-assembly with the 8 bolts and 4 nuts.
- Torque:
- Bolt : 12 N*m (122 kgf*cm, 9 ft.*lbf)
- Nut : 50 N*m (510 kgf*cm, 37 ft.*lbf)
Engage the 2 clamps to install the wire harness to the outer cowl top panel sub-assembly.
w/ Windshield Deicer:
Engage the 2 clamps to install the wire harness to the outer cowl top panel sub-assembly.
Connect the connector.
55701J
16.INSTALL OUTER COWL TOP PANEL SUB-ASSEMBLY (for RHD)
Install the outer cowl top panel sub-assembly with the 8 bolts and 4 nuts.
- Torque:
- Bolt : 12 N*m (122 kgf*cm, 9 ft.*lbf)
- Nut : 50 N*m (510 kgf*cm, 37 ft.*lbf)
Engage the 2 clamps to install the wire harness to the outer cowl top panel sub-assembly.
w/ Windshield Deicer:
Engage the 2 clamps to install the wire harness to the outer cowl top panel sub-assembly.
Connect the connector.
55735C
17.INSTALL COWL BODY MOUNTING REINFORCEMENT RH
for LHD:
Install the cowl body mounting reinforcement RH to the vehicle body with the 2 bolts.
- Torque:
- 12 N*m (122 kgf*cm, 9 ft.*lbf)
for RHD:
Install the cowl body mounting reinforcement RH to the vehicle body with the 2 bolts.
- Torque:
- 12 N*m (122 kgf*cm, 9 ft.*lbf)
55736D
18.INSTALL COWL BODY MOUNTING REINFORCEMENT LH
for LHD:
Install the cowl body mounting reinforcement LH to the vehicle body with the bolt.
- Torque:
- 12 N*m (122 kgf*cm, 9 ft.*lbf)
for RHD:
Install the cowl body mounting reinforcement LH to the vehicle body with the bolt.
- Torque:
- 12 N*m (122 kgf*cm, 9 ft.*lbf)
55735A
19.INSTALL WATER GUARD PLATE LH (for TMC Made RHD)
Engage the claw to install the water guard plate LH to the outer cowl top panel sub-assembly.
55737B
20.INSTALL NO. 1 HEATER AIR DUCT SPLASH SHIELD SEAL
for LHD:
Engage the claw to install the No. 1 heater air duct splash shield seal to the outer cowl top panel sub-assembly.
for RHD:
Engage the claw to install the No. 1 heater air duct splash shield seal to the outer cowl top panel sub-assembly.
21.INSTALL WINDSHIELD WIPER MOTOR AND LINK ASSEMBLY
22.INSTALL FRONT WHEEL
23.STABILIZE SUSPENSION
Lower the vehicle.
Bounce the vehicle up and down several times to stabilize the suspension.
24.INSPECT AND ADJUST FRONT WHEEL ALIGNMENT
25.INITIALIZATION HEADLIGHT ECU SUB-ASSEMBLY
26.PERFORM CALIBRATION
·
Parking support brake system ·
Simple intelligent parking assist system |
( ) |
| Panoramic view monitor system | ()
|