SUPPLEMENTAL RESTRAINT SYSTEMS AIRBAG SYSTEM B1825 Short in Side Squib LH Circuit B1826 Open in Side Squib LH Circuit B1827 Short in Side Squib LH Circuit (To Ground) B1828 Short in Side Squib LH Circuit (To B+)
DESCRIPTION
The side squib LH circuit consists of the airbag sensor assembly and front seat airbag assembly LH.
The airbag sensor assembly uses this circuit to deploy the airbag when deployment conditions are met.
These DTCs are stored when a malfunction is detected in the side squib LH circuit.
| DTC No. | Detection Item | DTC Detection Condition | Trouble Area | Test Mode / Check Mode |
|---|---|---|---|---|
| B1825 | Short in Side Squib LH Circuit | Any of the following conditions is met:
·
The airbag sensor assembly detects a line short in the side squib LH circuit during the primary check. ·
Side squib LH malfunction ·
Airbag sensor assembly malfunction |
·
Floor wire ·
Side squib LH (Front seat airbag assembly LH) ·
Airbag sensor assembly |
Applies to check mode |
| B1826 | Open in Side Squib LH Circuit | Any of the following conditions is met:
·
The airbag sensor assembly detects an open in the side squib LH circuit. ·
Side squib LH malfunction ·
Airbag sensor assembly malfunction |
·
Floor wire ·
Side squib LH (Front seat airbag assembly LH) ·
Airbag sensor assembly |
Applies to check mode |
| B1827 | Short in Side Squib LH Circuit (To Ground) | Any of the following conditions is met:
·
The airbag sensor assembly detects a short to ground in the side squib LH circuit. ·
Side squib LH malfunction ·
Airbag sensor assembly malfunction |
·
Floor wire ·
Side squib LH (Front seat airbag assembly LH) ·
Airbag sensor assembly |
Applies to check mode |
| B1828 | Short in Side Squib LH Circuit (To B+) | Any of the following conditions is met:
·
The airbag sensor assembly detects a short to B+ in the side squib LH circuit. ·
Side squib LH malfunction ·
Airbag sensor assembly malfunction |
·
Floor wire ·
Side squib LH (Front seat airbag assembly LH) ·
Airbag sensor assembly |
Applies to check mode |
| Vehicle Condition | ||||
|---|---|---|---|---|
| Pattern 1 | Pattern 2 | Pattern 3 | ||
| Diagnosis Condition | Ignition switch ON | ○ | ○ | ○ |
| Malfunction Status | The airbag sensor assembly detects a line short in the side squib LH circuit during the primary check | ○ | - | - |
| Side squib LH malfunction | - | ○ | - | |
| Airbag sensor assembly malfunction | - | - | ○ | |
| Detection Time | - | - | - | |
| Number of Trips | 1 trip | 1 trip | 1 trip | |
| Vehicle Condition | ||||
|---|---|---|---|---|
| Pattern 1 | Pattern 2 | Pattern 3 | ||
| Diagnosis Condition | Ignition switch ON | ○ | ○ | ○ |
| Malfunction Status | The airbag sensor assembly detects an open in the side squib LH circuit | ○ | - | - |
| Side squib LH malfunction | - | ○ | - | |
| Airbag sensor assembly malfunction | - | - | ○ | |
| Detection Time | - | - | - | |
| Number of Trips | 1 trip | 1 trip | 1 trip | |
| Vehicle Condition | ||||
|---|---|---|---|---|
| Pattern 1 | Pattern 2 | Pattern 3 | ||
| Diagnosis Condition | Ignition switch ON | ○ | ○ | ○ |
| Malfunction Status | The airbag sensor assembly detects a short to ground in the side squib LH circuit | ○ | - | - |
| Side squib LH malfunction | - | ○ | - | |
| Airbag sensor assembly malfunction | - | - | ○ | |
| Detection Time | - | - | - | |
| Number of Trips | 1 trip | 1 trip | 1 trip | |
| Vehicle Condition | ||||
|---|---|---|---|---|
| Pattern 1 | Pattern 2 | Pattern 3 | ||
| Diagnosis Condition | Ignition switch ON | ○ | ○ | ○ |
| Malfunction Status | The airbag sensor assembly detects a short to B+ in the side squib LH circuit | ○ | - | - |
| Side squib LH malfunction | - | ○ | - | |
| Airbag sensor assembly malfunction | - | - | ○ | |
| Detection Time | - | - | - | |
| Number of Trips | 1 trip | 1 trip | 1 trip | |
- HINT:
-
DTC will be output when conditions for either of the patterns in the table above are met.
WIRING DIAGRAM
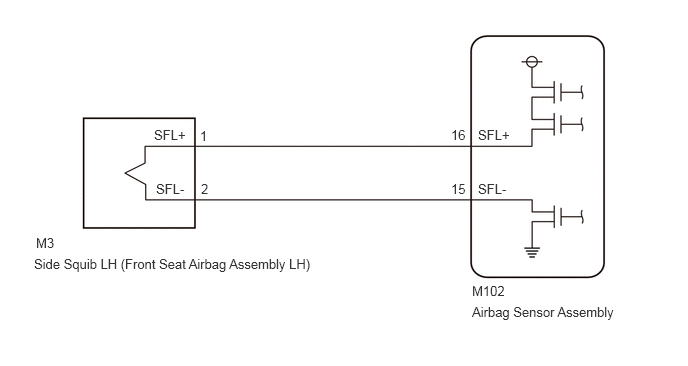
CAUTION / NOTICE / HINT
- NOTICE:
-
After turning the ignition switch off, waiting time may be required before disconnecting the cable from the negative (-) battery terminal. Therefore, make sure to read the disconnecting the cable from the negative (-) battery terminal notices before proceeding with work.
-
Click hereGeneral>INTRODUCTION>REPAIR INSTRUCTION>PRECAUTION
- HINT:
- ·
Perform the simulation method by selecting check mode (Signal Check) using the GTS.
Click hereVehicle Interior>SUPPLEMENTAL RESTRAINT SYSTEMS>AIRBAG SYSTEM>CHECK MODE PROCEDURE
·After selecting check mode (Signal Check), perform the simulation method by wiggling each connector of the airbag system or driving the vehicle on a city road or rough road.
Click hereGeneral>INTRODUCTION>HOW TO TROUBLESHOOT ECU CONTROLLED SYSTEMS>HOW TO PROCEED WITH TROUBLESHOOTING
PROCEDURE
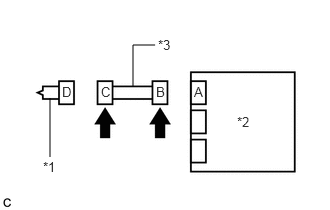
| *1 | Front Seat Airbag Assembly LH |
| *2 | Airbag Sensor Assembly |
| *3 | Floor Wire |
Turn the ignition switch off.
Disconnect the cable from the negative (-) battery terminal.
- CAUTION:
-
Wait at least 90 seconds after disconnecting the cable from the negative (-) battery terminal to disable the SRS system.
Check that the connectors are properly connected to the front seat airbag assembly LH and airbag sensor assembly.
- OK:
The connectors are properly connected.
- HINT:
-
If the connectors are not properly connected, reconnect the connectors and proceed to the next inspection.
Disconnect the connectors from the front seat airbag assembly LH and airbag sensor assembly.
Check that the terminals of the connectors are not deformed or damaged.
- OK:
The terminals are not deformed or damaged.
Check that the short springs of the activation prevention mechanism of the floor wire connector are not deformed or damaged.
- OK:
The short springs are not deformed or damaged.
- Result:
Proceed to OK NG
OK
NG
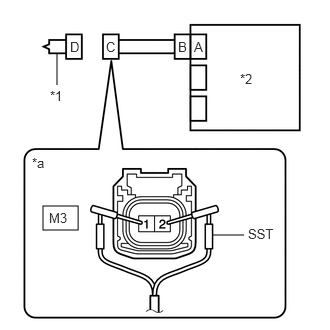
| *1 | Front Seat Airbag Assembly LH |
| *2 | Airbag Sensor Assembly |
| *a | Front view of wire harness connector
(to Front Seat Airbag Assembly LH) |
Connect the connector to the airbag sensor assembly.
Connect SST (resistance 2.1 Ω) to connector C.
- CAUTION:
-
Never connect a tester to the front seat airbag assembly LH for measurement, as this may lead to a serious injury due to airbag deployment.
- NOTICE:
- ·
Do not forcibly insert SST into the terminals of the connector when connecting it.
·Insert SST straight into the terminals of the connector.
- SST
- 09843-18061
Connect the cable to the negative (-) battery terminal.
Clear the DTCs stored in memory.
Click hereVehicle Interior>SUPPLEMENTAL RESTRAINT SYSTEMS>AIRBAG SYSTEM>DTC CHECK / CLEAR
- Body Electrical > SRS Airbag > Clear DTCs
- 50002 188
Turn the ignition switch off.
Turn the ignition switch to ON, and wait for at least 60 seconds.
Check for DTCs.
Click hereVehicle Interior>SUPPLEMENTAL RESTRAINT SYSTEMS>AIRBAG SYSTEM>DTC CHECK / CLEAR
- Body Electrical > SRS Airbag > Trouble Codes
- 50001 188
- OK:
DTC B1825, B1826, B1827 or B1828 is not output.
- HINT:
-
Codes other than DTCs B1825, B1826, B1827 and B1828 may be output at this time, but they are not related to this check.
Turn the ignition switch off.
Disconnect the cable from the negative (-) battery terminal.
- CAUTION:
-
Wait at least 90 seconds after disconnecting the cable from the negative (-) battery terminal to disable the SRS system.
Disconnect SST from connector C.
- Result:
Proceed to OK NG
OK
NG
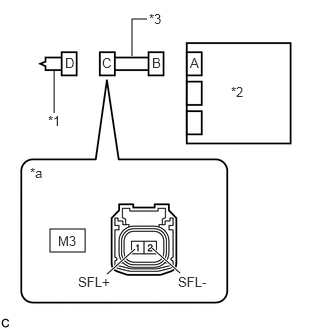
| *1 | Front Seat Airbag Assembly LH |
| *2 | Airbag Sensor Assembly |
| *3 | Floor Wire |
| *a | Front view of wire harness connector
(to Front Seat Airbag Assembly LH) |
Disconnect the floor wire from the airbag sensor assembly.
Check for a short to B+ in the circuit.
Connect the cable to the negative (-) battery terminal.
Turn the ignition switch to ON.
Measure the voltage according to the value(s) in the table below.
- Standard Voltage:
Tester Connection Switch Condition Specified Condition M3-1 (SFL+) - Body ground Ignition switch ON Below 1 V M3-2 (SFL-) - Body ground Ignition switch ON Below 1 V
Turn the ignition switch off.
Disconnect the cable from the negative (-) battery terminal.
- CAUTION:
-
Wait at least 90 seconds after disconnecting the cable from the negative (-) battery terminal to disable the SRS system.
Check for an open in the circuit.
Measure the resistance according to the value(s) in the table below.
- Standard Resistance:
Tester Connection Condition Specified Condition M3-1 (SFL+) - M3-2 (SFL-) Always Below 1 Ω
Check for a short to ground in the circuit.
Measure the resistance according to the value(s) in the table below.
- Standard Resistance:
Tester Connection Condition Specified Condition M3-1 (SFL+) - Body ground Always 1 MΩ or higher M3-2 (SFL-) - Body ground Always 1 MΩ or higher
Check for a short in the circuit.
Release the activation prevention mechanism built into connector B.
Click hereVehicle Interior>SUPPLEMENTAL RESTRAINT SYSTEMS>AIRBAG SYSTEM>DIAGNOSIS SYSTEM
Measure the resistance according to the value(s) in the table below.
- Standard Resistance:
Tester Connection Condition Specified Condition M3-1 (SFL+) - M3-2 (SFL-) Always 1 MΩ or higher
Restore the released activation prevention mechanism of connector B to the original condition.
- Result:
Proceed to OK NG
OK
NG
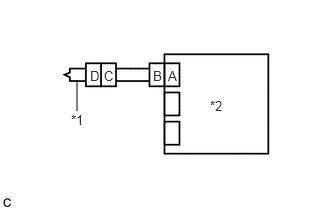
| *1 | Front Seat Airbag Assembly LH |
| *2 | Airbag Sensor Assembly |
Connect the connectors to the front seat airbag assembly LH and airbag sensor assembly.
Connect the cable to the negative (-) battery terminal.
Clear the DTCs stored in memory.
Click hereVehicle Interior>SUPPLEMENTAL RESTRAINT SYSTEMS>AIRBAG SYSTEM>DTC CHECK / CLEAR
- Body Electrical > SRS Airbag > Clear DTCs
- 50002 188
Turn the ignition switch off.
Turn the ignition switch to ON, and wait for at least 60 seconds.
Check for DTCs.
Click hereVehicle Interior>SUPPLEMENTAL RESTRAINT SYSTEMS>AIRBAG SYSTEM>DTC CHECK / CLEAR
- Body Electrical > SRS Airbag > Trouble Codes
- 50001 188
- OK:
DTC B1825, B1826, B1827 or B1828 is not output.
- HINT:
-
Codes other than DTCs B1825, B1826, B1827 and B1828 may be output at this time, but they are not related to this check.
- Result:
Proceed to OK NG
OK
Click hereGeneral>INTRODUCTION>HOW TO TROUBLESHOOT ECU CONTROLLED SYSTEMS>HOW TO PROCEED WITH TROUBLESHOOTING
NG