EC6A MANUAL TRANSMISSION / TRANSAXLE BACK-UP LIGHT SWITCH REMOVAL
CAUTION / NOTICE / HINT
The necessary procedures (adjustment, calibration, initialization, or registration) that must be performed after parts are removed, installed, or replaced during the back-up light switch assembly removal/installation are shown below.
| Replacement Part or Procedure | Necessary Procedures | Effect/Inoperative Function When Necessary Procedures are not Performed | Link |
|---|---|---|---|
| Disconnect cable from negative battery terminal | Memorize steering angle neutral point | Panoramic view monitor system | ( ) |
- HINT:
-
When the cable is disconnected/reconnected to the auxiliary battery terminal, systems temporarily stop operating. However, each system has a function that completes learning the first time the system is used.
- ·
Learning completes when vehicle is driven
Effect/Inoperative Function When Necessary Procedures are not Performed Necessary Procedures Link *1: When performing learning using the GTS
Click here(
)
Lane tracing assist system Drive the vehicle straight ahead at 35 km/h (22 mph) or more for 5 second or more. ( )
Pre-collision system Simple intelligent parking assist system*1 Parking support brake system*1
·Learning completes when vehicle is operated normally
Effect/Inoperative Function When Necessary Procedures are not Performed Necessary Procedures Link Air conditioning system
·Back door opener
Perform door unlock operation with door control switch or electrical key transmitter sub-assembly switch. ( )
Air conditioning system After the ignition switch is turned to ON, the servo motor standard position is recognized. -
PROCEDURE

 1. PRECAUTION
- NOTICE:
-
After turning the ignition switch off, waiting time may be required before disconnecting the cable from the negative (-) battery terminal.
-
Click hereGeneral>INTRODUCTION>REPAIR INSTRUCTION>PRECAUTION
2.DISCONNECT CABLE FROM NEGATIVE BATTERY TERMINAL
28800
3.REMOVE BATTERY
53141F
4.REMOVE RADIATOR COVER
17751
5.REMOVE NO. 1 AIR CLEANER INLET
17705
6.REMOVE AIR CLEANER CAP SUB-ASSEMBLY
17701
7.REMOVE AIR CLEANER CASE SUB-ASSEMBLY
89661
8.REMOVE ECM
74404A
9.REMOVE BATTERY CLAMP SUB-ASSEMBLY
84210
10.REMOVE BACK-UP LIGHT SWITCH ASSEMBLY
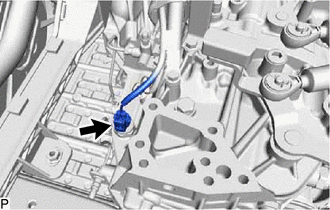
Disconnect the back-up light switch assembly connector.
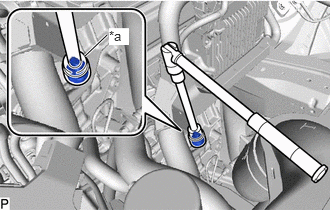
| *a | 27 mm Deep Socket Wrench |
Using a 27 mm deep socket wrench, remove the back-up light switch assembly and gasket from the manual transaxle assembly.