8NR-FTS ENGINE CONTROL SFI SYSTEM P15EA12 Oil Jet Control Valve Circuit Short to Battery P15EA14 Oil Jet Control Valve Circuit Short to Ground or Open
DESCRIPTION
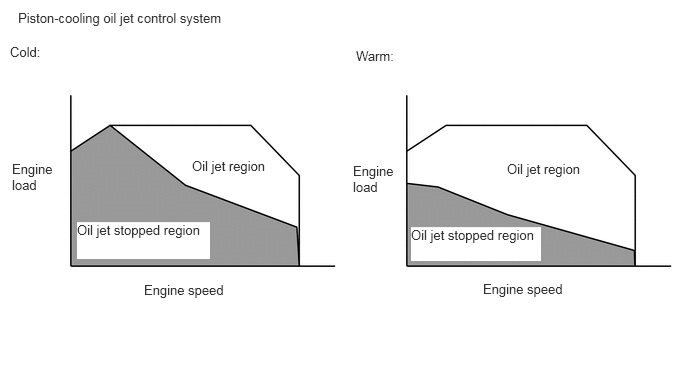
The piston-cooling oil jet control system uses the oil pressure switching valve assembly to start and stop the operation of the oil jets.
When the oil pressure switching valve assembly operates, oil pressure from the oil pressure switching valve assembly closes the relief valve, which shuts off the oil path between the oil pump and oil jet and stops the operation of the oil jets. This reduces fuel dilution during low-temperature starting and improves the piston heating to reduce friction and suppress the generation of deposits. When the oil pressure switching valve assembly is inoperative, oil pressure from the oil pressure switching valve assembly is cut and the relief valve opens. This opens the oil path between the oil pump and oil jet and starts the oil jet to cool and lubricate the pistons.
| DTC No. | Detection Item | DTC Detection Condition | Trouble Area | MIL | Memory | Note |
|---|---|---|---|---|---|---|
| P15EA12 | Oil Jet Control Valve Circuit Short to Battery | Short in oil pressure switching valve assembly circuit and power supply circuit (1 trip detection logic). | ·
Short in oil pressure switching valve assembly circuit ·
Oil pressure switching valve assembly ·
ECM |
Does not come on | DTC stored | SAE Code: P15EC |
| P15EA14 | Oil Jet Control Valve Circuit Short to Ground or Open | Open or short in pressure discharge valve assembly circuit (1 trip detection logic). | ·
Open or short in oil pressure switching valve assembly circuit ·
Oil pressure switching valve assembly ·
ECM |
Does not come on | DTC stored | SAE Code: P15EB |
MONITOR DESCRIPTION
The ECM monitors the output voltage of the oil pressure switching valve assembly while it is operating. If a continuous mismatch occurs between the ECM control value and the output voltage, the ECM determines there is a malfunction and stores a DTC.
CONFIRMATION DRIVING PATTERN
Connect the GTS to the DLC3.
Turn the ignition switch to ON.
Turn the GTS on.
Clear the DTCs (even if no DTCs are stored, perform the clear DTC procedure).
Turn the ignition switch off and wait for at least 30 seconds.
Turn the ignition switch to ON.
Turn the GTS on.
Start the engine.
Idle the engine for 30 seconds [A].
Enter the following menus: Powertrain / Engine / Trouble Codes [B].
Read the pending DTCs.
- HINT:
- ·
If a pending DTC is output, the system is malfunctioning.
·If a pending DTC is not output, perform the following procedure.
Enter the following menus: Powertrain / Engine / Utility / All Readiness.
Input the DTC: P15EA12 or P15EA14.
Check the DTC judgment result.
| GTS Display | Description |
|---|---|
| NORMAL | ·
DTC judgment completed ·
System normal |
| ABNORMAL | ·
DTC judgment completed ·
System abnormal |
| INCOMPLETE | ·
DTC judgment not completed ·
Perform driving pattern after confirming DTC enabling conditions |
| N/A | ·
Unable to perform DTC judgment ·
Number of DTCs which do not fulfill DTC preconditions has reached ECU memory limit |
- HINT:
- ·
If the judgment result shows NORMAL, the system is normal.
·If the judgment result shows ABNORMAL, the system has a malfunction.
·If the judgment result shows INCOMPLETE or N/A, perform steps [A] and [B] again.
WIRING DIAGRAM
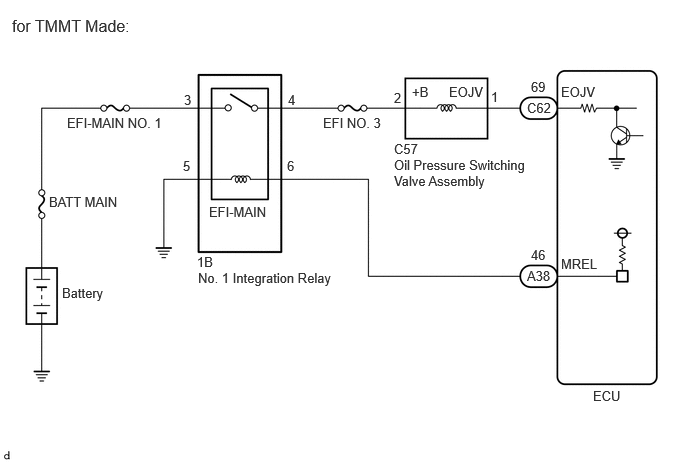
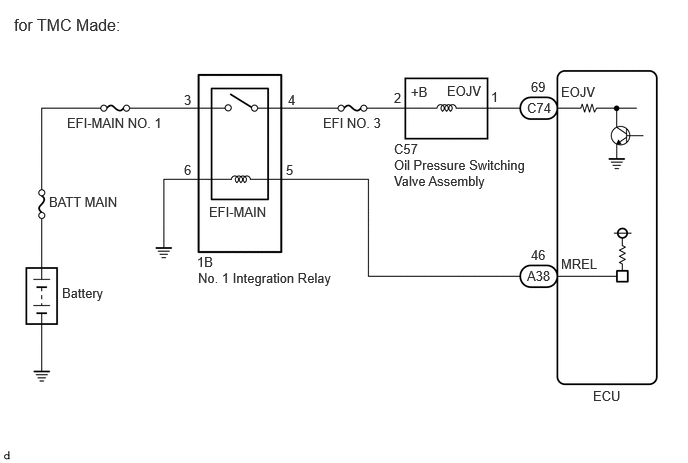
CAUTION / NOTICE / HINT
- NOTICE:
-
Inspect the fuses for circuits related to this system before performing the following procedure.
- HINT:
-
Read freeze frame data using the GTS. The ECM records vehicle and driving condition information as freeze frame data the moment a DTC is stored. When troubleshooting, freeze frame data can help determine if the vehicle was moving or stationary, if the engine was warmed up or not, if the air fuel ratio was lean or rich, and other data from the time the malfunction occurred.
PROCEDURE
Check the engine oil level.
Check the state of the oil level warning light (indicator).
- Result:
Result Proceed to Engine oil level is low and oil level warning light (indicator) is illuminated A Engine oil level is within the specified range and oil level warning light (indicator) is not illuminated B
- HINT:
-
If the oil level warning light (indicator) is not illuminated even though the engine oil level is lower than the Low mark, or the oil level warning light (indicator) is illuminated even though the engine oil level is within the specified range, inspect the oil level sensor and related parts.
A
B
Check for engine oil leaks.
- OK:
There are no engine oil leaks.
- HINT:
-
If there are engine oil leaks, perform repairs.
- Result:
Proceed to NEXT
NEXT
Add engine oil.
Click hereGeneral>MAINTENANCE>8NR-FTS OIL AND OIL FILTER>REPLACEMENT
- NOTICE:
-
Do not add engine oil to above the full level mark.
- Result:
Proceed to NEXT
NEXT
Connect the GTS to the DLC3.
Turn the ignition switch to ON.
- HINT:
-
Make sure the engine coolant temperature is 70°C (158°F) or less.
Turn the GTS on.
Enter the following menus: Powertrain / Engine / Utility / Engine Oil Jet Control Check.
- Powertrain > Engine > Utility
-
Tester Display Engine Oil Jet Control Check - 50005 372 4378
According to the display on the GTS, read the Data List and calculate the difference between the values of "Valve OFF: Hi Oil press" and "Valve ON: Low Oil press".
- OK:
30 kPa (gauge) or higher
- Result:
Proceed to OK NG
OK
Click hereEngine / Hybrid System>8NR-FTS (ENGINE CONTROL)>SFI SYSTEM>CHECK FOR INTERMITTENT PROBLEMS
NG
Inspect the oil pressure switching valve assembly.
Click hereEngine / Hybrid System>8NR-FTS (LUBRICATION)>OIL PRESSURE SWITCHING VALVE>INSPECTION
- Result:
Proceed to OK NG
OK
NG
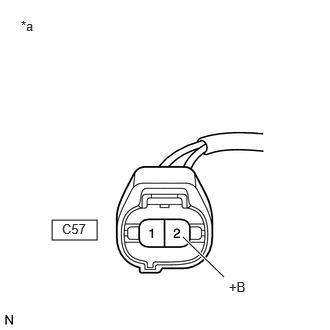
| *a | Front view of wire harness connector
(to Oil Pressure Switching Valve Assembly) |
Disconnect the oil pressure switching valve assembly connector.
Turn the ignition switch to ON.
Measure the voltage according to the value(s) in the table below.
- Standard Voltage:
Tester Connection Switch Condition Specified Condition C57-2 (+B) - Body ground Ignition switch ON 11 to 14 V
- Result:
Proceed to OK NG
OK
NG
Disconnect the C57 oil pressure switching valve assembly connector.
Disconnect the C62*1 or C74*2 ECM connector.
*1: for TMMT Made
*2: for TMC Made
Measure the resistance according to the value(s) in the table below.
- Standard Resistance:
for TMMT Made Tester Connection Condition Specified Condition C57-1 (EOJV) - C62-69 (EOJV) Always Below 1 Ω C57-1 (EOJV) or C62-69 (EOJV) - Body ground and other terminals Always 10 kΩ or higher
for TMC Made Tester Connection Condition Specified Condition C57-1 (EOJV) - C74-69 (EOJV) Always Below 1 Ω C57-1 (EOJV) or C74-69 (EOJV) - Body ground and other terminals Always 10 kΩ or higher
- Result:
Proceed to OK NG
OK
NG
Connect the GTS to the DLC3.
Turn the ignition switch to ON.
Turn the GTS on.
Clear the DTCs.
- Powertrain > Engine > Clear DTCs
- 50002 372
Turn the ignition switch off and wait for at least 30 seconds.
Start the engine.
Turn the GTS on.
Drive the vehicle in accordance with the driving pattern described in Confirmation Driving Pattern.
Enter the following menus: Powertrain / Engine / Utility / All Readiness.
- Powertrain > Engine > Utility
-
Tester Display All Readiness - 50005 372 20
Input the DTC: P15EA12 or P15EA14.
Check the DTC judgment result.
- Result:
Result Proceed to NORMAL
(DTCs are not output)A ABNORMAL
(DTC P15EA12 or P15EA14 is output)B
A
B