MIL Circuit
Circuit diagnosis · Vehicles built Oct 2006 – May 2009
Versions by build date: Oct 2006 – May 2009 from Jun 2009
DESCRIPTION
The MIL (Malfunction Indicator Lamp) is used to indicate vehicle malfunctions detected by the ECM. When the ignition switch is turned on (IG), power is supplied to the MIL circuit, and the ECM provides the circuit ground which illuminates the MIL.The MIL operation can be checked visually: When the ignition switch is first turned on (IG), the MIL should be illuminated and should then turn off. If the MIL remains illuminated or is not illuminated, conduct the following troubleshooting procedure using the intelligent tester.
WIRING DIAGRAM
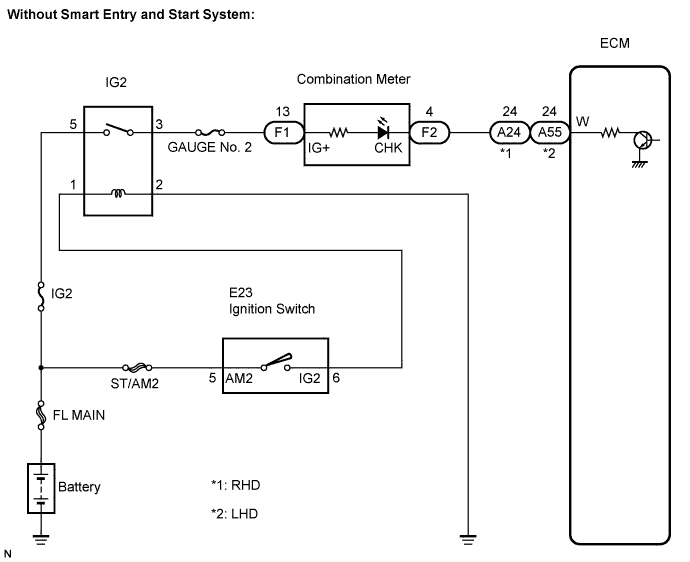

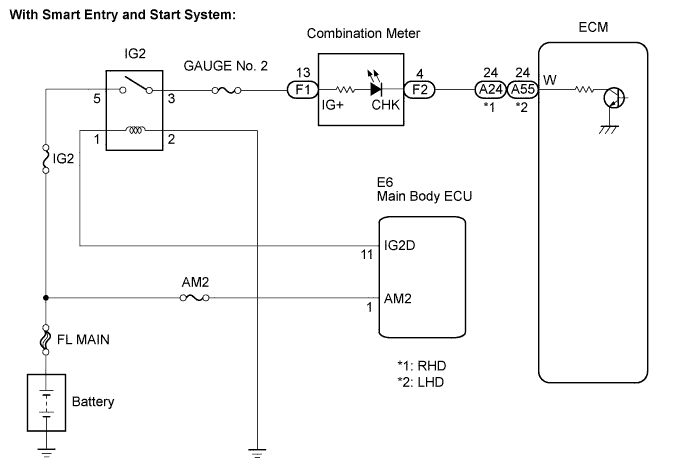
INSPECTION PROCEDURE
| 1. CHECK ILLUMINATION OF MIL |

Turn the ignition switch on (IG).
Check the illumination of MIL.
- Result:
Condition
Proceed to
MIL remains illuminated (Even after ignition switch is turned to on (IG) and several seconds have passed, MIL still remains illuminated)
A
MIL remains off (does not illuminate at all
B
MIL illuminates for several seconds, but turns off after engine is started
C
|
|
||||
|
|
||||


| A | |
 |
| 2. CHECK WHETHER MIL TURNS OFF |
Connect the intelligent tester to the DLC3.
Turn the ignition switch on (IG) and turn the tester ON.
Select the following menu items: Powertrain / Engine / DTC.
Check if any DTCs have been stored. Note down any DTCs.
Clear the DTCs (Click here).
Check if the MIL goes off.
- Standard:
- MIL goes off.
|
|
||||
| NG | |
|
| 3. CHECK HARNESS AND CONNECTOR (CHECK FOR SHORT IN WIRE HARNESS) |
Disconnect the A24 (RHD) or A55 (LHD) ECM connector.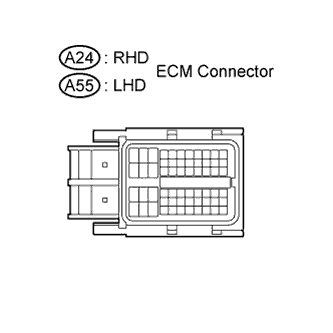
Turn the ignition switch on (IG).
Check that the MIL is not illuminated.
- OK:
- MIL is not illuminated.
Reconnect the ECM connector.
|
|
||||
| NG | |
|
| 4. CHECK HARNESS AND CONNECTOR (COMBINATION METER - ECM) |
Disconnect the A24 (RHD) or A55 (LHD) ECM connector.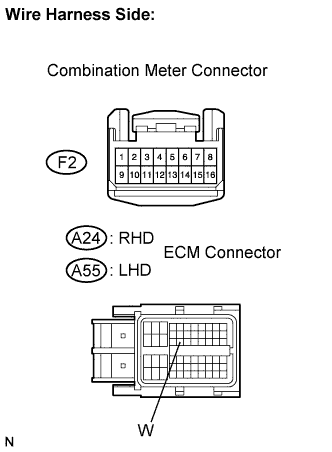
Disconnect the F2 combination meter connector.
Measure the resistance.
- Standard resistance (Check for short):
- RHD:
Tester Connection
Specified Condition
W (A24-24) or CHK (F2-4) - Body ground
10 kΩ or higher
- LHD:
Tester Connection
Specified Condition
W (A55-24) or CHK (F2-4) - Body ground
10 kΩ or higher
Reconnect the ECM connector.
Reconnect the combination meter connector.
|
|
||||
| NG | ||
 |
||
| ||
| 5. CHECK THAT ENGINE STARTS |
Turn the ignition switch on (IG).
Start the engine.
- Result:
Result
Proceed to
Engine starts
A
Engine does not start*
B
- HINT:
- *: The intelligent tester cannot communicate with the ECM.
|
|
||||
| A | |
|
| 6. CHECK HARNESS AND CONNECTOR |
Disconnect the A24 (RHD) or A55 (LHD) ECM connector.
Turn the ignition switch on (IG).
Measure the voltage.
- Standard voltage:
- RHD:
Tester Connection
Specified Condition
W (A24-24) - Body ground
9 to 14 V
- LHD:
Tester Connection
Specified Condition
W (A55-24) - Body ground
9 to 14 V
|
|
||||
| OK | ||
|
||
| ||
| 7. CHECK HARNESS AND CONNECTOR |
Disconnect the A24 (RHD) or A55 (LHD) ECM connector.
Disconnect the F2 combination meter connector.
Measure the resistance.
- Standard resistance (Check for open):
- RHD:
Tester Connection
Specified Condition
W (A24-24) - CHK (F2-4)
Below 1 Ω
- LHD:
Tester Connection
Specified Condition
W (A55-24) - CHK (F2-4)
Below 1 Ω
Reconnect the ECM connector.
Reconnect the combination meter connector.
|
|
||||
| OK | ||
|
||
| ||