Driver Side Door Lock Motor Circuit
Circuit diagnosis · Vehicles built from Jun 2006
DESCRIPTION
The driver's door lock motor is built into the driver's door lock assembly.The main body ECU controls the driver's door lock motor to lock/unlock the driver's door. This ECU applies current from terminal ACT+ to terminal ACTD to operate the motor to lock the door. It reverses the direction of the current flow to operate the motor to unlock the door.
WIRING DIAGRAM
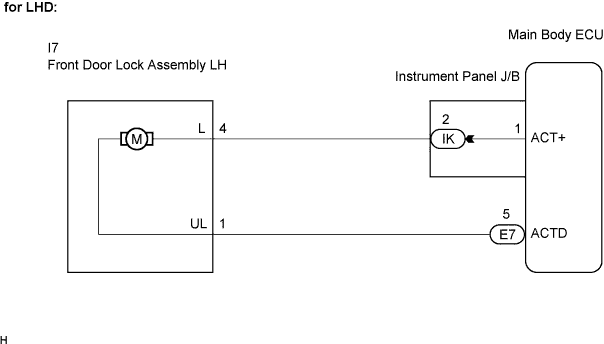

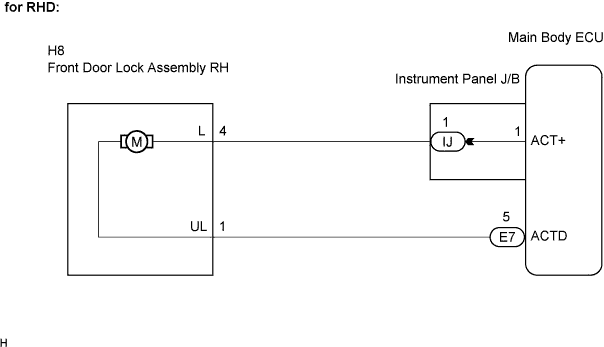
INSPECTION PROCEDURE
| 1. INSPECT FRONT DOOR LOCK ASSEMBLY (DOOR LOCK MOTOR) |

Inspect LHD models.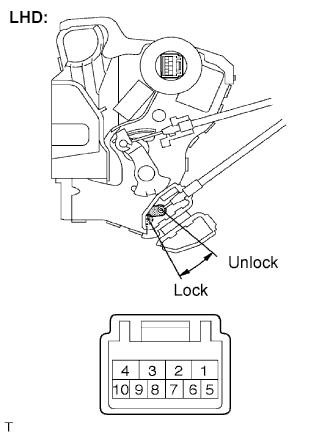
Remove the front door lock assembly LH.
Apply battery voltage and check operation of the door lock motor.
- OK:
Measurement Condition
Specified Condition
Battery positive (+) → Terminal 4
Battery negative (-) → Terminal 1
Lock
Battery positive (+) → Terminal 1
Battery negative (-) → Terminal 4
Unlock
Inspect RHD models.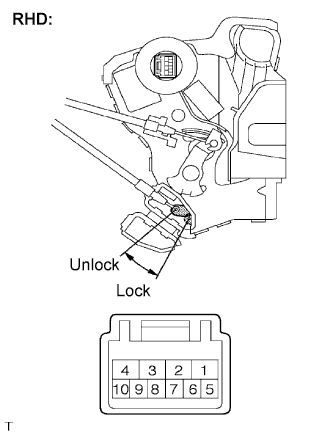
Remove the front door lock assembly RH.
Apply battery voltage and check operation of the door lock motor.
- OK:
Measurement Condition
Specified Condition
Battery positive (+) → Terminal 4
Battery negative (-) → Terminal 1
Lock
Battery positive (+) → Terminal 1
Battery negative (-) → Terminal 4
Unlock
|
|
||||

| OK | |
 |
| 2. CHECK WIRE HARNESS (FRONT DOOR LOCK - MAIN BODY ECU (INSTRUMENT PANEL J/B)) |
Disconnect the front door lock assembly connector.
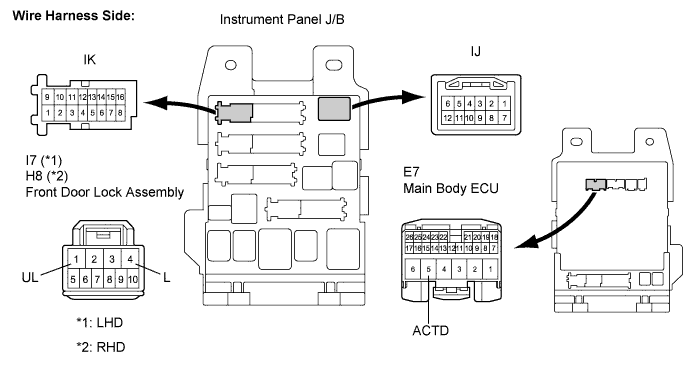
Disconnect the ECU (instrument panel J/B) connector.
Measure the resistance according to the value(s) in the table below.
- Standard resistance:
Tester Connection (Symbols)
Condition
Specified Condition
(*1) I7-4 (L) - IK-2
Always
Below 1 Ω
(*1) I7-1 (UL) - E7-5 (ACTD)
Always
Below 1 Ω
(*1) IK-2 - Body ground
Always
10 kΩ or higher
(*1) E7-5 (ACTD) - Body ground
Always
10 kΩ or higher
(*2) H8-4 (L) - IJ-1
Always
Below 1 Ω
(*2) H8-1 (UL) - E7-5 (ACTD)
Always
Below 1 Ω
(*2) IJ-1 - Body ground
Always
10 kΩ or higher
(*2) E7-5 (ACTD) - Body ground
Always
10 kΩ or higher
|
|
||||
| OK | ||
 |
||
| ||