Front Passenger Side Door UNLOCK Detection Switch Circuit
Circuit diagnosis · Vehicles built from Jun 2006
DESCRIPTION
The front passenger door unlock detection switch is built into the front passenger door lock assembly. The switch turns on when the front passenger door is unlocked and turns off when the door is locked.The main body ECU is connected to the front passenger door lock assembly via terminal LSWP and front passenger door lock/unlock state signals are input to the ECU.
The main body ECU applies voltage to the door unlock detection switch via terminal LSWP. When the door unlock detection switch is on (there is continuity between the switch terminals), an unlock state signal is input to the ECU. When the switch is off (there is no continuity between the switch terminals), a lock state signal is input.
WIRING DIAGRAM
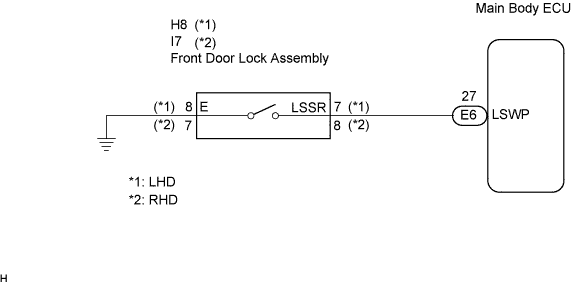

INSPECTION PROCEDURE
| 1. READ VALUE USING DATA LIST (DOOR UNLOCK DETECTION SWITCH) |

Check the DATA LIST to ensure proper function of the door unlock detection switch.
- HINT:
- When the rear left door or rear right door is unlocked, the LSWP terminal will be ON. In this case, perform the inspection with the other doors locked.
Main Body: Tester Display
Measurement Item/Range
Normal Condition
Diagnostic Note
P-Door Lock Pos SW
Passenger side door lock position switch signal/ON or OFF
ON: Passenger side door lock is in UNLOCK position
OFF: Passenger side door lock is in LOCK position
-
- OK:
- The display is as specified in the normal condition column.
|
|
||||

| OK | ||
 |
||
| ||
| 2. INSPECT FRONT DOOR LOCK ASSEMBLY (DOOR UNLOCK DETECTION SWITCH) |
Inspect LHD models.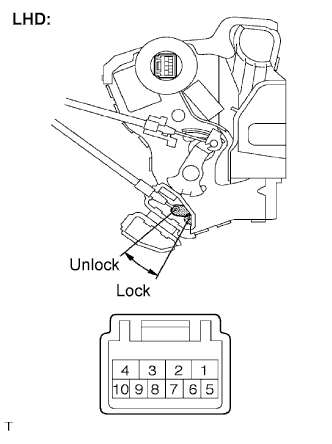
Remove the front door lock assembly RH.
Measure the resistance according to the value(s) in the table below.
- Standard resistance:
Tester Connection
Measurement Condition
Door Lock Condition
Specified Condition
7 - 8
Battery positive (+) → Terminal 4
Battery negative (-) → Terminal 1
Lock
10 kΩ or higher
7 - 8
Battery positive (+) → Terminal 1
Battery negative (-) → Terminal 4
Unlock
Below 1 Ω
Inspect RHD models.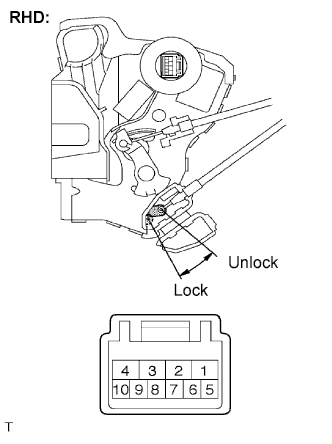
Remove the front door lock assembly LH.
Measure the resistance according to the value(s) in the table below.
- Standard resistance:
Tester Connection
Measurement Condition
Door Lock Condition
Specified Condition
7 - 8
Battery positive (+) → Terminal 4
Battery negative (-) → Terminal 1
Lock
10 kΩ or higher
7 - 8
Battery positive (+) → Terminal 1
Battery negative (-) → Terminal 4
Unlock
Below 1 Ω
|
|
||||

| OK | |
 |
| 3. CHECK WIRE HARNESS (FRONT DOOR LOCK ASSEMBLY - MAIN BODY ECU) |
Disconnect the front door lock assembly connector.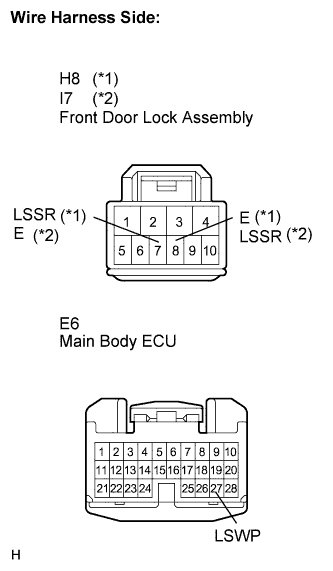
Disconnect the ECU connector.
Measure the resistance according to the value(s) in the table below.
- Standard resistance:
Tester Connection
(Symbols)
Condition
Specified Condition
(*1) H8-7 (LSSR) - E6-27 (LSWP)
Always
Below 1 Ω
(*1) H8-7 (LSSR) - Body ground
Always
10 kΩ or higher
(*1) H8-8 (E) - Body ground
Always
Below 1 Ω
(*2) I7-8 (LSSR) - E6-27 (LSWP)
Always
Below 1 Ω
(*2) I7-8 (LSSR) - Body ground
Always
10 kΩ or higher
(*2) I7-7 (E) - Body ground
Always
Below 1 Ω
|
|
||||
| OK | ||
|
||
| ||