Circuit diagnosis · Vehicles built Jun 2006 – May 2009
Versions by build date: Jun 2006 – May 2009from Jun 2009
DESCRIPTION
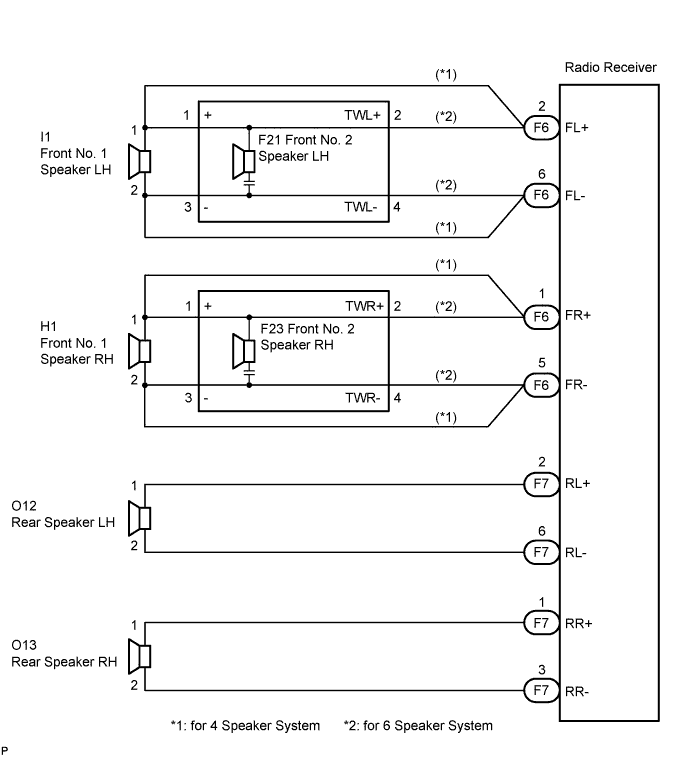
When the vehicle has a built-in type amplifier, a sound signal is sent from the radio receiver to the speakers via this circuit.
WIRING DIAGRAM
INSPECTION PROCEDURE
1. CHECK HARNESS AND CONNECTOR
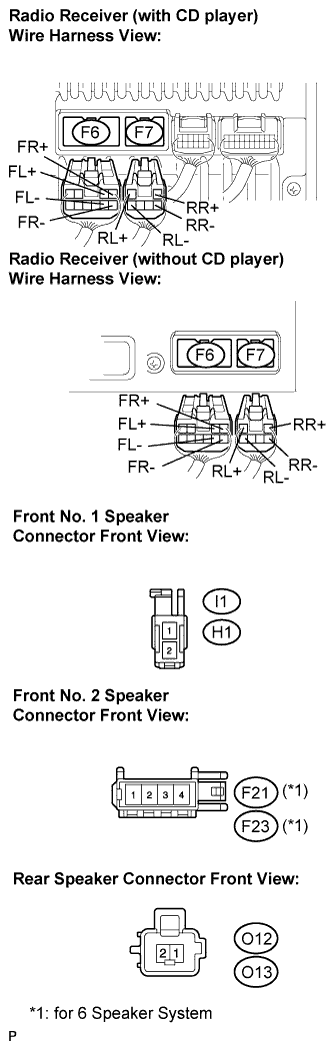
Disconnect the connectors shown in the illustration from the radio receiver and speakers.
for 6 Speaker System:Measure the resistance between each of the front No. 2 speakers and the radio receiver to check for an open circuit in the wire harness.
Standard resistance:
Below 1 Ω
for 6 Speaker System:Measure the resistance between each of the front No. 2 speakers and each of the front No. 1 speakers to check for an open circuit in the wire harness.
Standard resistance:
Below 1 Ω
for 4 Speaker System:Measure the resistance between each of the front No. 1 speakers and radio receiver to check for an open circuit in the wire harness.
Standard resistance:
Below 1 Ω
Measure the resistance between each of the rear speakers and the radio receiver to check for an open circuit in the wire harness.
Standard resistance:
Below 1 Ω
Measure the resistance between each speaker and body ground to check for a short circuit in the wire harness.
Standard resistance:
10 kΩ or higher
NG
REPAIR OR REPLACE HARNESS OR CONNECTOR
OK
2. INSPECT FRONT NO. 1 SPEAKER
Resistance check.
Measure the resistance between the terminals of the speaker.
Standard resistance:
Approximately 4 Ω
NG
REPLACE FRONT NO. 1 SPEAKER
OK
3. INSPECT REAR SPEAKER
Resistance check.
Measure the resistance between the terminals of the speaker.
Standard resistance:
Approximately 4 Ω
NG
REPLACE REAR SPEAKER
OK
4. CONFIRM MODEL
Result:
Result
Proceed to
6 Speaker System
A
4 Speaker System
B
B
PROCEED TO NEXT CIRCUIT INSPECTION SHOWN IN PROBLEM SYMPTOMS TABLE
A
5. INSPECT FRONT NO. 2 SPEAKER
Check that the malfunction disappears when another speaker in good condition is installed.
OK:
Malfunction disappears.
HINT:
Connect all the connectors to the front No. 2 speaker.
When there is a possibility that either the right or left front speaker is defective, inspect by interchanging the right one with the left one.
Perform the above inspection on both LH and RH sides.
OK
REPLACE FRONT NO. 2 SPEAKER
NG
PROCEED TO NEXT CIRCUIT INSPECTION SHOWN IN PROBLEM SYMPTOMS TABLE