Home › DRIVE LINE › DRIVE SHAFT › FRONT DRIVE SHAFTINSTALLATION
Removal / installation · Vehicles built from Jun 2009
Versions by build date: Jun 2006 – Sep 2006 Oct 2006 – May 2009 from Jun 2009
1.
INSTALL FRONT DRIVE SHAFT ASSEMBLY LH
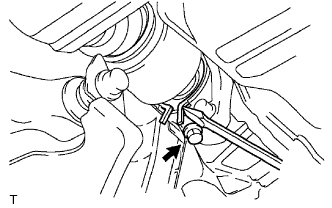
Coat the spline of the inboard joint shaft assembly with ATF. Align the shaft splines and install the drive shaft assembly LH with a brass bar and hammer.
NOTICE:
Set the shaft snap ring with the opening side facing down.
Be careful not to damage the drive shaft dust cover, boot, and oil seal.
Move the drive shaft assembly while keeping it level.
2.
INSTALL FRONT DRIVE SHAFT ASSEMBLY RH
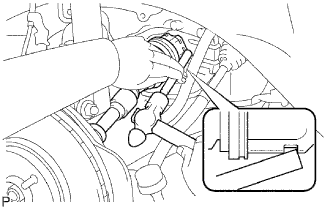
Coat the spline of the inboard joint shaft assembly with ATF. Install the front drive shaft assembly RH.
Using a screwdriver, install a new bearing bracket hole snap ring.
NOTICE:
Do not damage the boot and oil seal.
Move the drive shaft assembly while keeping it level.
Install a new bolt.
Torque:
32 N*m{
330 kgf*cm
, 24 ft.*lbf
}
3.
INSTALL FRONT AXLE ASSEMBLY
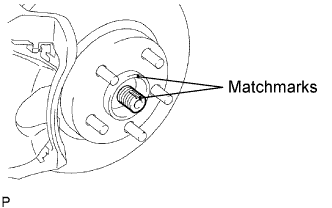
Align the matchmarks and install the front drive shaft assembly to the front axle hub sub-assembly.
NOTICE:
Be careful not to damage the drive shaft boot and speed sensor rotor.
4.
INSTALL FRONT SUSPENSION LOWER NO. 1 ARM
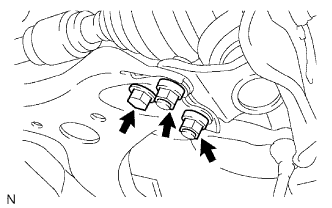
Install the lower ball joint to the front suspension lower No. 1 arm with the bolt and 2 nuts.
Torque:
75 N*m{
765 kgf*cm
, 55 ft.*lbf
}
5.
INSTALL TIE ROD END SUB-ASSEMBLY
Install the tie rod end sub-assembly to the steering knuckle with the nut.
Torque:
49 N*m{
500 kgf*cm
, 36 ft.*lbf
}
Install a new cotter pin.
NOTICE:
If the holes for the cotter pin are not aligned, tighten the nut up to 60° further.
6.
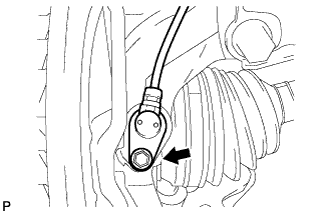
INSTALL FRONT SPEED SENSOR
Install the front speed sensor to the steering knuckle with the bolt.
Torque:
8.0 N*m{
82 kgf*cm
, 71 in.*lbf
}
NOTICE:
Prevent foreign matter from adhering to the speed sensor.
Be careful not to damage the speed sensor.
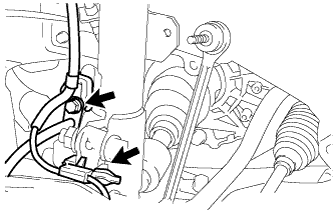
Install the flexible hose and the speed sensor to the shock absorber with the bolt and set the sensor clip on the knuckle.
Torque:
19 N*m{
192 kgf*cm
, 14 ft.*lbf
}
NOTICE:
Be careful not to damage the speed sensor.
Prevent foreign matter from adhering to the speed sensor.
Do not twist the sensor wire when installing the speed sensor.
7.
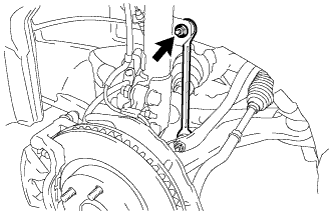
INSTALL FRONT STABILIZER LINK ASSEMBLY
Install the stabilizer link assembly with the nut.
Torque:
74 N*m{
755 kgf*cm
, 55 ft.*lbf
}
HINT:
If the ball joint turns together with the nut, use a hexagon wrench (6 mm) to hold the stud.
8.
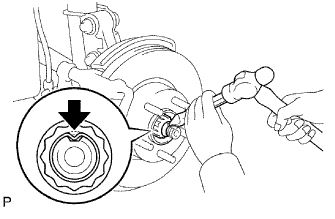
INSTALL FRONT AXLE HUB NUT
Using a socket wrench (30 mm), install a new axle hub nut.
Torque:
294 N*m{
3,000 kgf*cm
, 217 ft.*lbf
}
Using a chisel and hammer, stake the front axle hub nut.
9.
INSTALL FRONT WHEEL
Torque:
103 N*m{
1,050 kgf*cm
, 76 ft.*lbf
}
10.
ADD AUTOMATIC TRANSAXLE FLUID (for Automatic Transaxle)
for 2GR-FE: Click here
for 2AZ-FE: Click here
11.
ADD MANUAL TRANSAXLE OIL (for Manual Transaxle)
Park the vehicle on a level place. Remove the filler plug and gasket.
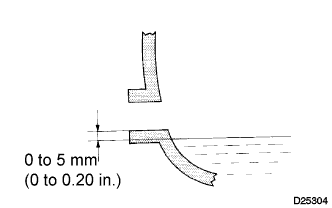
Check that the oil surface is within 5 mm (0.20 in.) below the lowest point of the filler plug opening.
Oil grade:
API GL-4 or GL-5
Viscosity:
SAE 75W-90
NOTICE:
Problems may occur if the oil level is too high or too low.
After replacing the oil, drive the vehicle and check the oil level again.
CAUTION:
Oil may be hot take care not to scold your finger.
Check for oil leakage if the oil level is low.
Install the filler plug and a new gasket.
Torque:
49 N*m{
500 kgf*cm
, 36 ft.*lbf
}
12.
INSPECT AUTOMATIC TRANSAXLE FLUID (for 2AZ-FE)
HINT:
Drive the vehicle so that the engine and transaxle are at normal operating temperature.
Fluid temperature:
70 to 80°C (158 to 176°F)
Park the vehicle on a level surface and set the parking brake. With the engine idling and the brake pedal depressed, move the shift lever to all positions from P to L. Then return it to P.
Pull out the dipstick and wipe it clean.
Push it back fully into the pipe.
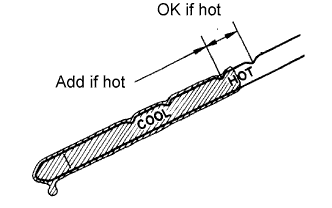
Pull it out again and check that the fluid level is within the HOT range. If the fluid level is below the HOT range, add new fluid and recheck the fluid level. If the fluid level exceeds the HOT range, drain the fluid once, add proper amount of new fluid and recheck the fluid level.
13.
INSPECT MANUAL TRANSAXLE OIL (for Manual Transaxle)
Stop the vehicle on a level surface. Remove the transmission filler plug and gasket.
Check that the oil surface is within 5 mm (0.20 in.) of the bottom of the transmission filler plug opening.
NOTICE:
Excessively large or small amounts of oil may cause trouble.
After replacing the oil, drive the vehicle and check the oil level again.
HINT:
Insert your finger into the filler plug hole. You should be able to just touch the surface of the oil if the oil is at the correct level.
CAUTION:
Oil may be hot take care not to scold your finger
Check for oil leakage if the oil level is low.
Install the transmission filler plug and a new gasket.
Torque:
49 N*m{
500 kgf*cm
, 36 ft.*lbf
}
14.
ADJUST FRONT WHEEL ALIGNMENT
HINT:
Click here
15.
CHECK ABS SPEED SENSOR SIGNAL
ABS: Click here
VSC: Click here