DISASSEMBLY
Removal / installation · Vehicles built from Jun 2006
| 1. SECURE RACK AND PINION POWER STEERING GEAR ASSEMBLY |

Using SST, secure the rack and pinion power steering gear assembly.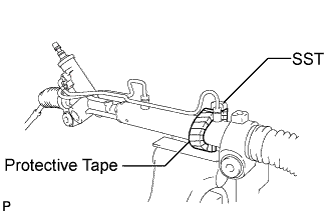

- SST
- 09612-00012
- HINT:
- Tape SST before use.
| 2. REMOVE STEERING RACK BOOT CLIP |
Using pliers, remove the RH and LH steering rack boot clips.
| 3. REMOVE NO. 2 STEERING RACK BOOT CLAMP |
Using pliers, remove the RH and LH No. 2 steering rack boot clamps as shown in the illustration.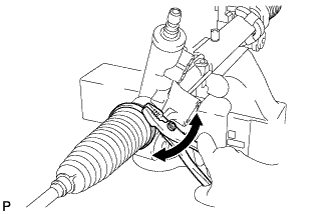
- NOTICE:
- Be careful not to damage the steering rack boots.
| 4. REMOVE NO. 2 STEERING RACK BOOT |
Remove the No. 2 steering rack boot.
| 5. REMOVE NO. 1 STEERING RACK BOOT |
Remove the No. 1 steering rack boot.
| 6. REMOVE STEERING RACK END SUB-ASSEMBLY |
Using a screwdriver and a hammer, unstake the RH and LH claw washers.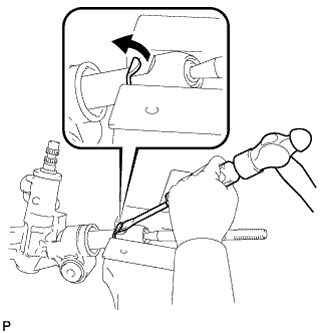
- NOTICE:
- Avoid any impact to the steering rack.
Using SST, remove the steering rack end sub-assembly (RH side) and the claw washer.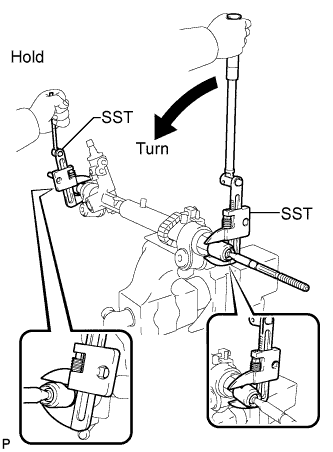
- SST
- 09922-10010
- NOTICE:
- Use SST 09922-10010 as shown in the illustration.
Using SST, remove the steering rack end sub-assembly (LH side) and the claw washer.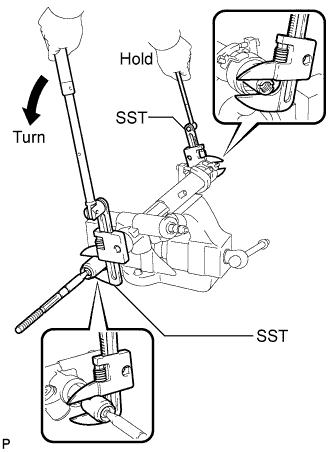
- SST
- 09922-10010
- NOTICE:
- Use SST 09922-10010 as shown in the illustration.
- HINT:
- Using SST, hold the rack and remove the steering rack end sub-assembly.
| 7. REMOVE RACK BEARING ASSEMBLY |
Remove and discard the sealing plug, adjuster plug, adjuster spring and rack bearing assembly.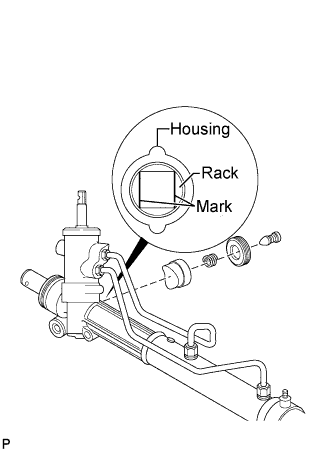
- NOTICE:
- The rack assembly must be marked inside the rack and pinion housing assembly to show correct alignment. Lubrication on the rack may cause the alignment marks to smear if the rack is moved.
Hold the rack firmly and mark the rack assembly position inside the housing assembly.
| 8. REMOVE PINION AND VALVE ASSEMBLY |
Remove and discard the spool shaft boot.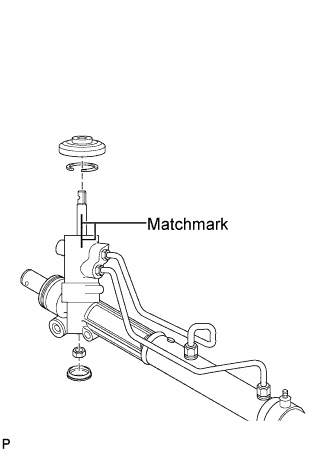
Remove and discard the retaining ring from the top of the rack and pinion housing assembly.
Remove and discard the dust cover from the bottom of the housing assembly.
- NOTICE:
- The spool shaft must be held in place during the following step.
Using SST to hold the spool shaft, make an alignment mark on the spool shaft and housing assembly.
- SST
- 09616-00011
Remove and discard the nut from the lower end of the pinion and valve assembly while holding the spool shaft with the SST.
- NOTICE:
- When performing the following procedure, do not remove the valve assembly from the rack and pinion housing assembly. Press the pinion end of the valve assembly only far enough to allow removal of the spool shaft seal and the needle bearing assembly. Put an oil pan below the housing assembly.
Remount the rack and pinion housing assembly in the vice with the cylinder lines facing down.
Gently tap a pointed center punch into the threaded end of the pinion to remove only the spool shaft seal and needle bearing assembly.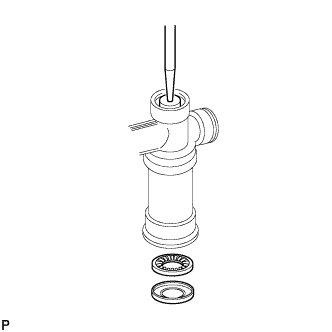
Discard the spool shaft seal and the needle bearing assembly.
Remount the rack and pinion housing assembly in a vice with the cylinder lines facing up.
- NOTICE:
- Do not scratch the spool shaft or inside of the housing assembly during removal. Scratching will require replacement of the rack and pinion power steering gear assembly.
Gently pull the valve assembly out of the housing assembly.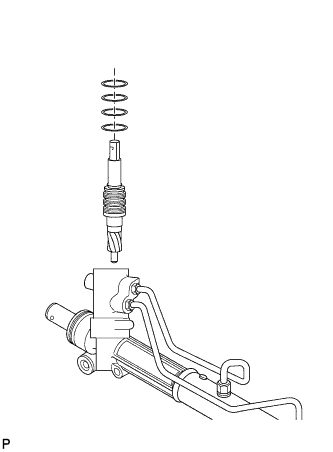
- NOTICE:
- Do not use a sharp tool to remove.
Remove and discard the valve body rings from the valve assembly.
| 9. REMOVE PINION BEARING ASSEMBLY |
Remove and discard the retaining ring.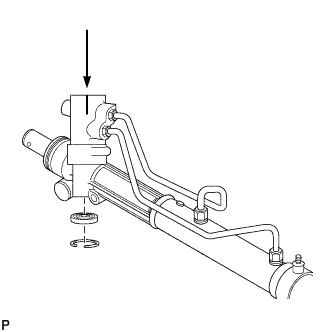
Remove the pinion bearing assembly by using a flat, blunt tool from the top of the rack and pinion housing assembly.
Discard the pinion bearing assembly.
| 10. REMOVE PINION SHAFT SEAL |
Gently tap the pinion shaft seal with flat, blunt tool from underneath.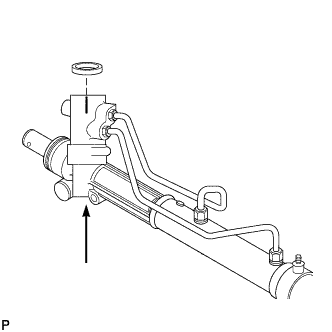
Discard the pinion shaft seal.
| 11. REMOVE STEERING RACK |
Look inside the rack and pinion housing assembly opposite of the valve end to locate the retaining ring inside the housing assembly.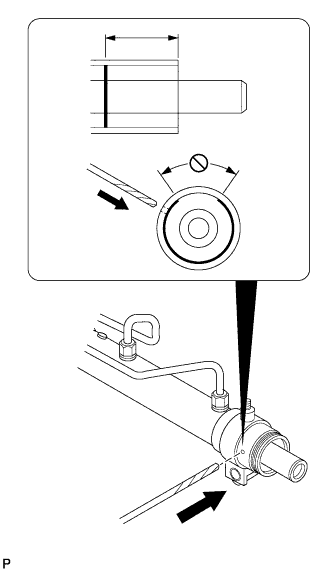
- NOTICE:
- The punch mark can be made in any location on the outside of the housing assembly but must avoid the opening section of the retaining ring.
Measure how far the retaining ring sits inside the housing assembly. Use a punch to mark on the outside of housing before drilling.
Use a 3.0 mm drill to create a hole on the outside of the housing assembly.
- NOTICE:
- Clean any metal shavings from the housing assembly before removing the retaining ring.
Place a probe in the hole from outside the housing assembly while inserting a curved-end ice pick inside the housing to locate the retaining ring. Using both tools, prise the retaining ring out of the housing assembly.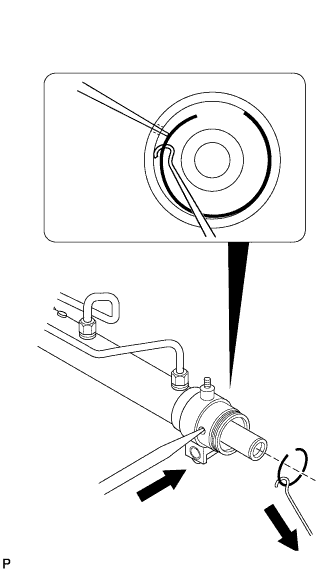
Discard the retaining ring.
Install the steering rack end sub-assembly on to the steering rack opposite the valve end to use as a handle.
Remove the steering rack from the housing assembly by pulling on the steering rack end sub-assembly.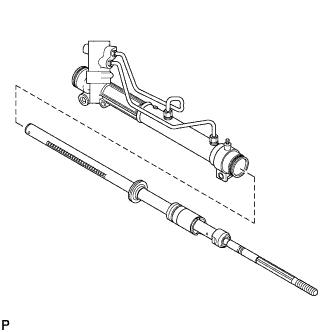
Remove the steering rack end sub-assembly from the steering rack.
| 12. REMOVE BULKHEAD AND SEALS ASSEMBLY |
Remove and discard the cylinder outer bulkhead assembly.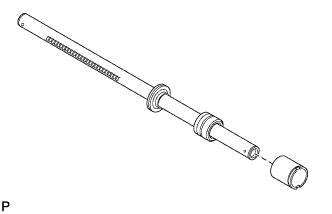
Remove and discard the bulkhead and seal assembly from the steering rack.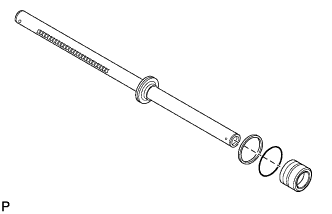
Remove and discard the O-rings from the piston.
Clean any burrs or debris from inside and outside of the rack and pinion housing assembly.
| 13. REMOVE INNER RACK SEAL |
- NOTICE:
- Do not scratch the housing assembly when using the SST.
Insert the flat end (no lip) of the SST into the rack and pinion housing assembly and gently tap on the inner rack seal and the inner rack seal insert to loosen.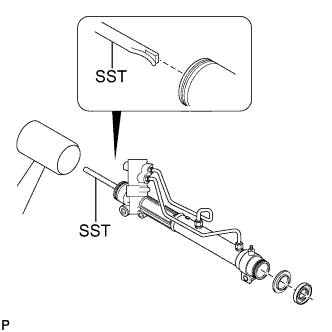
SST J34987
Using the SST, push the inner rack seal and the inner rack seal insert out of the housing assembly.
Discard the inner rack seal and the inner rack seal insert.