Headlight Cleaner Motor and Relay Circuit
Circuit diagnosis · Vehicles built from Oct 2006
DESCRIPTION
This circuit provides power to the headlight cleaner control relay.The headlight cleaner control relay receives the signal from the switch, etc., to operate the headlight cleaner motor and pump.
WIRING DIAGRAM
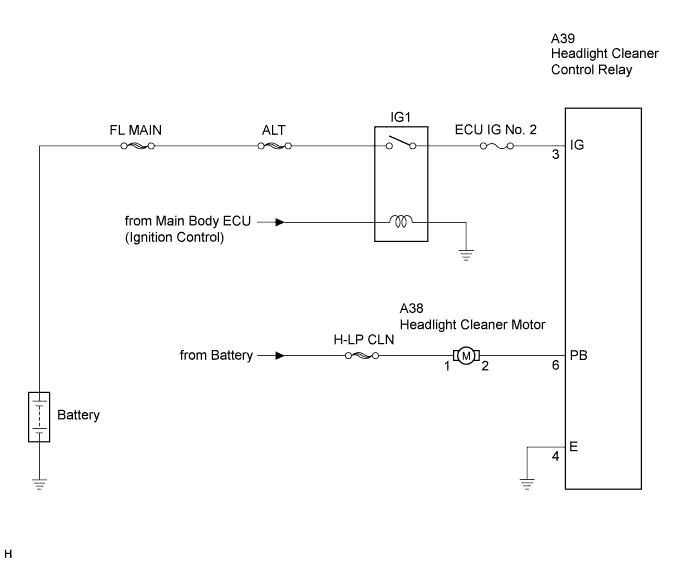

INSPECTION PROCEDURE
| 1. INSPECT FUSE (ECU IG NO. 2) |

Remove the ECU IG No. 2 fuse from the instrument panel J/B.
Measure the resistance of the fuse.
- Standard resistance:
- Below 1 Ω
|
|
||||

| OK | |
 |
| 2. INSPECT HEADLIGHT CLEANER MOTOR AND PUMP ASSEMBLY |
Disconnect the A38 headlight cleaner motor and pump assembly connector.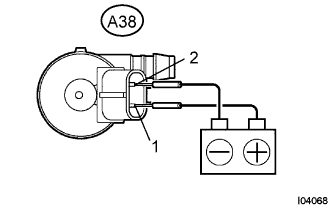
Connect the positive (+) battery lead to terminal A38-1 of the headlight cleaner motor and pump assembly, and the negative (-) battery lead to terminal A38-2.
- OK:
- Operation sounds are heard.
|
|
||||
| OK | |
|
| 3. CHECK HARNESS AND CONNECTOR (HEADLIGHT CLEANER MOTOR CIRCUIT) |
Connect the A38 headlight cleaner motor and pump assembly connector.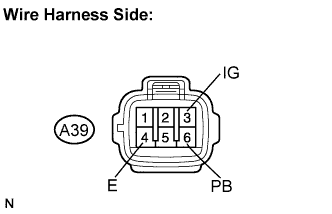
Disconnect the A39 headlight cleaner control relay connector.
Measure the voltage according to the value(s) in the table below.
- Standard voltage:
Tester Connection
Condition
Specified Condition
A39-3 (IG) - Body ground
Engine switch on (IG)
10 to 14 V
A39-6 (PB) - Body ground
Always
10 to 14 V
Measure the resistance according to the value(s) in the table below.
- Standard resistance:
Tester Connection
Condition
Specified Condition
A39-4 (E) - Body ground
Always
Below 1 Ω
|
|
||||
| OK | ||
 |
||
| ||