INSTALLATION
Removal / installation · Vehicles built Jun 2006 – Sep 2006
Versions by build date: Jun 2006 – Sep 2006 Oct 2006 – May 2009 from Jun 2009
| 1.
INSTALL LUMBAR SUPPORT ADJUSTER ASSEMBLY |
 |
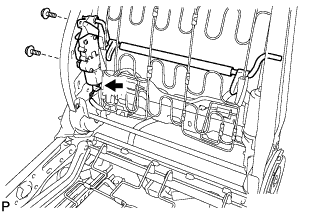
- Install the lumbar support adjuster assembly with the 2 screws.
Connect the connector.
| 2.
INSTALL FRONT SEATBACK ASSEMBLY (for Manual Seat) |
|
w/o airbag system (Click here).w/ airbag system (Click here).
| 3.
INSTALL FRONT SEATBACK ASSEMBLY (for Power Seat) |
|
w/o airbag system (Click here).w/ airbag system (Click here).
| 4.
INSTALL FRONT SEAT HEADREST SUPPORT (for Manual Seat)
|
|
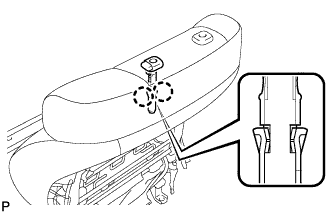
- Engage the 2 claws to install the front seat headrest support.
- HINT:
- Use the same procedure for the RH side and LH side.
| 5.
INSTALL FRONT SEAT HEADREST SUPPORT (for Power Seat)
|
|
- Engage the 2 claws to install the front seat headrest support.
- HINT:
- Use the same procedure for the RH side and LH side.
| 6.
INSTALL FRONT SEATBACK BOARD SUB-ASSEMBLY (for Manual Seat)
|
|
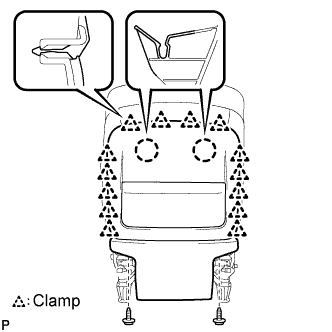
- Engage the 14 clamps.
Install the front seatback board sub-assembly with the 2 screws.
| 7.
INSTALL FRONT SEATBACK BOARD SUB-ASSEMBLY (for Power Seat)
|
|
- Engage the 2 claws.
Engage the 14 claws.
Install the front seatback board sub-assembly with the 2 screws.
| 8.
INSTALL FRONT INNER SEAT CUSHION SHIELD (for Manual Seat)
|
|
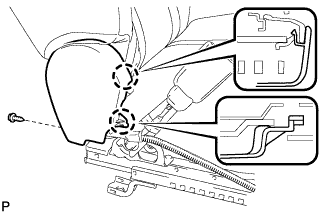
- Engage the 2 claws.
Install the front inner seat cushion shield with the screw.
| 9.
INSTALL FRONT INNER SEAT CUSHION SHIELD (for Power Seat)
|
|
- Install the front inner seat cushion shield with the screw.
Engage the 3 claws.
| 10.
INSTALL FRONT SEAT CUSHION SHIELD (for Manual Seat)
|
|
Connect the connector. (w/ lumber support)
- Engage the 2 claws.
Install the front seat cushion shield with the 2 screws.
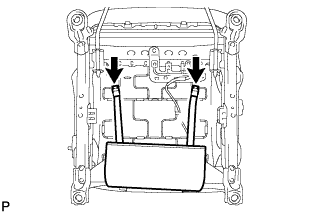
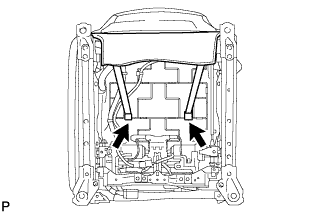
- Install the 2 rubber bands on the backside of the front seatback board sub-assembly.
| 11.
INSTALL FRONT SEAT CUSHION SHIELD ASSEMBLY (for Power Seat)
|
|
- Connect the connector.
Engage the 2 claws.
Install the front seat cushion shield assembly with the 5 screws.
- Install the 2 rubber bands on the backside of the front seatback board sub-assembly.
| 12.
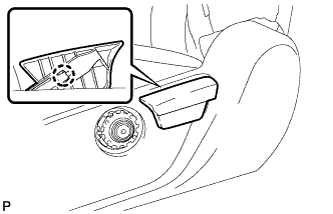
INSTALL RECLINING ADJUSTER RELEASE HANDLE (for Manual Seat)
|
|
- Engage the claw to install the reclining adjuster release handle.
| 13.
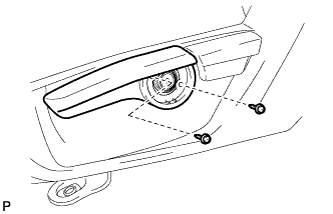
INSTALL VERTICAL ADJUSTING HANDLE (for Manual Seat)
|
|
- Install the No. 2 vertical adjusting handle with the 2 screws.
| 14.
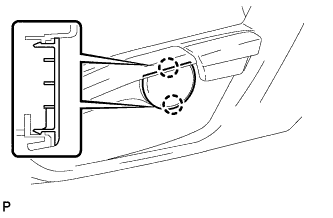
INSTALL VERTICAL ADJUSTER COVER LH (for Manual Seat)
|
|
- Engage the 2 claws to install the vertical adjuster cover.
| 15.
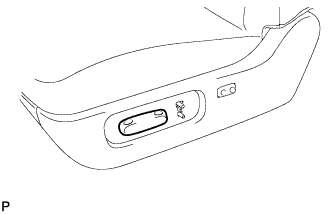
INSTALL SLIDE AND VERTICAL POWER SEAT SWITCH KNOB (for Power Seat)
|
|
- Install the slide and vertical power seat switch knob.
| 16.
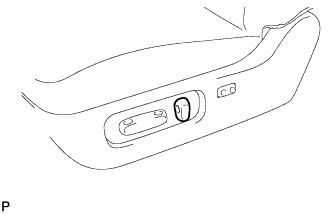
INSTALL RECLINING POWER SEAT SWITCH KNOB (for Power Seat)
|
|
- Install the reclining power seat switch knob.
| 17.
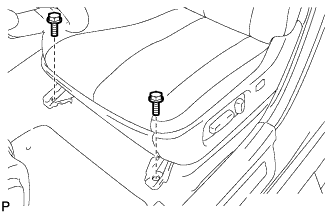
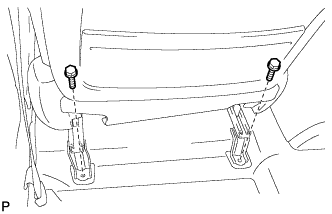
INSTALL FRONT SEAT ASSEMBLY (for Power Seat)
|
|
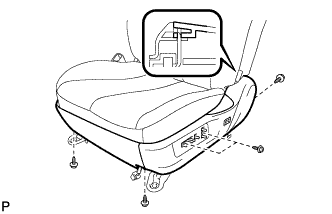
Place the seat in the cabin.
Connect the connectors under the seat.
Connect the cable to the negative (-) battery terminal.
Move the front seat assembly to the rearmost position by operating the slide and vertical power seat switch knob.
- Temporarily install the front side of the front seat assembly with the 2 bolts.
Move the front seat assembly fully forward by operating the slide and vertical power seat switch knob.
- Temporarily install the rear side of the front seat assembly with the 2 bolts.
Move the front seat assembly to the rearmost position by operating the slide and vertical power seat switch knob.
Fully tighten the 2 bolts on the front side of the front seat assembly in the order of the inner side bolt and then the outer side bolt.
-
Torque:
- 37 N*m{
377 kgf*cm
, 27 ft.*lbf
}
Move the front seat assembly fully forward by operating the slide and vertical power seat switch knob.
Fully tighten the 2 bolts on the rear side of the front seat assembly in the order of the inner side bolt and then the outer side bolt.
-
Torque:
- 37 N*m{
377 kgf*cm
, 27 ft.*lbf
}
| 18.
INSTALL INNER SEAT TRACK BRACKET COVER (for Power Seat)
|
|
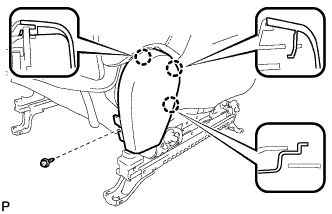
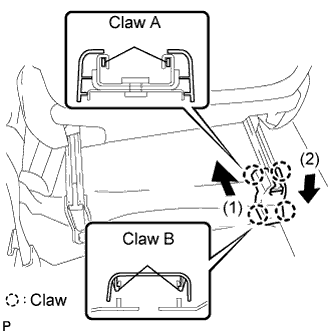
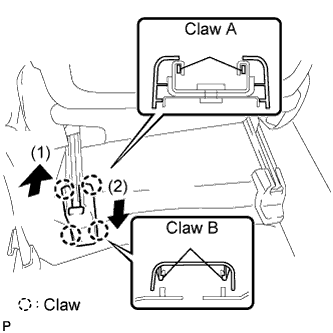
- Slide the inner seat track bracket cover along the seat rail toward the front of the vehicle. Engage claw A to the seat rail.
Push the inner seat track bracket cover to engage claw B.
| 19.
INSTALL INNER SEAT TRACK BRACKET COVER (for Manual Seat)
|
|
- Slide the inner seat track bracket cover along the seat rail toward the front of the vehicle. Engage claw A to the seat rail.
Push the inner seat track bracket cover inner to engage claw B.
| 20.
INSTALL OUTER SEAT TRACK BRACKET COVER (for Power Seat)
|
|
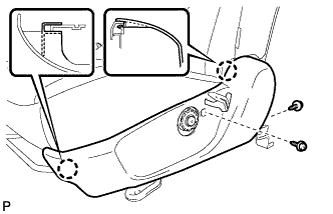
- Slide the outer seat track bracket cover along the seat rail toward the front of the vehicle. Engage claw A to the seat rail.
Push the seat track cover to engage claw B.
| 21.
INSTALL OUTER SEAT TRACK BRACKET COVER (for Manual Seat)
|
|
- Slide the outer seat track bracket cover along the seat rail toward the front of the vehicle. Engage claw A to the seat rail.
Push the outer seat track bracket cover to engage claw B.
| 22.
INSTALL FRONT SEAT HEADREST ASSEMBLY |
|
| 23.
CONNECT CABLE TO NEGATIVE BATTERY TERMINAL (for Manual Seat) |
|
| 24.
INSPECT SLIDE ADJUSTER LOCK (for Manual Seat) |
|
| 25.
INSPECT SRS WARNING LIGHT (w/ Airbag System) |
|
Inspect the SRS warning light. (Click here)
| 26.
INSPECT FRONT SEAT ASSEMBLY (for Power Seat)
|
|
Inspect the power seat operation.