Speed Signal Circuit
Circuit diagnosis · Vehicles built Jun 2006 – Sep 2006
Versions by build date: Jun 2006 – Sep 2006 Oct 2006 – May 2009 from Jun 2009
DESCRIPTION
The meter CPU receives vehicle speed signals from this circuit. The vehicle speed sensor detects the voltage that varies according to the vehicle speed. The skid control ECU supplies power to the vehicle speed sensor. The skid control ECU detects vehicle speed signals based on the pulses of the voltage. The skid control ECU transmits vehicle speed signals as pulses to the meter CPU. A voltage of 12 V is output from the combination meter assembly and then input to the skid control ECU. The signal is changed to a pulse signal at the transistor in the combination meter assembly.A voltage of 12 V or 5 V is output from each ECU or relay and then input to the combination meter assembly.
Each ECU controls the respective system based on the pulse signal.
- HINT:
- This circuit is used for another system, and is not used for combination meter operation.
WIRING DIAGRAM
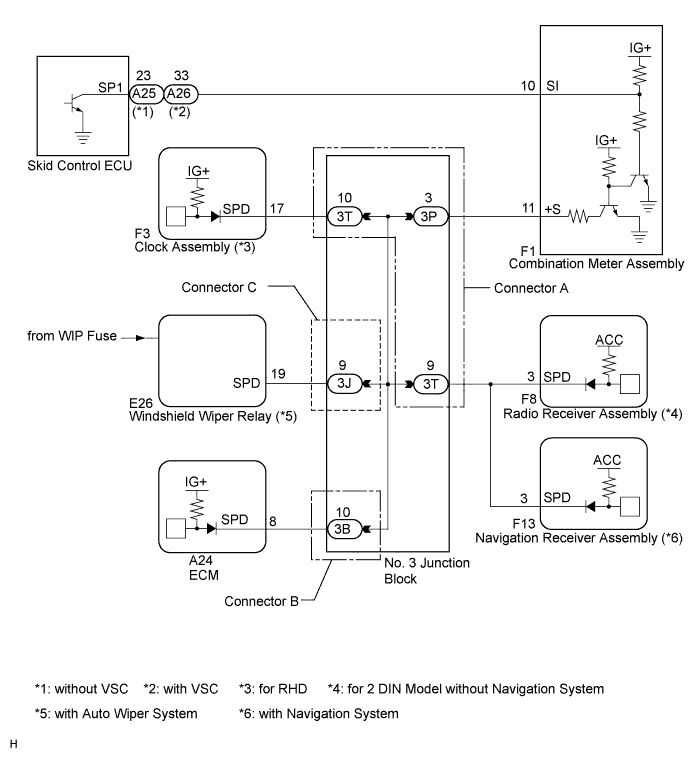

INSPECTION PROCEDURE
| 1. INSPECT COMBINATION METER ASSEMBLY (OUTPUT WAVEFORM) |

Check the waveform.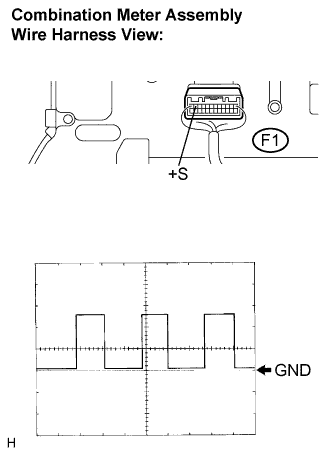
Remove the combination meter assembly with connector still connected.
Connect the oscilloscope to the terminals F1-11 (+S) and body ground.
Turn the ignition switch to the ON position.
Turn the wheel slowly.
Check the signal waveform according to the condition(s) in the table below.
Item
Condition
Tool setting
5 V/DIV., 20 ms./DIV.
Vehicle condition
Driving at approx. 20 km/h (12 mph)
- OK:
- The waveform is displayed as shown in the illustration.
- HINT:
- As the vehicle speed increases, the cycle of the waveform narrows.
|
|
||||

| OK | ||
 |
||
| ||
| 2. INSPECT ECU TERMINAL VOLTAGE (INPUT VOLTAGE) |
Remove the F1 connector.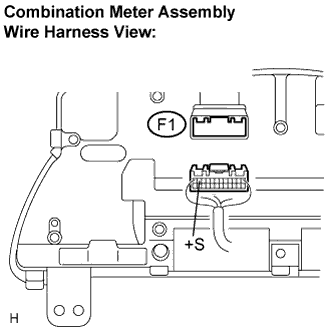
Measure the voltage according to the value(s) in the table below.
- Standard voltage:
Tester Connection
Condition
Specified Condition
F1-11 (+S) - Body ground
Turn the ignition switch to the ON position
4.5 to 14 V
- HINT:
- If any of the ECUs specified in the wiring diagram supplied power to the combination meter, the combination meter will output a waveform.
|
|
||||
| OK | |
 |
| 3. INSPECT COMBINATION METER ASSEMBLY (OUTPUT VOLTAGE) |
Remove the A25 (*1)/A26 (*2) connector.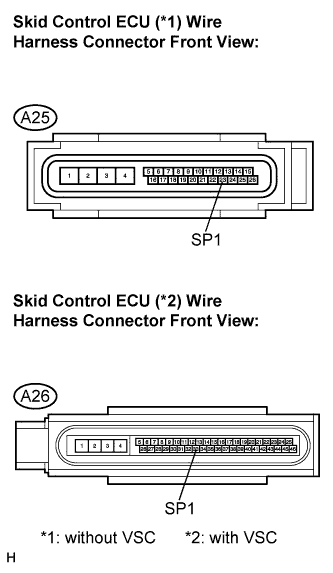
Measure the voltage according to the value(s) in the table below.
- Standard voltage:
Tester Connection
Condition
Specified Condition
A25-23 (SP1) (*1) - Body ground
Turn the ignition switch to the ON position
10 to 14 V
A26-33 (SP1) (*2) - Body ground
Turn the ignition switch to the ON position
10 to 14 V
|
|
||||
| OK | |
|
| 4. INSPECT SKID CONTROL ECU (OUTPUT WAVEFORM) |
Check the waveform.
Reconnect the A25 (*1)/A26 (*2) connector.
Remove the combination meter assembly with connector still connected.
Connect the oscilloscope to the terminals F1-10 (SI) and body ground.
Turn the ignition switch to the ON position.
Turn the wheel slowly.
Check the signal waveform according to the condition(s) in the table below.
*1: without VSC*2: with VSCItem
Condition
Tool setting
5 V/DIV., 20 ms./DIV.
Vehicle condition
Driving at approx. 20 km/h (12 mph)
- OK:
- The waveform is displayed as shown in the illustration.
- HINT:
- As the vehicle speed increases, the cycle of the waveform narrows.
|
|
||||

| OK | ||
|
||
| ||
| 5. CHECK HARNESS AND CONNECTOR (COMBINATION METER - NO. 3 JUNCTION BLOCK) |
Disconnect the A No. 3 junction block connector.
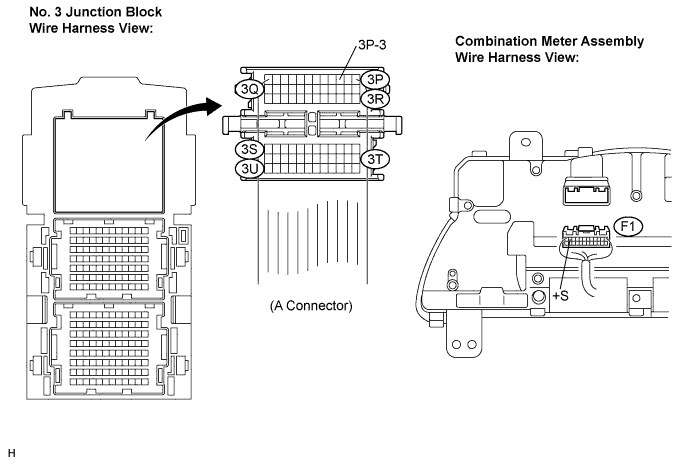
Measure the resistance according to the value(s) in the table below.
- Standard resistance:
Tester Connection
Condition
Specified Condition
F1-11 (+S) - 3P-3
Always
Below 1 Ω
F1-11 (+S) - Body ground
Always
10 kΩ or higher
|
|
||||
| OK | |
|
| 6. CHECK HARNESS AND CONNECTOR (NO. 3 JUNCTION BLOCK) |
Inspect for a short in the circuit that connected the No. 3 junction block shown in the wiring diagram.
- HINT:
- If voltage is not present, the circuit (ECU) was possibly the malfunctioning circuit. This is the circuit that will be diagnosed by following the A step that follows.
Disconnect the B and C No. 3 junction block connectors.
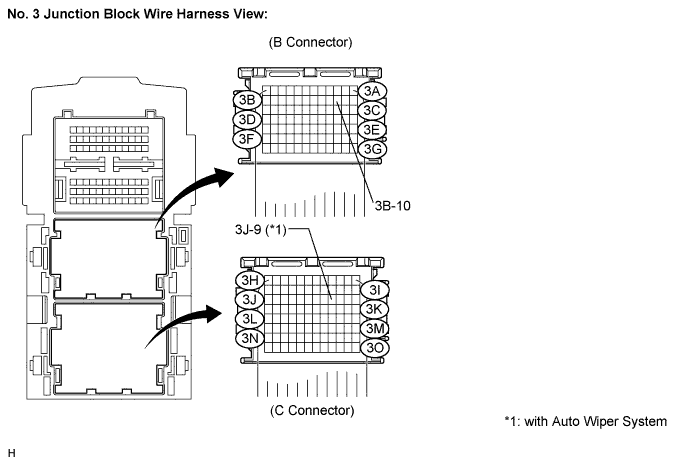
Measure the voltage according to the value(s) in the table below.
- Standard voltage:
Tester Connection
Condition
Specified Condition
3B-10 - Body ground
Turn the ignition switch to the ON position
4.5 to 14 V
3J-9 (*1) - Body ground
Turn the ignition switch to the ON position
4.5 to 14 V
Reconnect the B and C No. 3 junction block connector.
Disconnect the A No. 3 junction block connector.
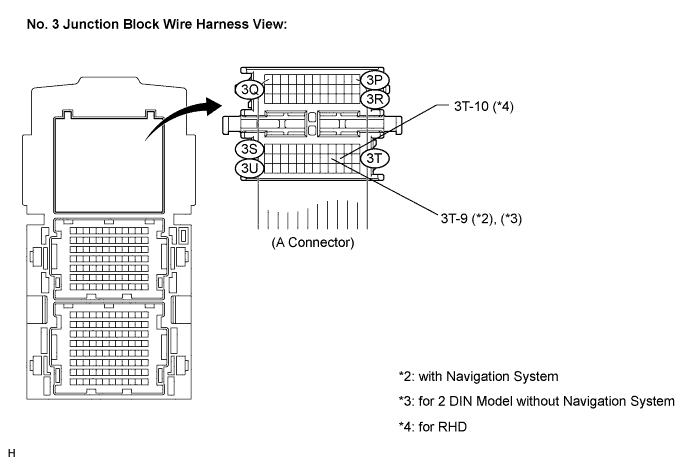
Measure the voltage according to the value(s) in the table below.
- Standard voltage:
Tester Connection
Condition
Specified Condition
3T-9 (*2), (*3) - Body ground
Turn the ignition switch to the ON position
4.5 to 14 V
3T-10 (*4) - Body ground
Turn the ignition switch to the ON position
4.5 to 14 V
- Result:
Result
Proceed to
Voltage is not present in one circuit
A
Voltage is present in all the circuit.
B
|
|
||||
| A | |
|
| 7. CHECK HARNESS AND CONNECTOR (NO. 3 JUNCTION BLOCK - MALFUNCTIONING CIRCUIT) |
Disconnect the ECU connector that is possibly the malfunctioning.
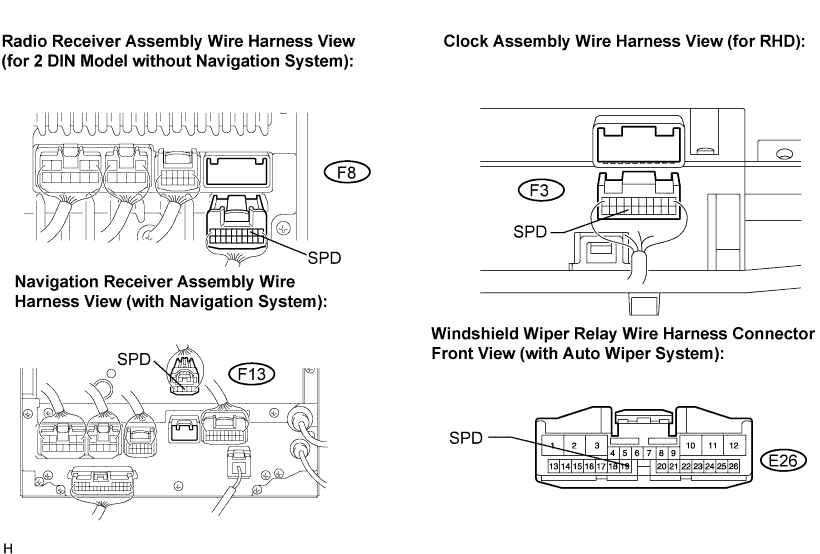
Measure the resistance according to the value(s) in the table below.
Measure the resistance according to the value(s) in the table below.
- Standard resistance:
Tester Connection
Condition
Specified Condition
F8-3 (SPD) (*1) - Body ground
Always
10 kΩ or higher
F13-3 (SPD) (*2) - Body ground
Always
10 kΩ or higher
E26-19 (SPD) (*3) - Body ground
Always
10 kΩ or higher
F3-17 (SPD) (*4) - Body ground
Always
10 kΩ or higher
- HINT:
- If an inspected wire harness is connected to another junction connector or junction block, measure the voltage and check wire harness and connector in each circuit.
Measure the resistance according to the value(s) in the table below.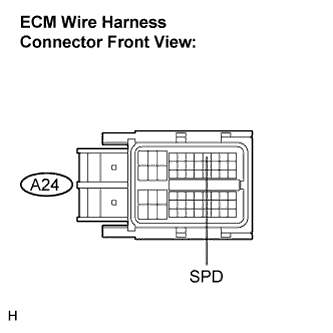
- Standard resistance:
Tester Connection
Condition
Specified Condition
A24-8 (SPD) - Body ground
Always
10 kΩ or higher
|
|
||||
| OK | ||
|
||
| ||
| 8. CHECK HARNESS AND CONNECTOR (COMBINATION METER - SKID CONTROL ECU) |
Disconnect the F1 connector.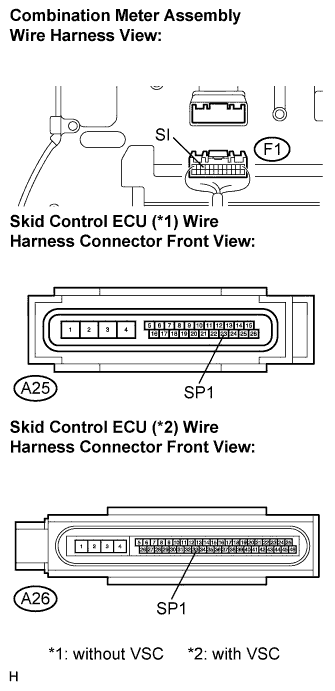
Measure the resistance according to the value(s) in the table below.
- Standard resistance:
Tester Connection
Condition
Specified Condition
A25-23 (SP1) (*1) - F1-10 (SI)
Always
Below 1 Ω
A25-23 (SP1) (*1) - Body ground
Always
10 kΩ or higher
A26-33 (SP1) (*2) - F1-10 (SI)
Always
Below 1 Ω
A26-12 (SP1) (*2) - Body ground
Always
10 kΩ or higher
|
|
||||
| OK | ||
|
||
| ||