2006-2011 Camry Aurion · Service Manual RESTRAINTS

INSTALLATION

Removal / installation · Vehicles built from Jun 2009

Versions by build date: Jun 2006 – Sep 2006 Oct 2006 – May 2009 from Jun 2009


1. INSTALL SEAT POSITION SENSOR (for Power Seat)
  1. Check that the ignition switch is off.

  1. Check that the negative battery (-) cable is disconnected.

    CAUTION:
    Wait for 90 seconds after disconnecting the cable to prevent airbag deployment.

  1. C133893E01
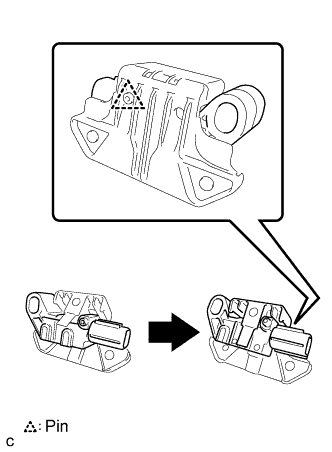
    Engage the pin and install the seat position sensor to the seat slide position sensor protector as shown in the illustration.

  1. C107067E08
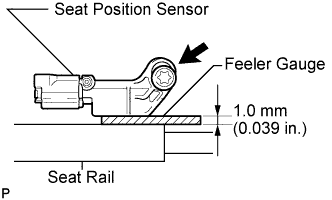
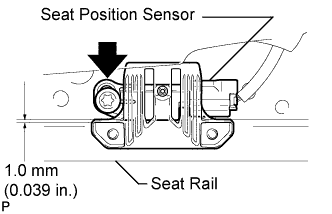
    Using a 1.0 mm (0.039 in.) feeler gauge, temporarily install the seat position sensor.

    NOTICE:
    1. If the seat position sensor has been dropped, or there are any cracks, dents or other defects in the case or connector, replace the seat position sensor with a new one.
    2. When installing the seat position sensor, be careful that the SRS wiring does not interfere with other parts and that it is not pinched between other parts.

    HINT:
    Be sure that the clearance between the seat position sensor and the seat rail is within 0.6 mm (0.024 in.) to 2.0 mm (0.079 in.).

  1. C133891
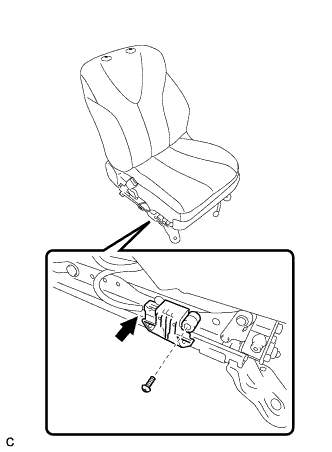
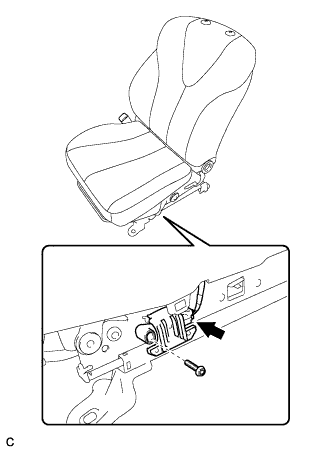
    Using a "TORX" socket (T30), tighten the "TORX" screw to install the seat position sensor.

    Torque:
    8.0 N*m{ 82 kgf*cm , 71 in.*lbf }

  1. Make sure that the clearance between the seat position sensor and the seat rail is within 0.6 mm (0.024 in.) to 2.0 mm (0.079 in.).

  1. Check that there is no looseness in the installation parts of the seat position sensor.

  1. Connect the connector.


2. INSTALL SEAT POSITION SENSOR (for Manual Seat)
  1. Check that the ignition switch is off.

  1. Check that the negative battery (-) cable is disconnected.

    CAUTION:
    Wait for 90 seconds after disconnecting the cable to prevent airbag deployment.

  1. C133902E01
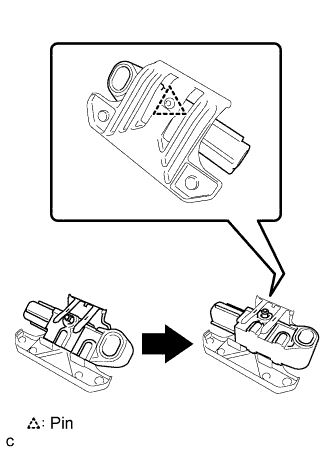
    Engage the pin and install the seat position sensor to the seat slide position sensor protector as shown in the illustration.

  1. C125585E06
    Using a 1.0 mm (0.039 in.) feeler gauge, temporarily install the seat position sensor.

    NOTICE:
    1. If the seat position sensor has been dropped, or there are any cracks, dents or other defects in the case or connector, replace the seat position sensor with a new one.
    2. When installing the seat position sensor, be careful that the SRS wiring does not interfere with other parts and that it is not pinched between other parts.

    HINT:
    Be sure that the clearance between the seat position sensor and the seat rail is within 0.6 mm (0.024 in.) to 2.0 mm (0.079 in.).

  1. C133900
    Using a "TORX" socket (T30), tighten the "TORX" screw to install the seat position sensor.

    Torque:
    8.0 N*m{ 82 kgf*cm , 71 in.*lbf }

  1. Make sure that the clearance between the seat position sensor and the seat rail is within 0.6 mm (0.024 in.) to 2.0 mm (0.079 in.).

  1. Check that there is no looseness in the installation parts of the seat position sensor.

  1. Connect the connector.


3. INSTALL FRONT SEAT CUSHION SHIELD (for Manual Seat)
  1. Connect the connector. (w/ lumber support)

  1. B149580
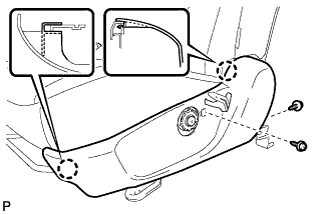
    Engage the 2 claws.

  1. Install the front seat cushion shield with the 2 screws.

  1. B153813
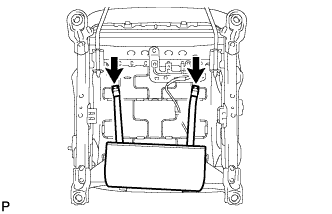
    Install the 2 rubber bands on the backside of the front seatback board sub-assembly.


4. INSTALL RECLINING ADJUSTER RELEASE HANDLE (for Manual Seat)

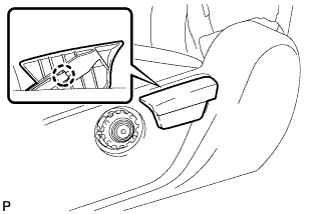
  1. B148952
    Engage the claw to install the reclining adjuster release handle.


5. INSTALL VERTICAL ADJUSTING HANDLE (for Manual Seat)

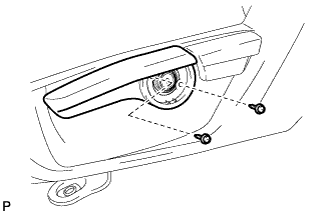
  1. B139104
    Install the No. 2 vertical adjusting handle with the 2 screws.


6. INSTALL VERTICAL ADJUSTER COVER LH (for Manual Seat)

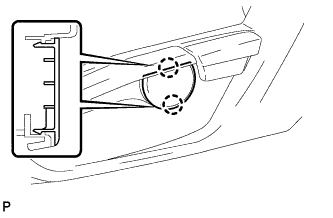
  1. B148953
    Engage the 2 claws to install the vertical adjuster cover.


7. INSTALL FRONT SEAT ASSEMBLY LH (for Power Seat)
for 2AZ-FE: (Click here)
for 2GR-FE: (Click here)

8. INSTALL INNER SEAT TRACK BRACKET COVER LH (for Power Seat)
for 2AZ-FE: (Click here)
for 2GR-FE: (Click here)

9. INSTALL OUTER SEAT TRACK BRACKET COVER LH (for Power Seat)
for 2AZ-FE: (Click here)
for 2GR-FE: (Click here)

10. INSTALL FRONT SEAT HEADREST ASSEMBLY (for Power Seat)

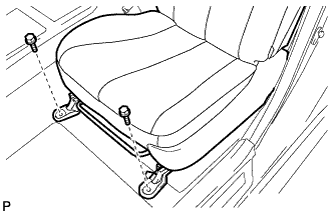
11. INSTALL FRONT SEAT ASSEMBLY LH (for Manual Seat)
  1. Place the front seat assembly in the vehicle and align the adjuster pin with the hole on the vehicle side.

  1. Connect the connector and clamp.

  1. Move the front seat assembly to the rearmost position by operating the slide handle.

    NOTICE:
    Check that the seat is locked.

  1. B139101
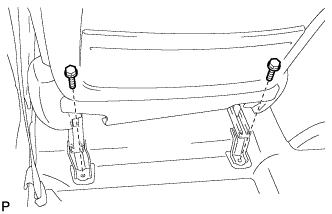
    Temporarily install the front seat track bracket with the 2 bolts.

  1. Move the front seat assembly fully forward by operating the slide handle.

    NOTICE:
    Check that the seat is locked.

  1. B139102
    Temporarily install the rear seat track bracket with the 2 bolts.

  1. Move the front seat assembly to the rearmost position by operating the slide handle.

    NOTICE:
    Check that the seat is locked.

  1. Fully tighten the 2 bolts on the front seat track bracket in the order of the inner side bolt and then the outer side bolt.

    Torque:
    37 N*m{ 377 kgf*cm , 27 ft.*lbf }

  1. Move the front seat assembly fully forward by operating the slide handle.

    NOTICE:
    Check that the seat is locked.

  1. Fully tighten the 2 bolts on the rear seat track bracket in the order of the inner side bolt and then the outer side bolt.

    Torque:
    37 N*m{ 377 kgf*cm , 27 ft.*lbf }


12. INSTALL INNER SEAT TRACK BRACKET COVER LH (for Manual Seat)

  1. B149588E01
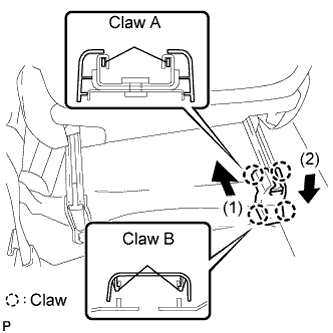
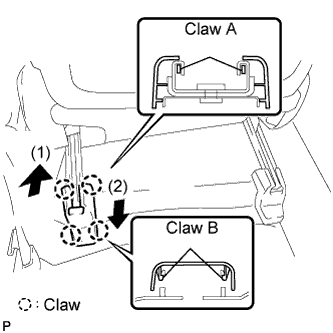
    Slide the inner seat track bracket cover along the seat rail toward the front of the vehicle. Engage claw A to the seat rail.

  1. Push the inner seat track bracket cover inner to engage claw B.


13. INSTALL OUTER SEAT TRACK BRACKET COVER LH (for Manual Seat)

  1. B149587E01
    Slide the outer seat track bracket cover along the seat rail toward the front of the vehicle. Engage claw A to the seat rail.

  1. Push the outer seat track bracket cover to engage claw B.


14. INSTALL FRONT SEAT HEADREST ASSEMBLY (for Manual Seat)

15. CONNECT CABLE TO NEGATIVE BATTERY TERMINAL (for Manual Seat)

16. INSPECT FRONT SEAT ASSEMBLY (for Power Seat)
for 2AZ-FE: (Click here)
for 2GR-FE: (Click here)

17. INSPECT SLIDE ADJUSTER LOCK (for Manual Seat)

18. INSPECT SRS WARNING LIGHT
  1. Inspect the SRS warning light (Click here).

← INSTALLATION (Oct 2006 – May 2009)COMPONENTS (from Jun 2006) →