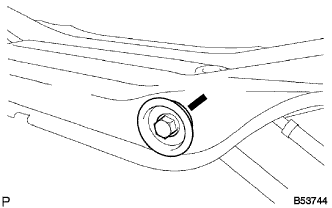
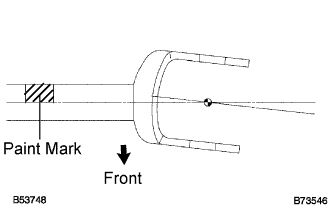
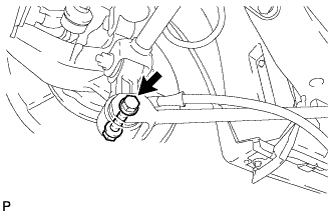
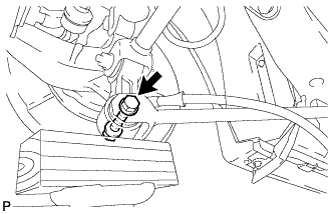
Install the rear No. 1 suspension arm (inner side) with the bolt, and temporarily tighten the bolt.
HINT:
Ensure that the paint mark faces the rear of the vehicle.
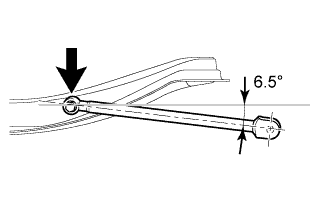
Set the rear No.1 suspension arm in the position shown in the illustration, and fully tighten the bolt.
Torque:
100 N*m{
1,020 kgf*cm
, 74 ft.*lbf
}
2.
INSTALL REAR SUSPENSION MEMBER SUB-ASSEMBLY (w/ Sport Suspension)
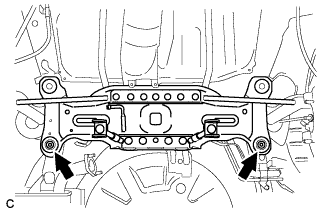
Raise the rear suspension member sub-assembly with a jack.
Install the rear suspension member sub-assembly with the 4 differential support member cushions.
Install the 2 rear suspension member lower stoppers and 2 bolts.
Torque:
56 N*m{
571 kgf*cm
, 41 ft.*lbf
}
3.
REMOVE REAR SUSPENSION MEMBER SUB-ASSEMBLY
Raise the rear suspension member sub-assembly with a jack.
Install the rear suspension member sub-assembly with the 2 rear suspension member lower stoppers and 2 bolts.
Torque:
56 N*m{
571 kgf*cm
, 41 ft.*lbf
}
4.
INSTALL REAR SUSPENSION MEMBER LOWER STOPPER LH
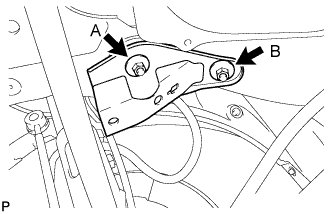
Install the rear suspension member lower stopper LH with the 2 nuts.
Torque:
Nut A:
55 N*m{
561 kgf*cm
, 41 ft.*lbf
}
Nut B:
38 N*m{
388 kgf*cm
, 28 ft.*lbf
}
5.
INSTALL REAR SUSPENSION MEMBER LOWER STOPPER RH
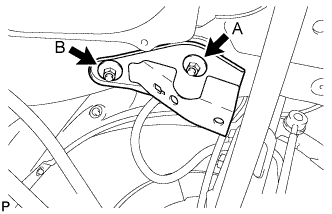
Install the rear suspension member lower stopper RH with the 2 nuts.
Torque:
Nut A:
55 N*m{
561 kgf*cm
, 41 ft.*lbf
}
Nut B:
38 N*m{
388 kgf*cm
, 28 ft.*lbf
}
6.
TEMPORARILY TIGHTEN REAR NO. 1 SUSPENSION ARM LH
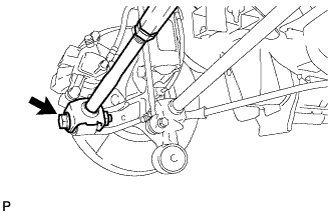
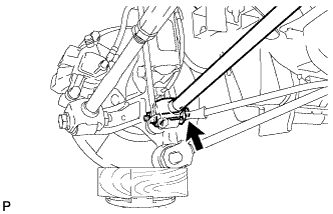
Connect the rear No. 1 suspension arm (outer side) to the rear axle carrier with the bolt and nut, and temporarily tighten the bolt and nut.
NOTICE:
When temporarily tightening the bolt, keep the nut from rotating.
HINT:
Insert the bolt from the front of the vehicle and temporarily install the bolt.
7.
TEMPORARILY TIGHTEN REAR NO. 1 SUSPENSION ARM RH
HINT:
Perform the same procedures as for the LH side.
8.
TEMPORARILY TIGHTEN REAR NO. 2 SUSPENSION ARM LH
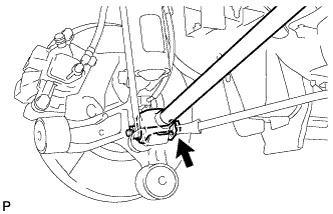
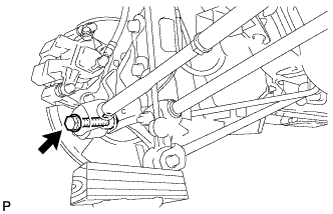
Connect the rear No. 2 suspension arm (outer side) to the rear axle carrier with the bolt and nut, and temporarily tighten the bolt.
NOTICE:
When temporarily tightening the bolt, keep the nut from rotating.
HINT:
Insert the bolt from the rear of the vehicle and temporarily install the bolt.
9.
TEMPORARILY TIGHTEN REAR NO. 2 SUSPENSION ARM RH
HINT:
Perform the same procedures as for the LH side.
10.
TEMPORARILY TIGHTEN REAR STRUT ROD LH
Connect the rear strut rod assembly LH (rear side) to the axle carrier with the bolt and nut, and temporarily tighten the bolt.
NOTICE:
When temporarily tightening the bolt, keep the nut from rotating.
HINT:
Insert the bolt from the inside of the vehicle and temporarily install the bolt.
11.
TEMPORARILY TIGHTEN REAR STRUT ROD RH
HINT:
Perform the same procedures as for the LH side.
12.
STABILIZE SUSPENSION
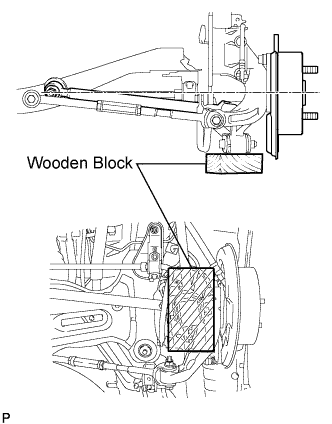
Jack up the rear axle carrier, placing a wooden block to avoid damage. Apply load to the suspension so that the installed bolt of the rear No. 1 suspension arm (inner side) is horizontally aligned with the center of the rear axle hub.
13.
FULLY TIGHTEN REAR NO. 1 SUSPENSION ARM LH
Fully tighten the bolt.
Torque:
100 N*m{
1,020 kgf*cm
, 74 ft.*lbf
}
14.
FULLY TIGHTEN REAR NO. 1 SUSPENSION ARM RH
HINT:
Perform the same procedures as for the LH side.
15.
FULLY TIGHTEN REAR NO. 2 SUSPENSION ARM LH
Fully tighten the bolt.
Torque:
100 N*m{
1,020 kgf*cm
, 74 ft.*lbf
}
16.
FULLY TIGHTEN REAR NO. 2 SUSPENSION ARM RH
HINT:
Perform the same procedures as for the LH side.
17.
FULLY TIGHTEN REAR STRUT ROD LH
Fully tighten the bolt.
Torque:
113 N*m{
1,152 kgf*cm
, 83 ft.*lbf
}
18.
FULLY TIGHTEN REAR STRUT ROD RH
HINT:
Perform the same procedures as for the LH side.
19.
INSTALL NO. 2 REAR STABILIZER BAR BRACKET
Install the No. 2 rear stabilizer bar bracket.
20.
INSTALL NO. 1 REAR STABILIZER BAR BRACKET
Install the No. 1 rear stabilizer bar bracket.
21.
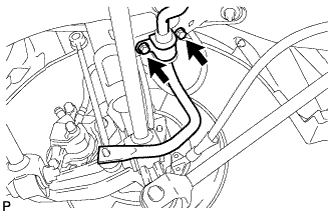
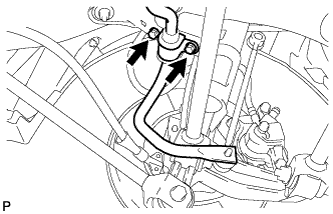
INSTALL REAR STABILIZER BAR
Install the rear stabilizer bar with the 2 bolts. (LH Side)
Torque:
31 N*m{
316 kgf*cm
, 23 ft.*lbf
}
Install the rear stabilizer bar with the 2 bolts. (RH Side)
Torque:
31 N*m{
316 kgf*cm
, 23 ft.*lbf
}
22.
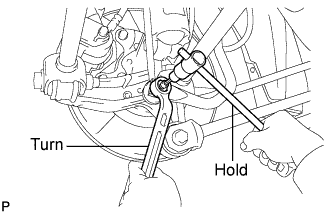
INSTALL REAR STABILIZER LINK ASSEMBLY LH
Connect the rear stabilizer link assembly LH with the nut.
Torque:
39 N*m{
398 kgf*cm
, 29 ft.*lbf
}
HINT:
If the ball joint turns together with the nut, use a hexagon wrench (5 mm) to hold the stud.
23.
INSTALL REAR STABILIZER LINK ASSEMBLY RH
HINT:
Perform the same procedures as for the LH side.
24.
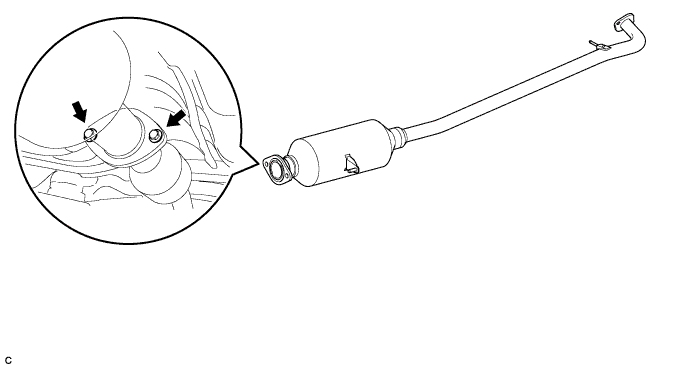
INSTALL CENTER EXHAUST PIPE ASSEMBLY
Install a new gasket onto the front exhaust pipe.
Install the center exhaust pipe assembly with the 2 bolts and 2 nuts.
Torque:
56 N*m{
571 kgf*cm
, 41 ft.*lbf
}
25.
INSTALL REAR WHEELS
Torque:
103 N*m{
1050 kgf*cm
, 76 ft.*lbf
}
26.
INSPECT FOR EXHAUST GAS LEAK
If gas is leaking, tighten the areas necessary to stop the leak. Replace the damaged parts as necessary.