TERMINALS OF ECU
System information · Vehicles built from Jun 2009
| REAR TELEVISION CAMERA ASSEMBLY (for 2AZ-FE) |


Disconnect the S22 connector from the rear television camera assembly.
Measure the voltage of each terminal of the wire harness side connector.
If the result is not as specified, there may be a malfunction on the wire harness side.Terminal No. (Symbol)
Wiring Color
Terminal Description
Condition
Specified Condition
S22-1 (CGND) - Body ground
Shield - Body ground
Ground
Always
Below 1 V
S22-5 (CB+) - S22-1 (CGND)
B - Shield
Power source
Ignition switch on (IG)
Shift lever in R
5.5 to 7.0 V
Reconnect the S22 connector to the rear television camera assembly.
Check for pulses between each terminal of the connector.
If the result is not as specified, the camera may have a malfunction.Terminal No. (Symbol)
Wiring Color
Terminal Description
Condition
Specified Condition
S22-6 (CV+) - S22-2 (CV-)
R - W
Display signal
Ignition switch on (IG)
Shift lever in R
Under normal conditions
Pulse generation
(See waveform 1)
Ignition switch on (IG)
Shift lever in R
Camera lens covered, blacking out screen
Pulse generation
(See waveform 2)
Reference (Oscilloscope waveform):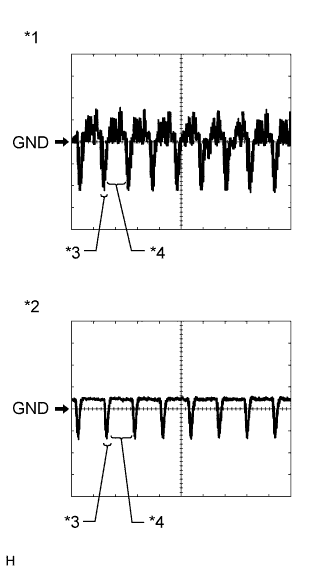
Waveform 1 (under normal conditions)
Item
Content
Terminal No. (Symbol)
S22-6 (CV+) - S22-2 (CV-)
Tool Setting
200 mV/DIV., 50 μsec./DIV.
Condition
Ignition switch on (IG), shift lever in R
- HINT:
- The video waveform changes according to the image sent by the rear television camera assembly.
Waveform 2 (camera lens is covered, blacking out the screen)
Item
Content
Terminal No. (Symbol)
S22-6 (CV+) - S22-2 (CV-)
Tool Setting
200 mV/DIV., 50 μsec./DIV.
Condition
Ignition switch on (IG), shift lever in R
- HINT:
- The video waveform changes according to the image sent by the rear television camera assembly.
Text in Illustration *1
Waveform 1 (under normal conditions)
*2
Waveform 2 (camera lens is covered, blacking out the screen)
*3
Synchronized Signal
*4
Video Waveform
| REAR TELEVISION CAMERA ASSEMBLY (for 2GR-FE) |

Disconnect the S17 connector from the rear television camera assembly.
Measure the voltage of each terminal of the wire harness side connector.
If the result is not as specified, there may be a malfunction on the wire harness side.Terminal No. (Symbol)
Wiring Color
Terminal Description
Condition
Specified Condition
S17-3 (CGND) - Body ground
Shield - Body ground
Ground
Always
Below 1 V
S17-4 (CB+) - S17-3 (CGND)
B - Shield
Power source
Ignition switch on (IG)
Shift lever in R
5.5 to 7.0 V
Reconnect the S17 connector to the rear television camera assembly.
Check for pulses between each terminal of the connector.
If the result is not as specified, the camera may have a malfunction.Terminal No. (Symbol)
Wiring Color
Terminal Description
Condition
Specified Condition
S17-2 (CV+) - S17-1 (CV-)
R - W
Display signal
Ignition switch on (IG)
Shift lever in R
Under normal conditions
Pulse generation
(See waveform 1)
Ignition switch on (IG)
Shift lever in R
Camera lens covered, blacking out screen
Pulse generation
(See waveform 2)
Reference (Oscilloscope waveform):
Waveform 1 (under normal conditions)
Item
Content
Terminal No. (Symbol)
S17-2 (CV+) - S17-1 (CV-)
Tool Setting
200 mV/DIV., 50 μsec./DIV.
Condition
Ignition switch on (IG), shift lever in R
- HINT:
- The video waveform changes according to the image sent by the rear television camera assembly.
Waveform 2 (camera lens is covered, blacking out the screen)
Item
Content
Terminal No. (Symbol)
S17-2 (CV+) - S17-1 (CV-)
Tool Setting
200 mV/DIV., 50 μsec./DIV.
Condition
Ignition switch on (IG), shift lever in R
- HINT:
- The video waveform changes according to the image sent by the rear television camera assembly.
Text in Illustration *1
Waveform 1 (under normal conditions)
*2
Waveform 2 (camera lens is covered, blacking out the screen)
*3
Synchronized Signal
*4
Video Waveform
| RADIO AND DISPLAY ASSEMBLY (Click here) |