Reverse Signal Circuit
Circuit diagnosis · Vehicles built from Jun 2009
DESCRIPTION
The radio and display assembly receives the reverse signal from the park/neutral position switch assembly (for Automatic Transaxle) or back-up light switch assembly (for Manual Transaxle).WIRING DIAGRAM
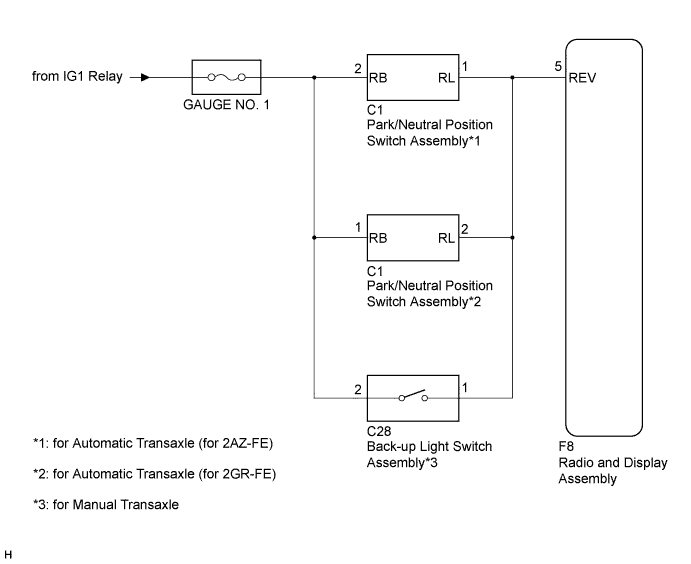

INSPECTION PROCEDURE
| 1. CHECK RADIO AND DISPLAY ASSEMBLY (REVERSE SIGNAL INPUT) |

Disconnect the F8 connector from the radio and display assembly.
Measure the voltage according to the value(s) in the table below.
- Standard Voltage:
Tester Connection
Condition
Specified Condition
F8-5 (REV) - Body ground
Ignition switch on (IG), shift lever in R
7 V or higher
|
|
||||

| OK | ||
 |
||
| ||
| 2. CONFIRM MODEL |
Choose the model to be inspected.
- Result:
Model
Proceed to
for A/T (for 2AZ-FE)
A
for A/T (for 2GR-FE)
B
for M/T
C
|
|
||||
|
|
||||
| A | |
 |
| 3. CHECK HARNESS AND CONNECTOR (RADIO AND DISPLAY ASSEMBLY - PARK/NEUTRAL POSITION SWITCH) |
Disconnect the F8 connector from the radio and display assembly.
Disconnect the C1 connector from the park/neutral position switch assembly.
Measure the resistance according to the value(s) in the table below.
- Standard Resistance:
Tester Connection
Condition
Specified Condition
F8-5 (REV) - C1-1 (RL)
Always
Below 1 Ω
F8-5 (REV) - Body ground
Always
10 kΩ or higher
|
|
||||

| OK | |
|
| 4. INSPECT PARK/NEUTRAL POSITION SWITCH ASSEMBLY |
Remove the park/neutral position switch assembly (Click here).
Measure the resistance according to the value(s) in the table below.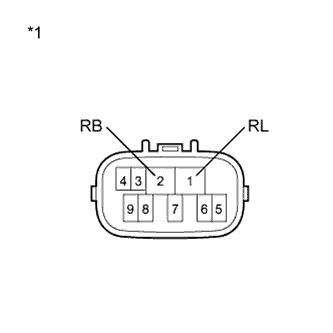
- Standard Resistance:
Tester Connection
Condition
Specified Condition
1 (RL) - 2 (RB)
Shift lever in R
Below 1 Ω
1 (RL) - 2 (RB)
Shift lever in any position except R
10 kΩ or higher
Text in Illustration *1
Component without harness connected
(Park/Neutral Position Switch Assembly)
|
|
||||
| OK | ||
|
||
| ||
| 5. CHECK HARNESS AND CONNECTOR (RADIO AND DISPLAY ASSEMBLY - PARK/NEUTRAL POSITION SWITCH) |
Disconnect the F8 connector from the radio and display assembly.
Disconnect the C1 connector from the park/neutral position switch assembly.
Measure the resistance according to the value(s) in the table below.
- Standard Resistance:
Tester Connection
Condition
Specified Condition
F8-5 (REV) - C1-2 (RL)
Always
Below 1 Ω
F8-5 (REV) - Body ground
Always
10 kΩ or higher
|
|
||||
| OK | |
|
| 6. INSPECT PARK/NEUTRAL POSITION SWITCH ASSEMBLY |
Remove the park/neutral position switch assembly (Click here).
Measure the resistance according to the value(s) in the table below.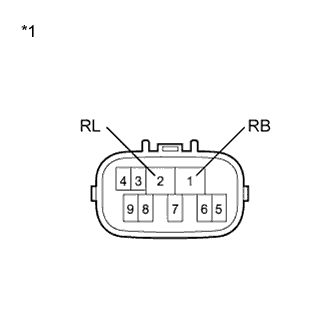
- Standard Resistance:
Tester Connection
Condition
Specified Condition
2 (RL) - 1 (RB)
Shift lever in R
Below 1 Ω
2 (RL) - 1 (RB)
Shift lever in any position except R
10 kΩ or higher
Text in Illustration *1
Component without harness connected
(Park/Neutral Position Switch Assembly)
|
|
||||
| OK | ||
|
||
| ||
| 7. CHECK HARNESS AND CONNECTOR (RADIO AND DISPLAY ASSEMBLY - BACK-UP LIGHT SWITCH) |
Disconnect the F8 connector from the radio and display assembly.
Disconnect the C28 connector from the back-up light switch assembly.
Measure the resistance according to the value(s) in the table below.
- Standard Resistance:
Tester Connection
Condition
Specified Condition
F8-5 (REV) - C28-1
Always
Below 1 Ω
F8-5 (REV) - Body ground
Always
10 kΩ or higher
|
|
||||
| OK | |
|
| 8. INSPECT BACK-UP LIGHT SWITCH ASSEMBLY |
Remove the back-up light switch assembly.
Measure the resistance according to the value(s) in the table below.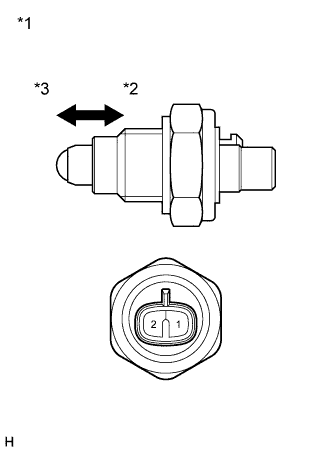
- Standard Resistance:
Tester Connection
Switch Condition
Specified Condition
1 - 2
Pushed
Below 1 Ω
1 - 2
Released
10 kΩ or higher
Text in Illustration *1
Component without harness connected
(Back-up Light Switch Assembly)
*2
Pushed
*3
Released
|
|
||||
| OK | ||
|
||
| ||