Home › TRANSMISSION › CLUTCH › CLUTCH MASTER CYLINDERINSTALLATION
Removal / installation · Vehicles built Jun 2006 – Sep 2006
Versions by build date: Jun 2006 – Sep 2006 Oct 2006 – May 2009 from Jun 2009
1.
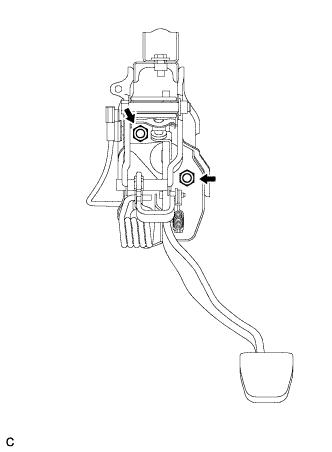
INSTALL CLUTCH MASTER CYLINDER ASSEMBLY (for LHD)
Install a new gasket to the clutch master cylinder assembly. Install the clutch master cylinder with the 2 nuts.
Torque:
12 N*m{
120 kgf*cm
, 9 ft.*lbf
}
2.
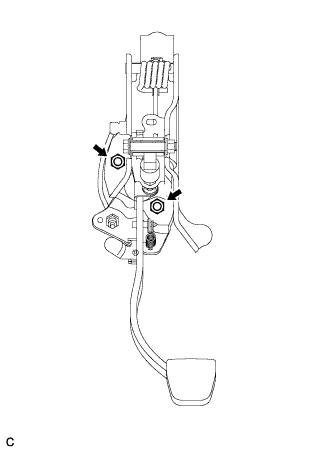
INSTALL CLUTCH MASTER CYLINDER ASSEMBLY (for RHD)
Install a new gasket to the clutch master cylinder assembly. Install the clutch master cylinder with the 2 nuts.
Torque:
12 N*m{
120 kgf*cm
, 9 ft.*lbf
}
3.
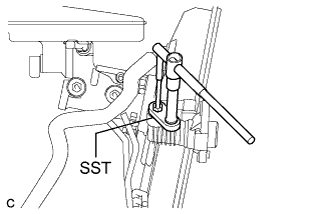
CONNECT CLUTCH LINE
Using SST, connect the clutch line.
SST
09023-00101
Torque:
15 N*m{
155 kgf*cm
, 11 ft.*lbf
}
4.
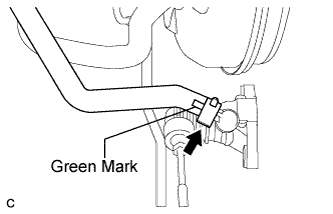
CONNECT CLUTCH RESERVOIR TUBE
Connect the clutch reservoir tube to the clutch master cylinder with the clip.
NOTICE:
Connect the clutch reservoir tube so that it will not be twisted.
Make sure that the green mark is positioned as shown in the illustration.
5.
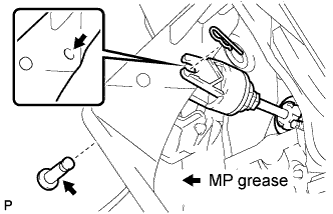
CONNECT CLUTCH MASTER CYLINDER PUSH ROD CLEVIS
Apply MP grease to the contact surface of the pin and clevis pin bushing.
Connect the clevis pin to the clutch pedal with the pin and a new clip.
HINT:
Install the pin from the left side of the vehicle.
6.
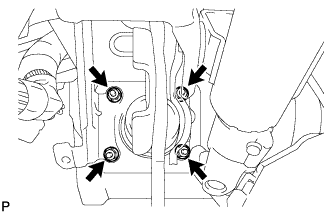
INSTALL BRAKE BOOSTER ASSEMBLY
Install the brake booster assembly and the gasket with the 4 nuts.
Torque:
13 N*m{
133 kgf*cm
, 10 ft.*lbf
}
NOTICE:
Do not damage the brake lines.
7.
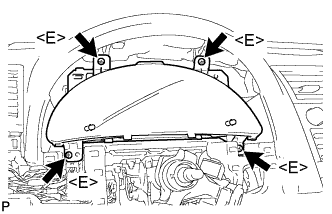
INSTALL COMBINATION METER ASSEMBLY
Connect each connector. Install the combination meter assembly with the 4 screws <E>.
8.
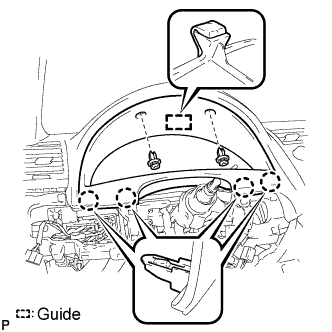
INSTALL INSTRUMENT CLUSTER FINISH PANEL SUB-ASSEMBLY
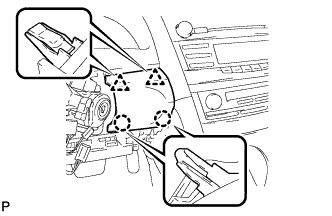
Engage the guide and the 4 claws. Install the instrument cluster finish panel sub-assembly with the 2 clips.
9.
INSTALL LOWER INSTRUMENT PANEL FINISH PANEL
Engage the 2 claws and 2 clips to install the lower instrument panel finish panel.
10.
INSTALL NO. 1 INSTRUMENT PANEL SUB-ASSEMBLY (for LHD)
Connect each connector.
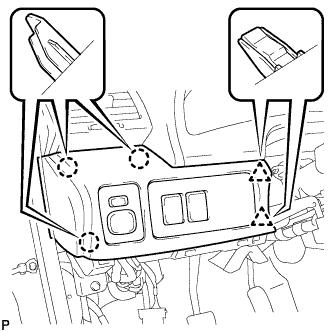
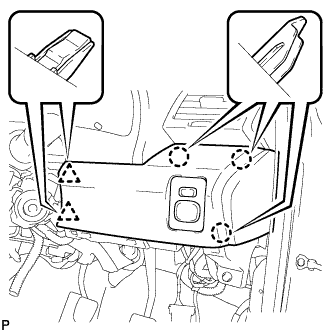
Engage the 3 claws and 2 clips to install the No. 1 instrument panel sub-assembly.
11.
INSTALL NO. 1 INSTRUMENT PANEL SUB-ASSEMBLY (for RHD)
Connect each connector.
Engage the 3 claws and 2 clips to install the No. 1 instrument panel sub-assembly.
12.
INSTALL LOWER NO. 1 INSTRUMENT PANEL FINISH PANEL
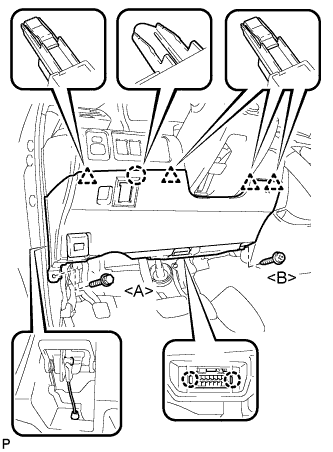
Install the air hose and connect the connector. Engage the 2 claws and the DLC3.
Engage the claw and the 4 clips.
Install the lower No. 1 instrument panel finish panel with the screw <B> and bolt <A>.
13.
INSTALL COWL SIDE TRIM SUB-ASSEMBLY LH
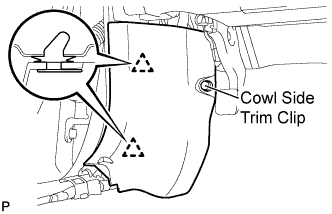
Engage the 2 clips. Install the cowl side trim sub-assembly LH with the cowl side trim clip.
14.
INSTALL FRONT DOOR SCUFF PLATE LH
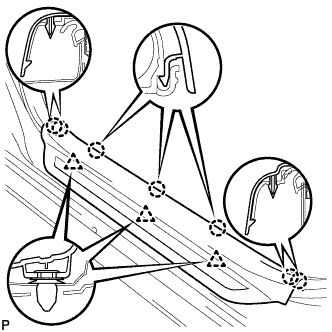
Engage the 7 claws and 3 clips, then install the front door scuff plate LH.
15.
INSTALL COWL TOP OUTER FRONT PANEL SUB-ASSEMBLY
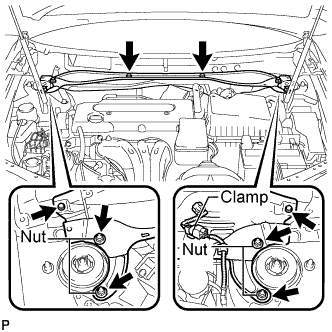
Install the outer cowl top panel sub-assembly with the 4 bolts and 4 nuts.
Torque:
Bolt:
5.0 N*m{
51 kgf*cm
, 44 in.*lbf
}
Nut:
85 N*m{
867 kgf*cm
, 63 ft.*lbf
}
16.
INSTALL WINDSHIELD WIPER MOTOR AND LINK ASSEMBLY
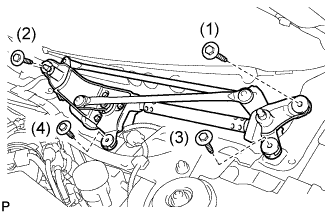
Install the windshield wiper motor and link assembly with the 4 bolts.
Torque:
7.5 N*m{
77 kgf*cm
, 66 in.*lbf
}
NOTICE:
Tighten the bolts in the order shown in the illustration.
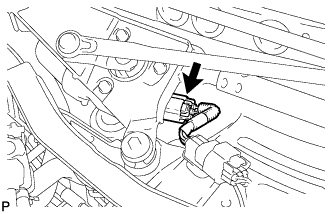
Connect the connector.
17.
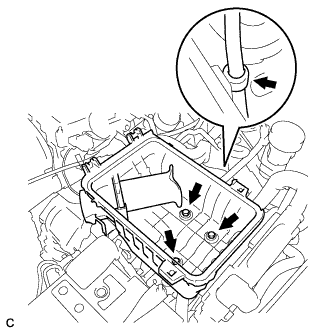
INSTALL AIR CLEANER CASE SUB-ASSEMBLY (for LHD)
Install the air cleaner case with the 3 bolts.
Torque:
5.0 N*m{
51 kgf*cm
, 44 in.*lbf
}
Connect the hose clamp.
18.
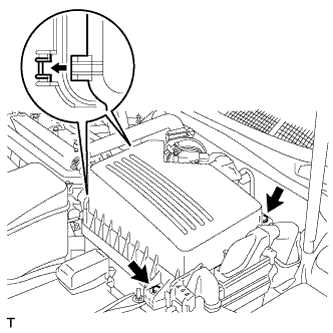
INSTALL AIR CLEANER CAP SUB-ASSEMBLY (for LHD)
Install the air cleaner filter element onto the air cleaner case.
Insert the hinges. Install the air cleaner cap sub-assembly with the 2 bolts.
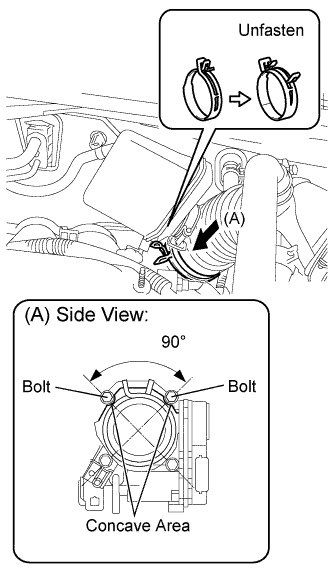
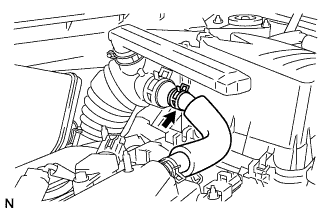
Connect the No. 1 air cleaner hose to the throttle body and unfasten the No. 1 air cleaner hose clamp.
NOTICE:
Match each concave area concavity of the air cleaner hose with the bolt of the throttle body.
Make sure that the hose clamp is at the correct angle.
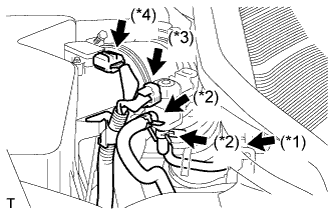
Connect the No. 2 ventilation hose to the air cleaner hose.
Connect the purge line hose to the clamp (* 1). Connect the 2 purge VSV vacuum hoses (* 2).
Connect the purge VSV connector (* 3).
Connect the mass air flow meter connector (* 4).
19.
CONNECT CABLE TO NEGATIVE BATTERY TERMINAL
20.
BLEED CLUTCH PIPE LINE
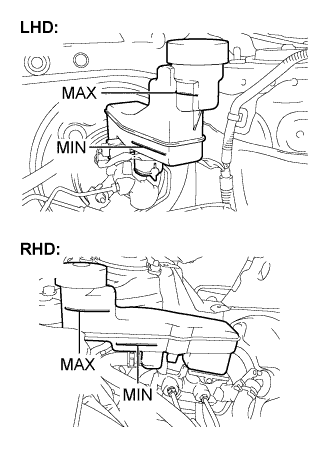
Fill the brake reservoir with brake fluid and bleed the clutch system.
Torque:
8.3 N*m{
85 kgf*cm
, 74 in.*lbf
}
21.
INSPECT BRAKE FLUID
Check the brake fluid (Click here ).
HINT:
Check for leakage in the brake system.
Check for leakage in the clutch system.
22.
INSPECT FLUID LEVEL IN RESERVOIR
Check the fluid level. If brake fluid level is low, check for leakage and inspect the disc brake pad. If necessary, refill the reservoir with brake fluid after repair and replacement.
Fluid:
SAE J1703 or FMVSS No. 116 DOT3
23.
INSPECT AND ADJUST CLUTCH PEDAL SUB-ASSEMBLY
Click here .