INSTALLATION
Removal / installation · Vehicles built from Oct 2006
- HINT:
- When installing the name plate, heat the vehicle body and name plate using a heat light.
- Heating temperature:
Item
Temperature
Vehicle Body
40 to 60°C (104 to 140°F)
Name Plate
20 to 30°C (68 to 86°F)
- NOTICE:
- Do not heat the vehicle body and name plate excessively.
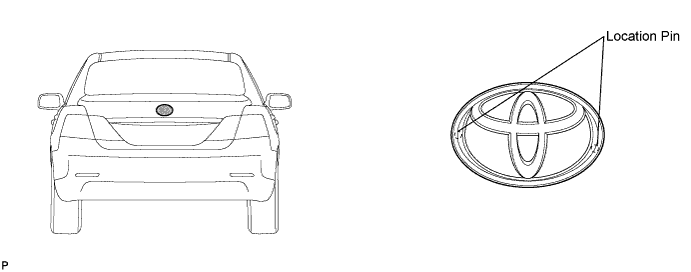
| 1. INSTALL LUGGAGE COMPARTMENT DOOR EMBLEM |

Clean the vehicle body surface.
Using a heat light, heat the vehicle body surface.
Remove the double-sided tape from the vehicle body.
Wipe off any tape adhesive residue with cleaner.
Clean the emblem. (If reusing the emblem)
Using a heat light, heat the emblem.
Remove the double-sided tape from the emblem.
Wipe off any tape adhesive residue with cleaner.
Apply new double-sided tape to the emblem.
Install the emblem.
Using a heat light, heat the vehicle body and emblem.
Remove the release paper from the emblem.
- HINT:
- After removing the release paper, keep the exposed adhesive free from foreign matter.
Install the emblem.

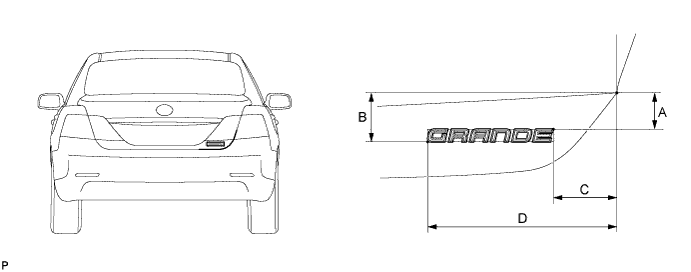
| 2. INSTALL NO. 2 LUGGAGE COMPARTMENT DOOR NAME PLATE |
Clean the vehicle body surface.
Using a heat light, heat the vehicle body surface.
Remove the double-sided tape from the vehicle body.
Wipe off any tape adhesive residue with cleaner.
Clean the plate. (If reusing the plate)
Using a heat light, heat the plate.
Remove the double-sided tape from the plate.
Wipe off any tape adhesive residue with cleaner.
Apply new double-sided tape to the plate.
Install the plate.
Using a heat light, heat the vehicle body and plate.
Remove the release paper from the plate.
- HINT:
- After removing the release paper, keep the exposed adhesive free from foreign matter.
Install the plate.
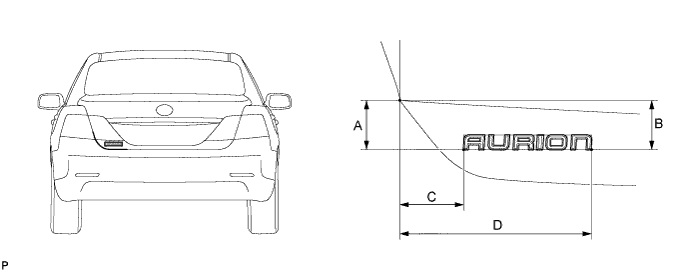
- Reference measurement:
Area
Measurement
A
49.4 mm (1.945 in.)
B
50.0 mm (1.969 in.)
C
65.2 mm (2.567 in.)
D
195.4 mm (7.693 in.)
| 3. INSTALL NO. 3 LUGGAGE COMPARTMENT DOOR PLATE |
Clean the vehicle body surface.
Using a heat light, heat the vehicle body surface.
Remove the double-sided tape from the vehicle body.
Wipe off any tape adhesive residue with cleaner.
Clean the name plate. (If reusing the name plate)
Using a heat light, heat the name plate.
Remove the double-sided tape from the name plate.
Wipe off any tape adhesive residue with cleaner.
Apply new double-sided tape to the name plate.
Install the name plate.
Using a heat light, heat the vehicle body and name plate.
Remove the release paper from the name plate.
- HINT:
- After removing the release paper, keep the exposed adhesive free from foreign matter.
Install the name plate.
for AT-X plate: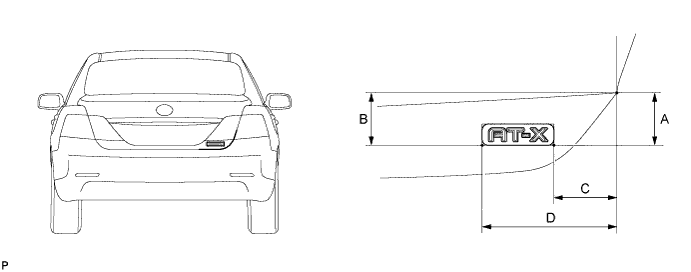
- Reference measurement:
Area
Measurement
A
53.1 mm (2.091 in.)
B
53.5 mm (2.106 in.)
C
61.9 mm (2.437 in.)
D
135.1 mm (5.319 in.)
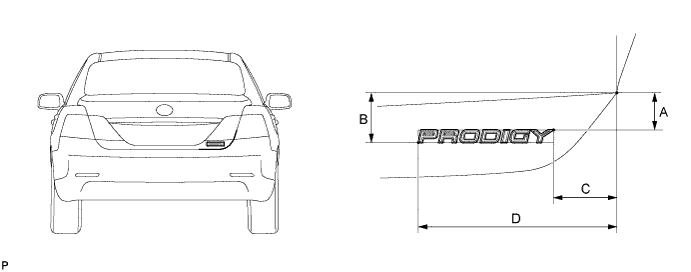
- Reference measurement:
Area
Measurement
A
37.5 mm (1.476 in.)
B
49.8 mm (1.961 in.)
C
62.7 mm (2.469 in.)
D
201.2 mm (7.921 in.)
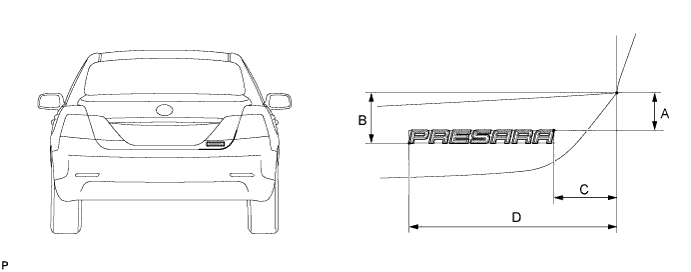
- Reference measurement:
Area
Measurement
A
35.9 mm (1.413 in.)
B
50.1 mm (1.972 in.)
C
60.8 mm (2.394 in.)
D
209.6 mm (8.252 in.)
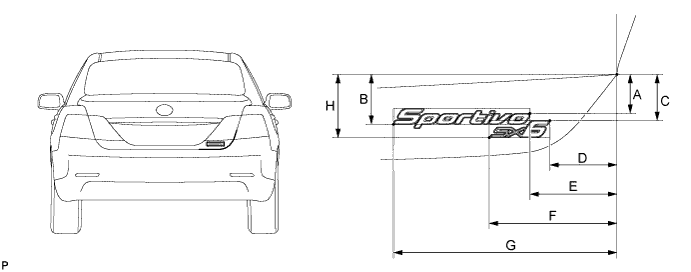
- Reference measurement:
Area
Measurement
A
37.9 mm (1.492 in.)
B
50.3 mm (1.980 in.)
C
45.2 mm (1.780 in.)
D
65.9 mm (2.594 in.)
E
86.5 mm (3.406 in.)
F
127.7 mm (5.028 in.)
G
227.2 mm (8.945 in.)
H
63.5 mm (2.500 in.)
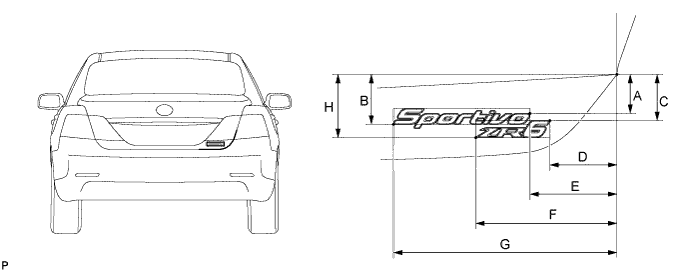
- Reference measurement:
Area
Measurement
A
37.9 mm (1.492 in.)
B
50.3 mm (1.980 in.)
C
45.2 mm (1.780 in.)
D
65.9 mm (2.594 in.)
E
86.5 mm (3.406 in.)
F
142.1 mm (5.595 in.)
G
227.2 mm (8.945 in.)
H
63.6 mm (2.504 in.)
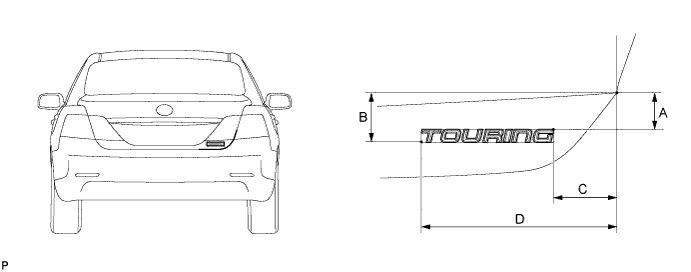
- Reference measurement:
Area
Measurement
A
35.7 mm (1.406 in.)
B
50.2 mm (1.976 in.)
C
61.0 mm (2.402 in.)
D
196.1 mm (7.720 in.)
- Reference measurement:
Area
Measurement
A
35.6 mm (1.402 in.)
B
50.2 mm (1.976 in.)
C
60.7 mm (2.390 in.)
D
189.7 mm (7.469 in.)
| 4. INSTALL FRONT FENDER PLATE LH |
Clean the vehicle body surface.
Using a heat light, heat the vehicle body surface.
Remove the double-sided tape from the vehicle body.
Wipe off any tape adhesive residue with cleaner.
Clean the plate. (If reusing the name plate)
Using a heat light, heat the plate.
Remove the double-sided tape from the plate.
Wipe off any tape adhesive residue with cleaner.
Apply new double-sided tape to the plate.
Install the plate.
Using a heat light, heat the vehicle body and plate.
Remove the release paper from the plate.
- HINT:
- After removing the release paper, keep the exposed adhesive free from foreign matter.
Install the plate.
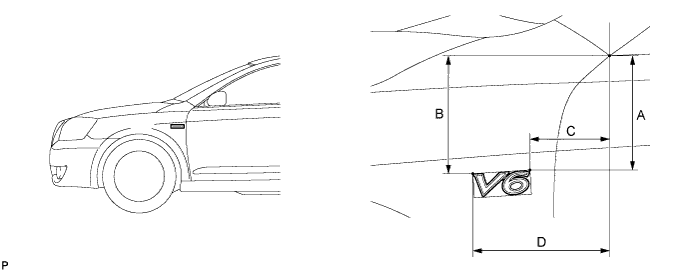
- Reference measurement:
Area
Measurement
A
170.5 mm (6.713 in.)
B
172.5 mm (6.791 in.)
C
111.7 mm (4.398 in.)
D
171.7 mm (6.760 in.)
| 5. INSTALL FRONT FENDER PLATE RH |
Clean the vehicle body surface.
Using a heat light, heat the vehicle body surface.
Remove the double-sided tape from the vehicle body.
Wipe off any tape adhesive residue with cleaner.
Clean the plate. (If reusing the name plate)
Using a heat light, heat the plate.
Remove the double-sided tape from the plate.
Wipe off any tape adhesive residue with cleaner.
Apply new double-sided tape to the plate.
Install the plate.
Using a heat light, heat the vehicle body and plate.
Remove the release paper from the plate.
- HINT:
- After removing the release paper, keep the exposed adhesive free from foreign matter.
Install the plate.
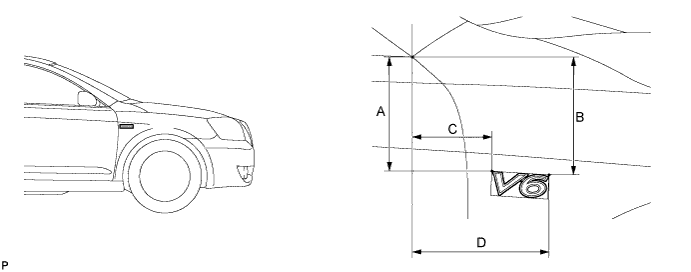
- Reference measurement:
Area
Measurement
A
170.5 mm (6.713 in.)
B
172.5 mm (6.791 in.)
C
111.7 mm (4.398 in.)
D
171.7 mm (6.760 in.)
| 6. INSTALL FRONT DOOR NAME PLATE |
Clean the vehicle body surface.
Using a heat light, heat the vehicle body surface.
Remove the double-sided tape from the vehicle body.
Wipe off any tape adhesive residue with cleaner.
Clean the name plate. (If reusing the name plate)
Using a heat light, heat the name plate.
Remove the double-sided tape from the name plate.
Wipe off any tape adhesive residue with cleaner.
Apply new double-sided tape to the name plate.
Install the name plate.
Using a heat light, heat the vehicle body and name plate.
Remove the release paper from the name plate.
- HINT:
- After removing the release paper, keep the exposed adhesive free from foreign matter.
Install the name plate.
for AURION plate LH side: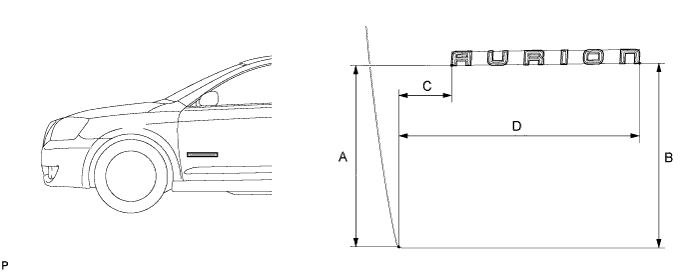
- Reference measurement:
Area
Measurement
A
228.1 mm (8.980 in.)
B
233.6 mm (9.197 in.)
C
68.1mm (2.681 in.)
D
298.7 mm (11.760 in.)
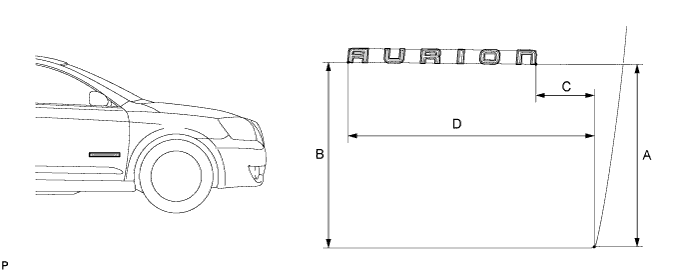
- Reference measurement:
Area
Measurement
A
228.1 mm (8.980 in.)
B
233.6 mm (9.197 in.)
C
68.1 mm (2.681 in.)
D
298.7 mm (11.760 in.)