Image from Camera for Rear View Monitor is Abnormal
Circuit diagnosis · Vehicles built from Jun 2009
DESCRIPTION
The display signal from the rear television camera assembly transmits to the navigation receiver assembly.WIRING DIAGRAM
| for 2AZ-FE |
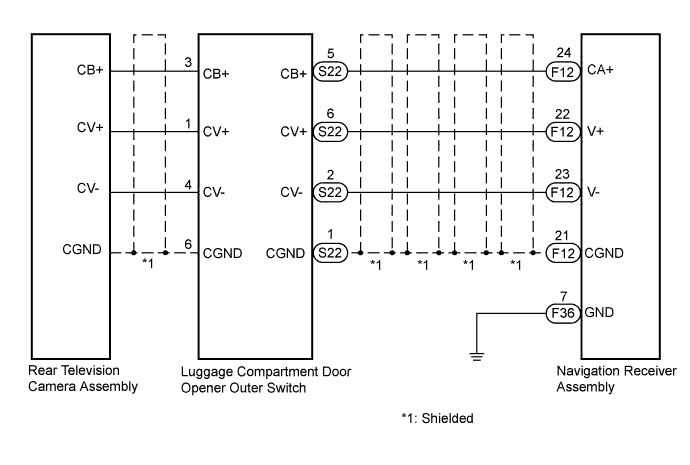

| for 2GR-FE |
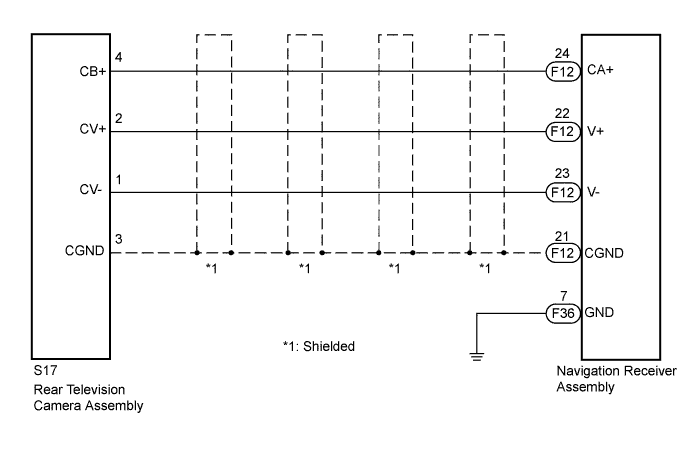
INSPECTION PROCEDURE
| 1. CONFIRM MODEL |

Choose the model to be inspected.
- Result:
Result
Proceed to
for 2AZ-FE
A
for 2GR-FE
B
|
|
||||

| A | |
 |
| 2. CHECK HARNESS AND CONNECTOR (NAVIGATION RECEIVER - LUGGAGE COMPARTMENT DOOR OPENER SWITCH) |
Disconnect the F12 connector from the navigation receiver assembly and the S22 connector from the luggage compartment door opener outer switch.
Measure the resistance according to the value(s) in the table below.
- Standard Resistance:
Tester Connection
Condition
Specified Condition
S22-6 (CV+) - F12-22 (V+)
Always
Below 1 Ω
S22-5 (CB+) - F12-24 (CA+)
Always
Below 1 Ω
S22-1 (CGND) - F12-21 (CGND)
Always
Below 1 Ω
S22-2 (CV-) - F12-23 (V-)
Always
Below 1 Ω
S22-6 (CV+) - Body ground
Always
10 kΩ or higher
S22-5 (CB+) - Body ground
Always
10 kΩ or higher
S22-1 (CGND) - Body ground
Always
10 kΩ or higher
S22-2 (CV-) - Body ground
Always
10 kΩ or higher
|
|
||||

| OK | |
|
| 3. INSPECT NAVIGATION RECEIVER ASSEMBLY |
Reconnect the S22 connector to the luggage compartment door opener outer switch.
Reconnect the F12 connector to the navigation receiver assembly.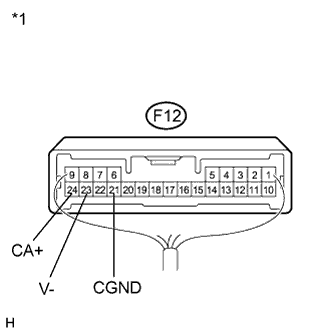
Measure the resistance according to the value(s) in the table below.
- Standard Resistance:
Tester Connection
Condition
Specified Condition
F12-23 (V-) - Body ground
Always
Below 1 Ω
F12-21 (CGND) - Body ground
Always
Below 1 Ω
Measure the voltage according to the value(s) in the table below.
- Standard Voltage:
Tester Connection
Condition
Specified Condition
F12-24 (CA+) - F12-21 (CGND)
Ignition switch on (IG)
Shift lever in R
5.5 to 7.0 V
Text in Illustration *1
Component with harness connected
(Navigation Receiver Assembly)
|
|
||||
| OK | |
|
| 4. INSPECT REAR TELEVISION CAMERA ASSEMBLY |
Check that the F12 and F36 connectors are connected to the navigation receiver assembly.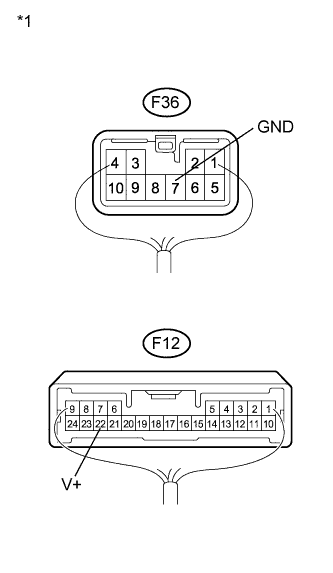
Check the waveform of the rear television camera assembly using an oscilloscope.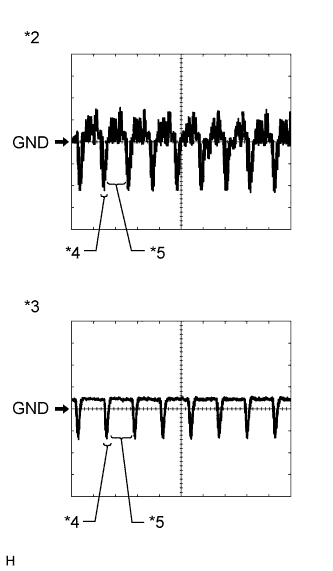
- HINT:
- A waterproof connector is used for the rear television camera assembly. Therefore, inspect the waveform at the navigation receiver assembly with the connector connected.
- OK:
- Waveform is as shown in the illustration.
Item
Content
Terminal No. (Symbol)
F12-22 (V+) - F36-7 (GND)
Tool Setting
200 mV/DIV., 50 μsec./DIV.
Condition
Ignition switch on (IG), shift lever in R
- HINT:
- The video waveform changes according to the image sent by the rear television camera assembly.
Text in Illustration *1
Component with harness connected
(Navigation Receiver Assembly)
*2
Waveform 1 (under normal conditions)
*3
Waveform 2 (camera lens is covered, blacking out the screen)
*4
Synchronized Signal
*5
Video Waveform
|
|
||||
| OK | ||
 |
||
| ||
| 5. REPLACE LUGGAGE COMPARTMENT DOOR OPENER OUTER SWITCH |
Replace the luggage compartment door opener outer switch with a new or normally functioning one (Click here).
| NEXT | |
|
| 6. CONFIRM SYMPTOMS |
Check if the same malfunction recurs when the rear view monitor screen is displayed.
- Result:
Result
Proceed to
Malfunction does not reoccur
(returns to normal)
A
Malfunction reoccurs
B
|
|
||||
| A | ||
|
||
| ||
| 7. CHECK HARNESS AND CONNECTOR (NAVIGATION RECEIVER - REAR TELEVISION CAMERA) |
Disconnect the F12 connector from the navigation receiver assembly.
Disconnect the S17 connector from the rear television camera assembly.
Measure the resistance according to the value(s) in the table below.
- Standard Resistance:
Tester Connection
Condition
Specified Condition
S17-2 (CV+) - F12-22 (V+)
Always
Below 1 Ω
S17-4 (CB+) - F12-24 (CA+)
Always
Below 1 Ω
S17-3 (CGND) - F12-21 (CGND)
Always
Below 1 Ω
S17-1 (CV-) - F12-23 (V-)
Always
Below 1 Ω
S17-2 (CV+) - Body ground
Always
10 kΩ or higher
S17-4 (CB+) - Body ground
Always
10 kΩ or higher
S17-3 (CGND) - Body ground
Always
10 kΩ or higher
S17-1 (CV-) - Body ground
Always
10 kΩ or higher
|
|
||||
| OK | |
|
| 8. INSPECT NAVIGATION RECEIVER ASSEMBLY |
Reconnect the S17 connector to the rear television camera assembly.
Reconnect the F12 connector to the navigation receiver assembly.
Measure the resistance according to the value(s) in the table below.
- Standard Resistance:
Tester Connection
Condition
Specified Condition
F12-23 (V-) - Body ground
Always
Below 1 Ω
F12-21 (CGND) - Body ground
Always
Below 1 Ω
Measure the voltage according to the value(s) in the table below.
- Standard Voltage:
Tester Connection
Condition
Specified Condition
F12-24 (CA+) - F12-21 (CGND)
Ignition switch on (IG)
Shift lever in R
5.5 to 7.0 V
Text in Illustration *1
Component with harness connected
(Navigation Receiver Assembly)
|
|
||||
| OK | |
|
| 9. INSPECT REAR TELEVISION CAMERA ASSEMBLY |
Check that the F12 and F36 connectors are connected to the navigation receiver assembly.
Check the waveform of the rear television camera assembly using an oscilloscope.
- OK:
- Waveform is as shown in the illustration.
Item
Content
Terminal No. (Symbol)
F12-22 (V+) - F36-7 (GND)
Tool Setting
200 mV/DIV., 50 μsec./DIV.
Condition
Ignition switch on (IG), shift lever in R
- HINT:
- The video waveform changes according to the image sent by the rear television camera assembly.
Text in Illustration *1
Component with harness connected
(Navigation Receiver Assembly)
*2
Waveform 1 (under normal conditions)
*3
Waveform 2 (camera lens is covered, blacking out the screen)
*4
Synchronized Signal
*5
Video Waveform
|
|
||||
| OK | ||
|
||
| ||