INSTALLATION
Removal / installation · Vehicles built from Jun 2009
| 1. INSTALL STEREO COMPONENT AMPLIFIER ASSEMBLY |

Install the stereo component amplifier assembly with the bolt as shown in the illustration.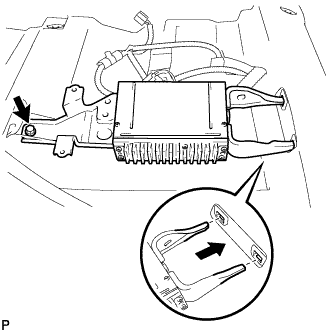

Connect the connector and install the bolt.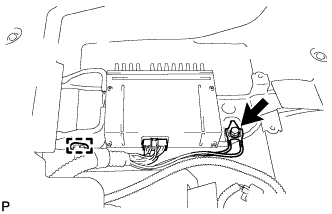
Engage the clamp.
| 2. INSTALL AUDIO AMPLIFIER COVER |
Install the audio amplifier cover with the 2 clips.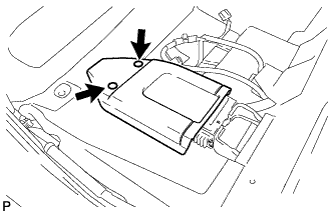
| 3. INSTALL FRONT SEAT ASSEMBLY RH (for Manual Seat) |
Place the front passenger's seat assembly in the vehicle and align the adjuster pin with the hole on the vehicle side.
Connect the connectors and clamp.
Move the front passenger's seat assembly to the rearmost position by operating the slide handle.
- NOTICE:
- Check that the seat is locked.
Temporarily install the front seat track bracket with the 2 bolts.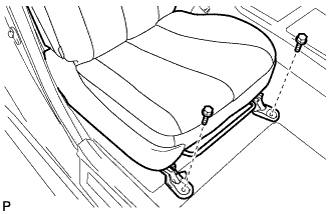
Move the front passenger's seat assembly fully forward by operating the slide handle.
- NOTICE:
- Check that the seat is locked.
Temporarily install the rear seat track bracket with the 2 bolts.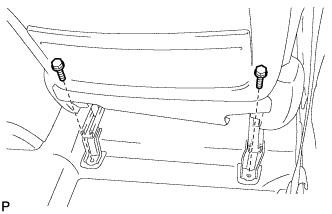
Move the front passenger's seat assembly to the rearmost position by operating the slide handle.
- NOTICE:
- Check that the seat is locked.
Fully tighten the 2 bolts on the front seat track bracket in the order of the inner side bolt and then the outer side bolt.
- Torque:
- 37 N*m{ 377 kgf*cm , 27 ft.*lbf }
Move the front passenger's seat assembly fully forward by operating the slide handle.
- NOTICE:
- Check that the seat is locked.
Fully tighten the 2 bolts on the rear seat track bracket in the order of the inner side bolt and then the outer side bolt.
- Torque:
- 37 N*m{ 377 kgf*cm , 27 ft.*lbf }
| 4. INSTALL OUTER SEAT TRACK BRACKET COVER RH (for Manual Seat) |
Slide the outer seat track bracket cover along the seat rail toward the front of the vehicle. Engage claw A to the seat rail.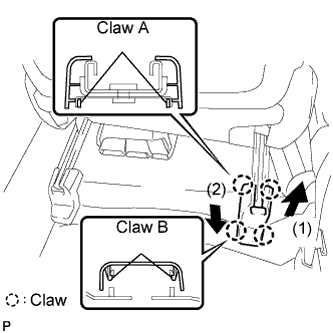
Push the outer seat track bracket cover to engage claw B.
| 5. INSTALL INNER SEAT TRACK BRACKET COVER RH (for Manual Seat) |
Slide the inner seat track bracket cover along the seat rail toward the front of the vehicle. Engage claw A to the seat rail.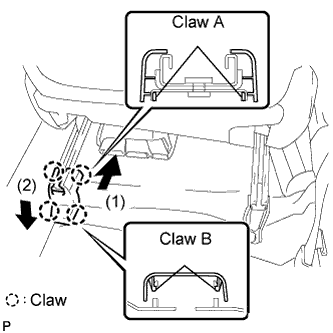
Push the inner seat track bracket cover to engage claw B.
| 6. INSTALL FRONT SEAT HEADREST ASSEMBLY (for Manual Seat) |
| 7. INSTALL FRONT SEAT ASSEMBLY RH (for Power Seat) |
Place the seat in the cabin.
Connect the connectors under the seat.
Connect the cable to the negative (-) battery terminal.
Move the front passenger's seat assembly to the rearmost position by operating the slide and vertical power seat switch knob.
Temporarily install the front side of the front passenger's seat assembly with the 2 bolts.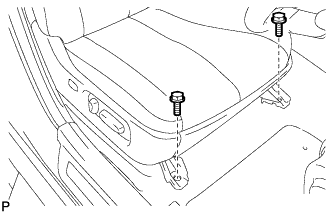
Move the front passenger's seat assembly fully forward by operating the slide and vertical power seat switch knob.
Temporarily install the rear side of the front passenger's seat assembly with the 2 bolts.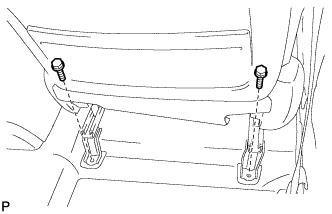
Move the front passenger's seat assembly to the rearmost position by operating the slide and vertical power seat switch knob.
Fully tighten the 2 bolts on the front side of the front passenger's seat assembly in the order of the inner side bolt and then the outer side bolt.
- Torque:
- 37 N*m{ 377 kgf*cm , 27 ft.*lbf }
Move the front passenger's seat assembly fully forward by operating the slide and vertical power seat switch knob.
Fully tighten the 2 bolts on the rear side of the front passenger's seat assembly in the order of the inner side bolt and then the outer side bolt.
- Torque:
- 37 N*m{ 377 kgf*cm , 27 ft.*lbf }
| 8. INSTALL OUTER SEAT TRACK BRACKET COVER RH (for Power Seat) |
Engage the 4 claws and install the outer seat track bracket cover.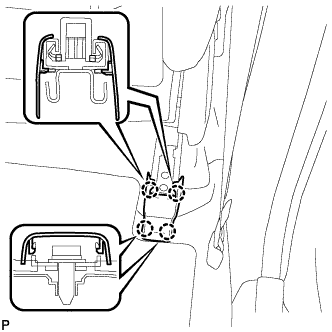
| 9. INSTALL INNER SEAT TRACK BRACKET COVER RH (for Power Seat) |
Engage the 4 claws and install the inner seat track bracket cover.
| 10. INSTALL FRONT SEAT HEADREST ASSEMBLY (for Power Seat) |
| 11. CONNECT CABLE TO NEGATIVE BATTERY TERMINAL (for Manual Seat) |
| 12. INSPECT SLIDE ADJUSTER LOCK (for Manual Seat) |
| 13. INSPECT FRONT SEAT ASSEMBLY (for Power Seat) |
Inspect the power seat operation.
| 14. INSPECT SRS WARNING LIGHT |