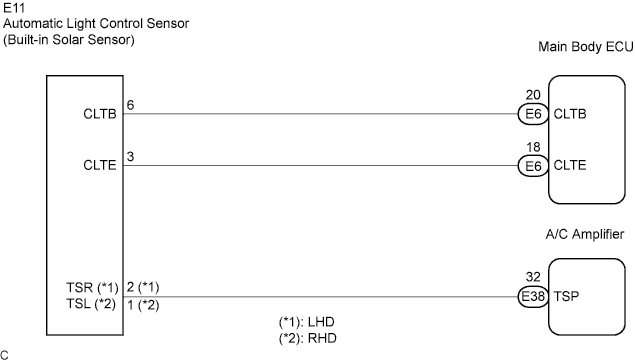
DTC B1421/21 Solar Sensor Circuit (Passenger Side) |
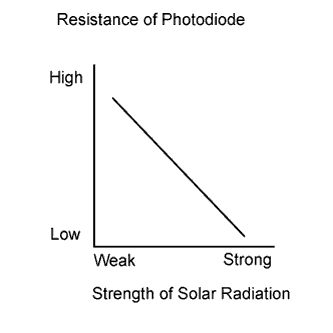
| DTC No. | DTC Detection Condition | Trouble Area |
| B1421/21 | Open or short in passenger side solar sensor circuit |
|
| 1.READ VALUE USING INTELLIGENT TESTER |
Connect the intelligent tester to the DLC3.
Turn the ignition switch to the ON position and turn the intelligent tester main switch on.
Expose the sensing portion of the solar sensor to light.
Select the item below in the Data List, and read the display on the intelligent tester.
| Item | Measure Item / Display (Range) | Normal Condition | Diagnostic Note |
| Solar Sensor (D side) (Solar Sens-D) | Passenger side solar sensor / Min.: 0, Max.: 255 | Passenger side solar sensor value increases as brightness increases | - |
| Result | Proceed to |
| NG | A |
| OK (When troubleshooting according to the PROBLEM SYMPTOMS TABLE) | B |
| OK (When troubleshooting according to the DTC) | C |
|
| ||||
|
| ||||
| A | |
 |
| 2.CHECK HARNESS AND CONNECTOR (SOLAR SENSOR) |
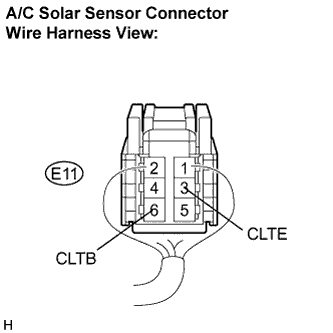 |
Disconnect the solar sensor connector.
Measure the voltage according to the value(s) in the table below.
| Tester Connection | Condition | Specified Condition |
| E11-6 (CLTB) - E11-3 (CLTE) | Ignition switch: LOCK | Below 1 V |
| E11-6 (CLTB) - E11-3 (CLTE) | Ignition switch: ON | 10 to 14 V |
|
| ||||
| NG | |
|
| 3.CHECK HARNESS AND CONNECTOR (MAIN BODY ECU - SOLAR SENSOR) |
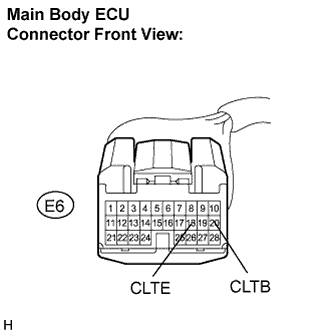 |
Disconnect the main body ECU connector.
|
Measure the resistance according to the value(s) in the table below.
| Tester Connection | Condition | Specified Condition |
| E6-20 (CLTB) - E11-6 (CLTB) | Always | Below 1 Ω |
| E6-18 (CLTE) - E11-3 (CLTE) | Always | Below 1 Ω |
| E6-20 (CLTB) - Body ground | Always | 10 kΩ or higher |
| E6-18 (CLTE) - Body ground | Always | 10 kΩ or higher |
|
| ||||
| OK | ||
 | ||
| ||
| 4.CHECK SOLAR SENSOR |
 |
Remove the solar sensor with its connector still connected.
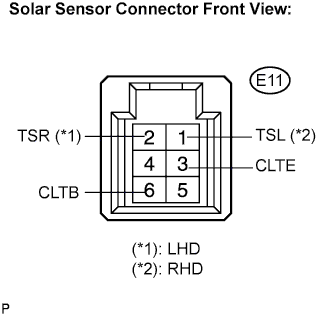
Connect the positive (+) lead from the battery to terminal 6 (CLTB), and the negative (-) lead to terminal 3 (CLTE) of the solar sensor.
Measure the voltage according to the value(s) in the table below.
| Tester Connection | Condition | Specified Condition |
| E11-2 (TSR) - E11-3 (CLTE) | Sensor is subjected to electric light | 0.8 to 4.3 V |
| E11-2 (TSR) - E11-3 (CLTE) | Sensor is covered with a cloth | Below 0.8 V |
| Tester Connection | Condition | Specified Condition |
| E11-1 (TSL) - E11-3 (CLTE) | Sensor is subjected to electric light | 0.8 to 4.3 V |
| E11-1 (TSL) - E11-3 (CLTE) | Sensor is covered with a cloth | Below 0.8 V |
|
| ||||
| OK | |
|
| 5.CHECK HARNESS AND CONNECTOR (SOLAR SENSOR - A/C AMPLIFIER) |
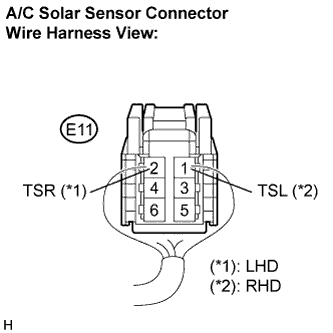 |
Disconnect the solar sensor connector.
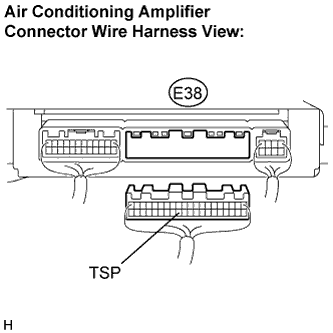 |
Disconnect the A/C amplifier connector.
Measure the resistance according to the value(s) in the table below.
| Tester Connection (Symbols) | Condition | Specified Condition |
| E38-32 (TSP) - E11-2 (TSR) | Always | Below 1 Ω |
| E38-32 (TSP) - Body ground | Always | 10 kΩ or higher |
| Tester Connection (Symbols) | Condition | Specified Condition |
| E38-32 (TSP) - E11-1 (TSL) | Always | Below 1 Ω |
| E38-32 (TSP) - Body ground | Always | 10 kΩ or higher |
|
| ||||
| OK | ||
| ||
| ||

