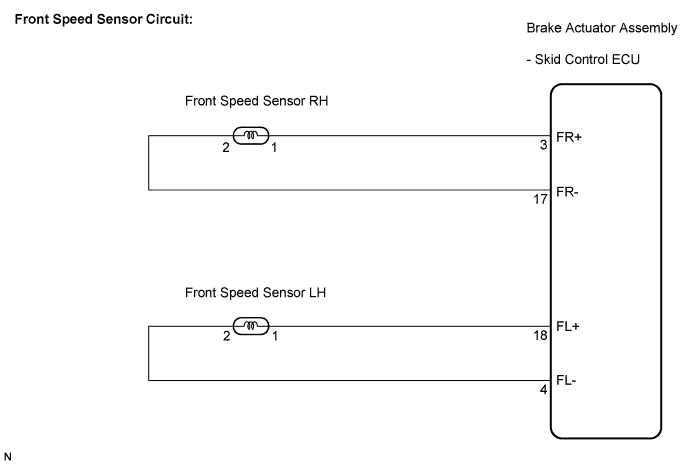
DTC C1235/35 Foreign Object is Attached on Tip of Front Speed Sensor RH |
DTC C1236/36 Foreign Object is Attached on Tip of Front Speed Sensor LH |
DTC C1238/38 Foreign Object is Attached on Tip of Rear Speed Sensor RH |
DTC C1239/39 Foreign Object is Attached on Tip of Rear Speed Sensor LH |
DTC C1275/75 Abnormal Change in Output Signal of Front Speed Sensor RH (Test Mode DTC) |
DTC C1276/76 Abnormal Change in Output Signal of Front Speed Sensor LH (Test Mode DTC) |
DTC C1277/77 Abnormal Change in Output Signal of Rear Speed Sensor RH (Test Mode DTC) |
DTC C1278/78 Abnormal Change in Output Signal of Rear Speed Sensor LH (Test Mode DTC) |
| DTC No. | DTC Detection Condition | Trouble Area |
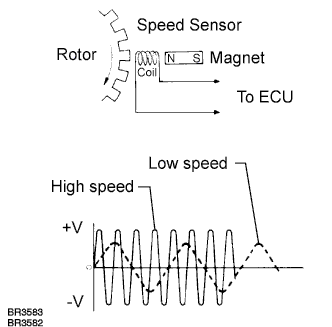
| C1235/35 C1236/36 C1238/38 C1239/39 | At a vehicle speed of 12 mph (20 km/h) or more, noise occurs in the sensor signal from the abnormal wheel for 5 seconds or more. |
|
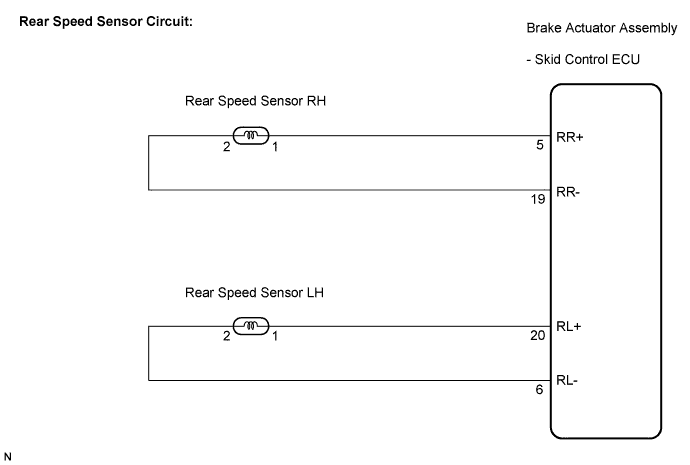
| 1.CHECK SPEED SENSOR AND SPEED SENSOR ROTOR SERRATIONS |
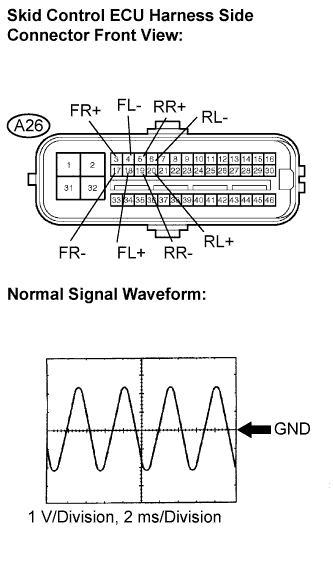 |
Disconnect the skid control ECU connector.
Connect the oscilloscope to each speed sensor terminal of the skid control ECU.
Check that a waveform is output when the tires are rotated (by the sensor circuit).
Check that the waveform does not change while jiggling a connector or a wire harness.
|
| ||||
| OK | |
 |
| 2.RECONFIRM DTC |
Reconnect the skid control ECU connector.
Clear the DTC (Click here).
Start the engine.
Drive the vehicle at the speed of 12 mph (20 km/h) or more for at least 60 seconds.
Check if the same DTC is recorded (Click here).
| Condition | Proceed to |
| DTCs (C1235/35, C1236/36, C1238/38 and/or C1239/39) are not output | A |
| DTCs (C1235/35, C1236/36, C1238/38 and/or C1239/39) are output | B |
|
| ||||
| A | ||
 | ||
| ||
| 3.INSPECT EACH SPEED SENSOR |
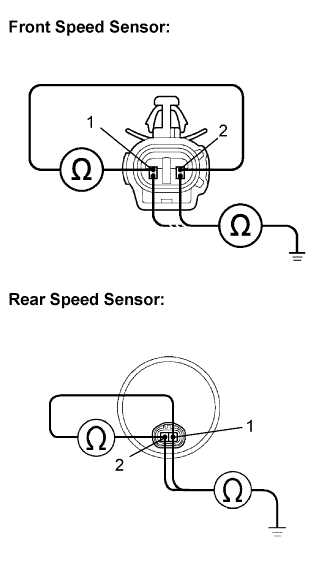 |
Disconnect each speed sensor connector.
Measure the resistance according to the value(s) in the table below.
| Tester Connection | Condition | Specified Condition |
| 1 (FR+) - 2 (FR-) | Always | 1.4 to 1.8 kΩ at 20°C (68 °F) |
| 1 (FR+) - Body ground | Always | 10 kΩ or higher |
| 2 (FR-) - Body ground | Always | 10 kΩ or higher |
| 2 (RR+) - 1 (RR-) | Always | 0.9 to 2.1 kΩ |
| 2 (RR+) - Body ground | Always | 10 kΩ or higher |
| 1 (RR-) - Body ground | Always | 10 kΩ or higher |
| Tester Connection | Condition | Specified Condition |
| 1 (FL+) - 2 (FL-) | Always | 1.4 to 1.8 kΩ at 20°C (68 °F) |
| 1 (FL+) - Body ground | Always | 10 kΩ or higher |
| 2 (FL-) - Body ground | Always | 10 kΩ or higher |
| 2 (RL+) - 1 (RL-) | Always | 0.9 to 2.1 kΩ |
| 2 (RL+) - Body ground | Always | 10 kΩ or higher |
| 1 (RL-) - Body ground | Always | 10 kΩ or higher |
| Result | Proceed to |
| OK (for rear) | A |
| OK (for front) | B |
| NG | C |
|
| ||||
|
| ||||
| A | |
|
| 4.CHECK HARNESS AND CONNECTOR (SKID CONTROL SENSOR WIRE) |
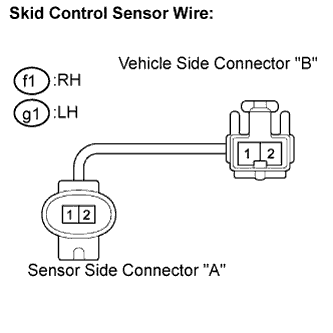 |
Disconnect the skid control sensor wire.
Measure the resistance according to the value(s) in the table below.
| Tester Connection | Condition | Specified Condition |
| f1 ("A"-1) - f1 ("B"-2) | Always | Below 1 Ω |
| f1 ("A"-1) - f1 ("B"-1) | Always | 10 kΩ or higher |
| f1 ("A"-1) - Body ground | Always | 10 kΩ or higher |
| f1 ("A"-2) - f1 ("B"-1) | Always | Below 1 Ω |
| f1 ("A"-2) - f1 ("B"-2) | Always | 10 kΩ or higher |
| f1 ("A"-2) - Body ground | Always | 10 kΩ or higher |
| Tester Connection | Condition | Specified Condition |
| g1 ("A"-1) - g1 ("B"-2) | Always | Below 1 Ω |
| g1 ("A"-1) - g1 ("B"-1) | Always | 10 kΩ or higher |
| g1 ("A"-1) - Body ground | Always | 10 kΩ or higher |
| g1 ("A"-2) - g1 ("B"-1) | Always | Below 1 Ω |
| g1 ("A"-2) - g1 ("B"-2) | Always | 10 kΩ or higher |
| g1 ("A"-2) - Body ground | Always | 10 kΩ or higher |
|
| ||||
| OK | |
|
| 5.CHECK HARNESS AND CONNECTOR (SKID CONTROL ECU - EACH SPEED SENSOR) |
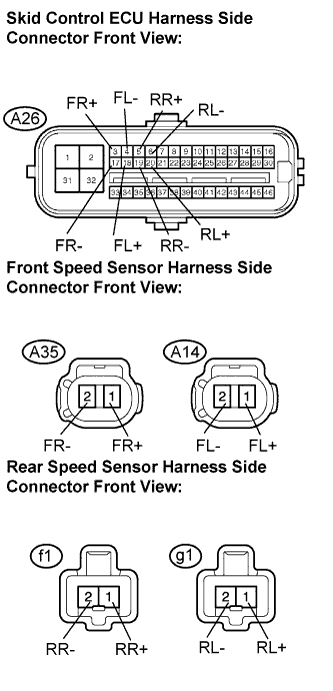 |
Measure the resistance according to the value(s) in the table below.
| Tester Connection | Condition | Specified Condition |
| A26-3 (FR+) - A35-1 (FR+) | Always | Below 1 Ω |
| A26-3 (FR+) - Body ground | Always | 10 kΩ or higher |
| A26-17 (FR-) - A35-2 (FR-) | Always | Below 1 Ω |
| A26-17 (FR-) - Body ground | Always | 10 kΩ or higher |
| A26-5 (RR+) - f1-1 (RR+) | Always | Below 1 Ω |
| A26-5 (RR+) - Body ground | Always | 10 kΩ or higher |
| A26-19 (RR-) - f1-2 (RR-) | Always | Below 1 Ω |
| A26-19 (RR-) - Body ground | Always | 10 kΩ or higher |
| Tester Connection | Condition | Specified Condition |
| A26-18 (FL+) - A14-1 (FL+) | Always | Below 1 Ω |
| A26-18 (FL+) - Body ground | Always | 10 kΩ or higher |
| A26-4 (FL-) - A14-2 (FL-) | Always | Below 1 Ω |
| A26-4 (FL-) - Body ground | Always | 10 kΩ or higher |
| A26-20 (RL+) - g1-1 (RL+) | Always | Below 1 Ω |
| A26-20 (RL+) - Body ground | Always | 10 kΩ or higher |
| A26-6 (RL-) - g1-2 (RL-) | Always | Below 1 Ω |
| A26-6 (RL-) - Body ground | Always | 10 kΩ or higher |
|
| ||||
| OK | |
|
| 6.RECONFIRM DTC |
Reconnect the skid control sensor wire.
Reconnect the skid control ECU connector and the speed sensor connector.
Clear the DTC (Click here).
Start the engine.
Drive the vehicle at the speed of 12 mph (20 km/h) or more for at least 60 seconds.
Check if the same DTC is recorded (Click here).
| Condition | Proceed to |
| DTCs (C1235/35, C1236/36, C1238/38 and/or C1239/39) are output (for front) | A |
| DTCs (C1235/35, C1236/36, C1238/38 and/or C1239/39) are output (for rear) | B |
| DTCs (C1235/35, C1236/36, C1238/38 and/or C1239/39) are not output | C |
|
| ||||
|
| ||||
| A | |
|
| 7.CHECK FRONT SPEED SENSOR TIP |
Turn the ignition switch off.
Remove the front speed sensor (Click here).
Check the speed sensor tip.
|
| ||||
| OK | |
|
| 8.CHECK EACH SPEED SENSOR ROTOR |
Turn the ignition switch off.
Remove each speed sensor rotor.
Check the speed sensor rotor.
|
| ||||
| OK | |
|
| 9.RECONFIRM DTC |
Install the front speed sensor and the speed sensor rotor.
Clear the DTC (Click here).
Start the engine.
Drive the vehicle at the speed of 12 mph (20 km/h) or more for at least 60 seconds.
Check if the same DTC is recorded (Click here).
| Condition | Proceed to |
| DTCs (C1235/35, C1236/36, C1238/38 and/or C1239/39) are output | A |
| DTCs (C1235/35, C1236/36, C1238/38 and/or C1239/39) are not output | B |
|
| ||||
| A | ||
| ||
| ||

