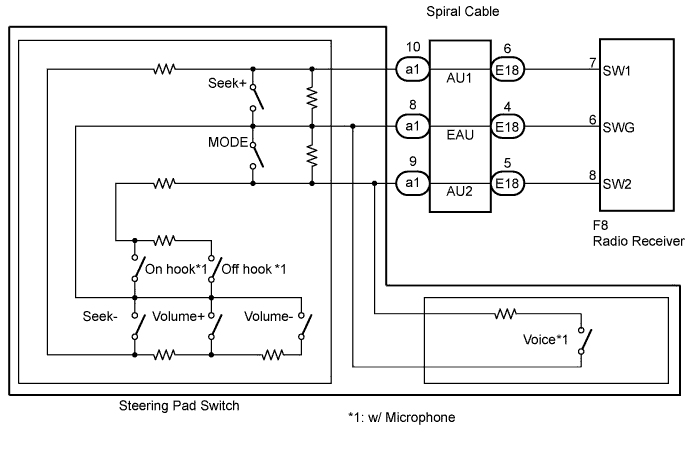
AUDIO AND VISUAL SYSTEM > Steering Pad Switch Circuit |
| 1.INSPECT RADIO RECEIVER |
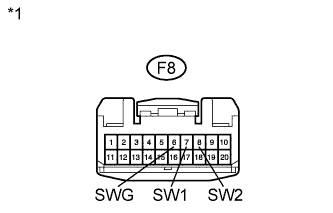 |
Disconnect the radio receiver connector.
Measure the resistance according to the value(s) in the table below.
| Tester Connection | Condition | Specified Condition |
| F8-7 (SW1) - F8-6 (SWG) | No switch is pushed | 95 to 105 kΩ |
| F8-7 (SW1) - F8-6 (SWG) | Seek+ switch: pushed | Below 2.5 Ω |
| F8-7 (SW1) - F8-6 (SWG) | Seek- switch: pushed | 313.5 to 346.5 Ω |
| F8-7 (SW1) - F8-6 (SWG) | Volume+ switch: pushed | 959.5 to 1060.5 Ω |
| F8-7 (SW1) - F8-6 (SWG) | Volume- switch: pushed | 3049.5 to 3370.5 Ω |
| F8-8 (SW2) - F8-6 (SWG) | No switch is pushed | 95 to 105 kΩ |
| F8-8 (SW2) - F8-6 (SWG) | MODE switch: pushed | Below 2.5 Ω |
| F8-8 (SW2) - F8-6 (SWG)*2 | Voice switch: pushed | 3049.5 to 3370.5 Ω |
| F8-8 (SW2) - F8-6 (SWG)*2 | On hook switch: pushed | 313.5 to 346.5 Ω |
| F8-8 (SW2) - F8-6 (SWG)*2 | Off hook switch: pushed | 959.5 to 1060.5 Ω |
| *1 | Front view of wire harness connector (to Radio Receiver) |
|
| ||||
| OK | ||
 | ||
| ||
| 2.INSPECT STEERING PAD SWITCH |
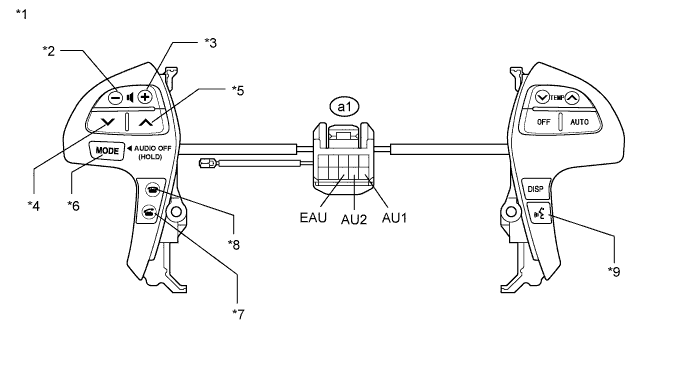
Disconnect the steering pad switch assembly connector.
Measure the resistance according to the value(s) in the table below.
| Tester Connection | Condition | Specified Condition |
| a1-10 (AU1) - a1-8 (EAU) | No switch is pushed | 95 to 105 kΩ |
| a1-10 (AU1) - a1-8 (EAU) | Seek+ switch: pushed | Below 2.5 Ω |
| a1-10 (AU1) - a1-8 (EAU) | Seek- switch: pushed | 313.5 to 346.5 Ω |
| a1-10 (AU1) - a1-8 (EAU) | Volume+ switch: pushed | 959.5 to 1060.5 Ω |
| a1-10 (AU1) - a1-8 (EAU) | Volume- switch: pushed | 3049.5 to 3370.5 Ω |
| a1-9 (AU2) - a1-8 (EAU) | No switch is pushed | 95 to 105 kΩ |
| a1-9 (AU2) - a1-8 (EAU) | MODE switch: pushed | Below 2.5 Ω |
| a1-9 (AU2) - a1-8 (EAU) | Voice switch: pushed*10 | 3049.5 to 3370.5 Ω |
| a1-9 (AU2) - a1-8 (EAU) | On hook switch: pushed*10 | 313.5 to 346.5 Ω |
| a1-9 (AU2) - a1-8 (EAU) | Off hook switch: pushed*10 | 959.5 to 1060.5 Ω |
| *1 | Component without harness connected (Steering Pad Switch Assembly) | *2 | Volume- |
| *3 | Volume+ | *4 | Seek- |
| *5 | Seek+ | *6 | MODE |
| *7 | Off hook*10 | *8 | On hook*10 |
| *9 | Voice*10 | - | - |
|
| ||||
| OK | |
 |
| 3.INSPECT SPIRAL CABLE |
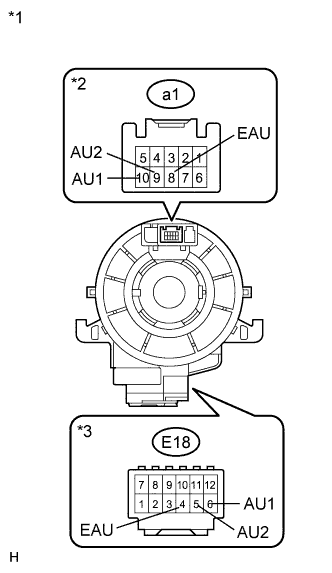 |
Disconnect the steering pad switch assembly and spiral cable connectors.
Measure the resistance according to the value(s) in the table below.
| Tester Connection | Condition | Specified Condition |
| a1-8 (EAU) - E18-4 (EAU) | Center | Below 1 Ω |
| 2.5 rotations to the left | ||
| 2.5 rotations to the right | ||
| a1-10 (AU1) - E18-6 (AU1) | Center | Below 1 Ω |
| 2.5 rotations to the left | ||
| 2.5 rotations to the right | ||
| a1-9 (AU2) - E18-5 (AU2) | Center | Below 1 Ω |
| 2.5 rotations to the left | ||
| 2.5 rotations to the right |
| *1 | Component without harness connected (Spiral Cable) |
| *2 | Steering Pad Switch Side |
| *3 | Vehicle Side |
|
| ||||
| OK | ||
| ||
| ||

