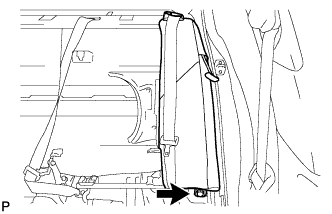
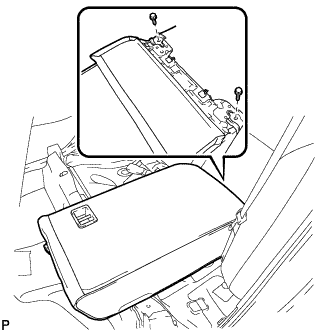
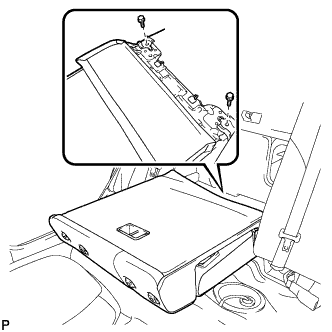
Home › BODY › SLIDING ROOF › SLIDING ROOF HOUSING

SLIDING ROOF HOUSING > INSTALLATION

for Preparation Click here


1. INSTALL SLIDING ROOF WEATHERSTRIP


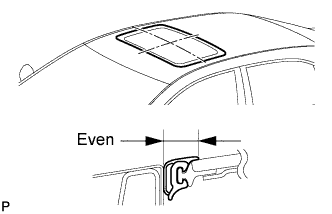
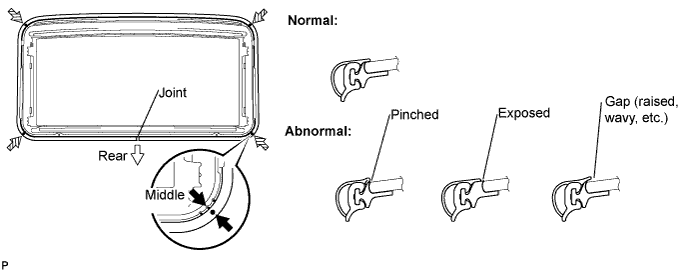
  1. Install the sliding roof weatherstrip as follows:

    1. Position the joint of the weatherstrip at the rear center.

    2. Align the marks on the weatherstrip with the middle marks at the corners of the sliding roof panel and install the weatherstrip.


    3. Install the lip of the weatherstrip firmly.

      B139674E01


2. INSTALL SLIDING ROOF HOUSING SUB-ASSEMBLY


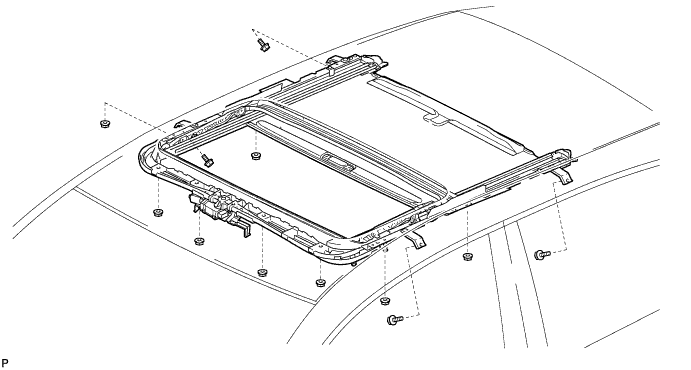
  1. Install the sliding roof housing sub-assembly with the 4 bolts and 8 nuts.


    B148827

    Torque:
    5.5 N*m{ 56 kgf*cm , 49 in.*lbf }


    B122242E01
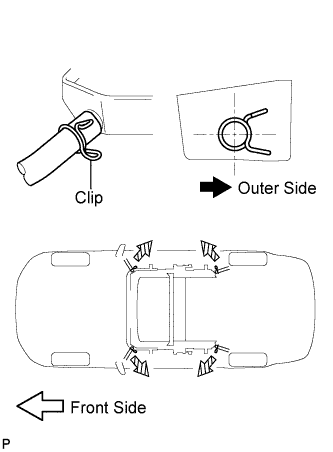
  1. Connect the 4 sliding roof drain hoses.

    NOTICE:
    The clip must face toward the outside of the vehicle and also be above the lower surface of the sliding roof housing when installing the drain hoses.


3. INSTALL SLIDING ROOF GLASS SUB-ASSEMBLY


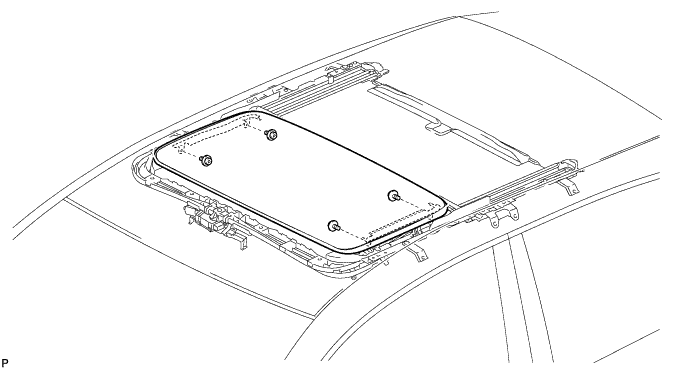
  1. Using a T25 "TORX" driver, temporarily install the sliding roof glass sub-assembly with the 4 screws.


    B132109


    B132111E01
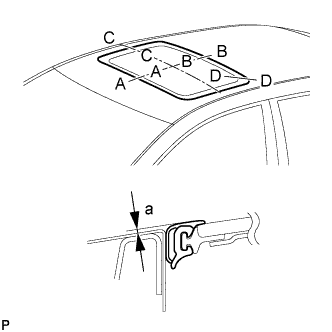
  1. Perform a level check.

    1. Check the difference in level for "a" between the roof panel and the upper surface of the weatherstrip when the sliding roof glass is fully closed.

      Standard:
      Area
      Measurement
      A - A
      0 + 1.0 mm (0 + 0.039 in.)
      0 - 2.0 mm (0 - 0.079 in.)
      B - B
      0 + 2.0 mm (0 + 0.079 in.)
      0 - 1.0 mm (0 - 0.039 in.)
      C - C
      0 + 1.5 mm (0 + 0.059 in.)
      0 - 1.5 mm (0 - 0.059 in.)
      D - D
      0 + 1.5 mm (0 + 0.059 in.)
      0 - 1.0 mm (0 - 0.039 in.)

      HINT:
      "+" represents the condition that the glass is above the panel level. "-" represents the condition that the glass is below the panel level.


    B132112E01
  1. Perform a gap check.

    1. Check the gap between the roof panel and roof glass.

      NOTICE:
      The gap must be even all around.

  1. After adjusting the sliding roof glass, using a T25 "TORX" driver, install the sliding roof glass sub-assembly with the 4 screws.

    Torque:
    4.0 N*m{ 41 kgf*cm , 35 in.*lbf }


4. CHECK FOR WATER LEAKS
  1. After adjusting the sliding roof glass sub-assembly, check for water leaks.

  1. If there are any leaks, readjust the sliding roof glass sub-assembly.


5. INSTALL SLIDING ROOF SIDE GARNISH LH


    B132108
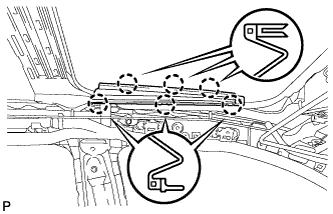
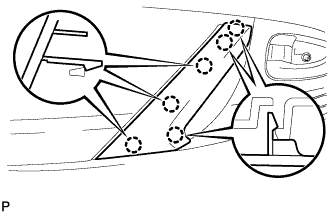
  1. Engage the 6 claws and install the sliding roof side garnish LH.


6. INSTALL SLIDING ROOF SIDE GARNISH RH

HINT:
Use the same procedures for the RH side and the LH side.


7. INSTALL CURTAIN SHIELD AIRBAG ASSEMBLY LH


8. INSTALL CURTAIN SHIELD AIRBAG ASSEMBLY RH

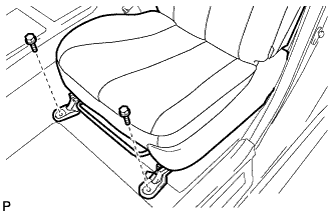
HINT:
Use the same procedures for the RH side and the LH side.


9. INSTALL FRONT SIDE RAIL SPACER LH
  1. Engage the 2 claws and install the front side rail spacer LH.


10. INSTALL FRONT SIDE RAIL SPACER RH

HINT:
Use the same procedures for the RH side and the LH side.


11. INSTALL ROOF HEADLINING ASSEMBLY


    B139561
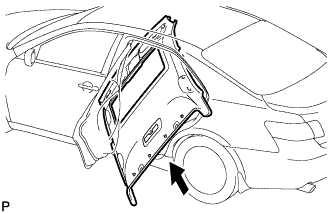
  1. Pull the roof headlining assembly into the vehicle through the rear left door.

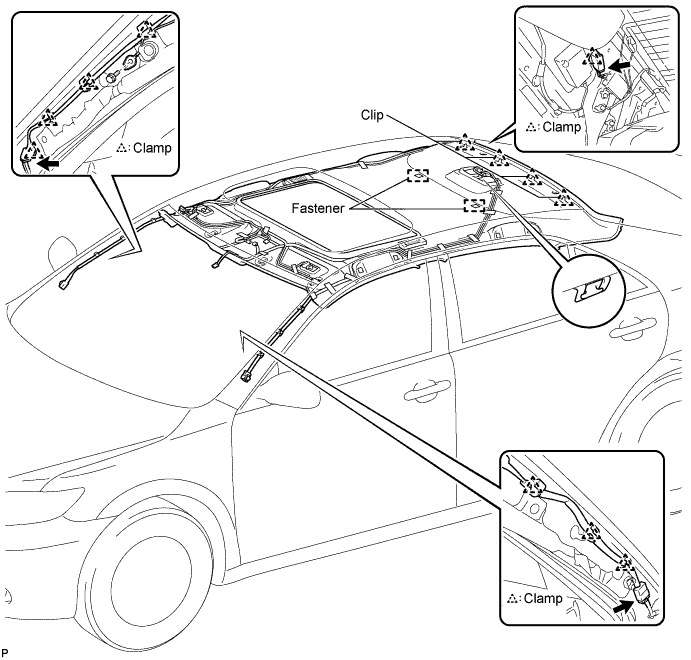
  1. Engage the hook, 4 clips, and 2 fasteners.

  1. Connect the sliding roof drive gear connector.

  1. Connect the antenna cord sub-assembly connector and engage the clamp to the rear pillar RH.

  1. Connect the antenna cord sub-assembly connector and engage each clamp to the front pillar RH.

  1. Install the radio setting condenser to the front pillar RH with the bolt.


  1. Connect the No. 1 roof wire connector and engage each clamp to the front pillar LH.


    B147611E01


12. INSTALL SUNSHADE TRIM HOLDER (w/ Rear Sunshade)


    B132143
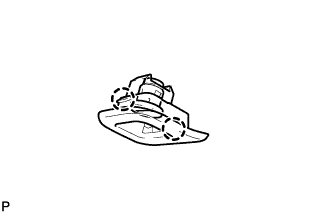
  1. Engage the 2 claws.


    B132092
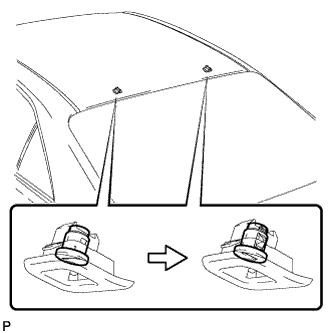
  1. Using a screwdriver, turn the pin of each sunshade trim holder 90°to install the sunshade trim holders.


13. INSTALL SUN ROOF OPENING TRIM MOULDING


    B147634E01
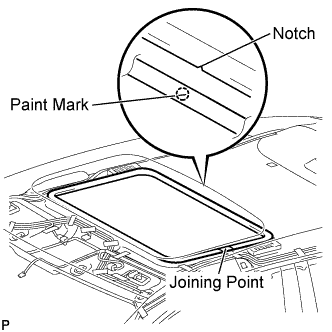
  1. Align the paint mark on the inner surface of the opening trim moulding with the notch of the roof headlining, and install the sun roof opening trim moulding so that joining point of the opening trim is on the left side of the vehicle as shown in the illustration.

    NOTICE:
    After installation, check that the corners fit correctly.


14. INSTALL SPOT LIGHT ASSEMBLY
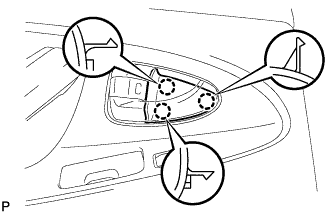

    B132096
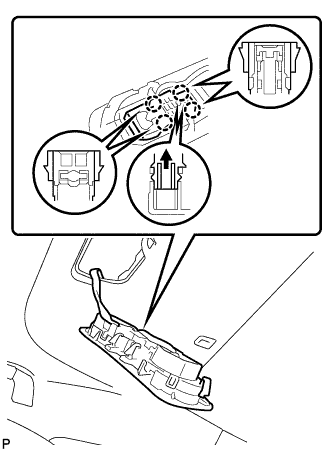
  1. Push the light bulb holder in the direction indicated by the arrow in the illustration to engage the claw.

  1. Engage the 4 claws.


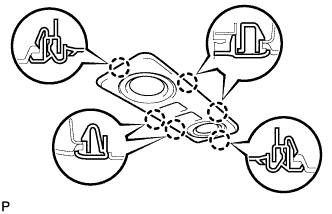
    B132094
  1. Engage the 6 claws and install the spot light assembly.


15. INSTALL FRONT ASSIST GRIP SUB-ASSEMBLY


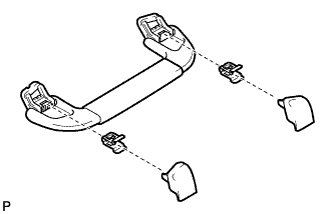
    B132101
  1. Assemble the front assist grip sub-assembly as shown in the illustration.


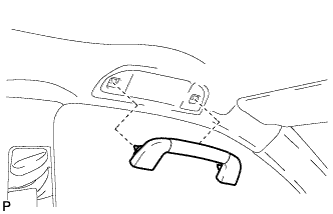
    B132102
  1. Install the front assist grip sub-assembly.

    HINT:
    Use the same procedures for the RH side and the LH side.


16. INSTALL REAR ASSIST GRIP SUB-ASSEMBLY

HINT:
Use the same procedures for the rear side and the front side.


17. INSTALL VISOR HOLDER
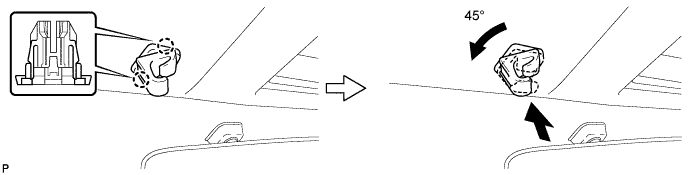
  1. Engage the 2 claws.


  1. Push in the visor holder and turn it approximately 45°as shown in the illustration.


    B132103E01


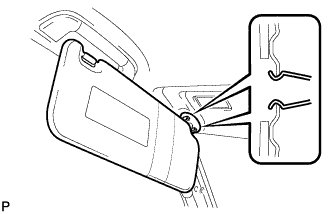
18. INSTALL VISOR ASSEMBLY LH


    B139565
  1. Engage the 2 clips and install the visor assembly LH.


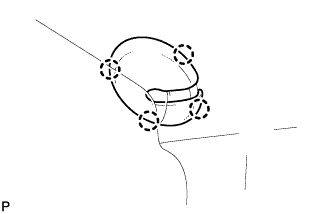
    B139566
  1. Engage the 4 claws and install the visor bracket cover.


19. INSTALL VISOR ASSEMBLY RH

HINT:
Use the same procedures for the RH side and the LH side.


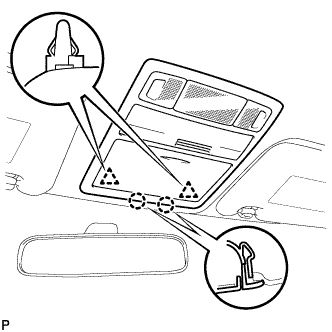
20. INSTALL ROOF CONSOLE BOX ASSEMBLY


    B132065
  1. Connect the connectors.

  1. Engage the 2 claws and 2 clips, and then install the roof console box assembly.


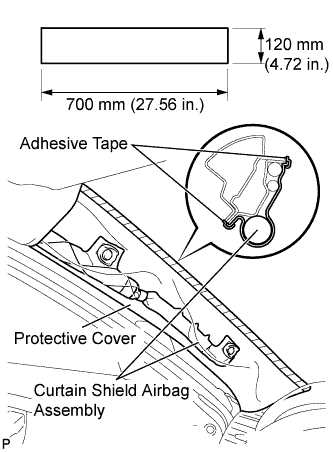
21. INSTALL FRONT PILLAR GARNISH LH


    B132100E01
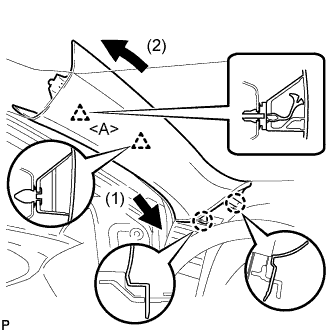
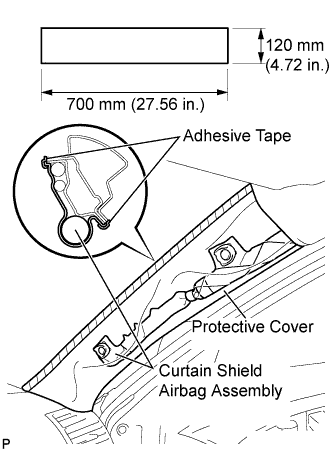
  1. Remove the protective cover.


    B132098E01
  1. Install a new clip <A> on the front pillar garnish LH.

  1. Engage the 2 claws and 2 clips, then install the front pillar garnish LH.


22. INSTALL FRONT PILLAR GARNISH RH


    B132099E01
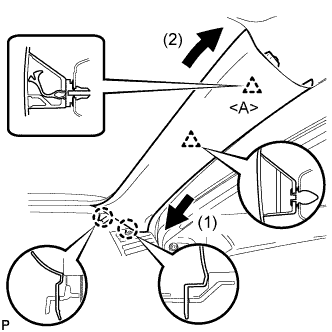
  1. Remove the protective cover.


    B132097E01
  1. Install a new clip <A> on the front pillar garnish RH.

  1. Engage the 2 claws and 2 clips, then install the front pillar garnish RH.


23. INSTALL ROOF SIDE INNER GARNISH LH


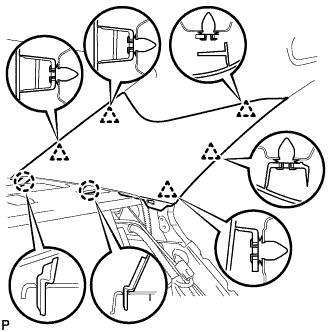
    B132063
  1. Engage the 5 clips and 2 claws, then install the roof side inner garnish LH.


24. INSTALL ROOF SIDE INNER GARNISH RH

HINT:
Use the same procedures for the RH side and the LH side.


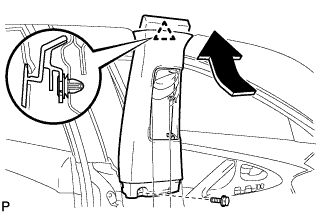
25. INSTALL UPPER CENTER PILLAR GARNISH LH


    B132060
  1. Engage the clip.

  1. Install the upper center pillar garnish LH with the bolt.


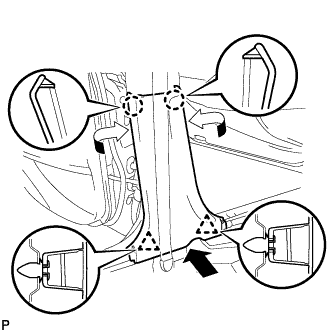
26. INSTALL LOWER CENTER PILLAR GARNISH LH


    B132058
  1. Engage the 2 claws and 2 clips, then install the lower center pillar garnish LH.


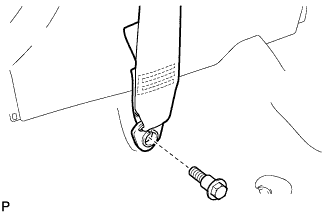
27. CONNECT FRONT SEAT OUTER BELT ASSEMBLY LH


    B131996
  1. Install the floor end of the front seat outer belt assembly LH with the bolt.

    Torque:
    42 N*m{ 428 kgf*cm , 31 ft.*lbf }


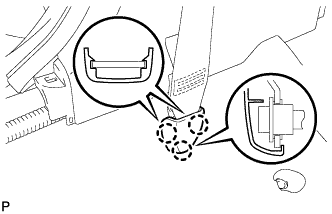
28. INSTALL LAP BELT OUTER ANCHOR COVER (for LH Side)


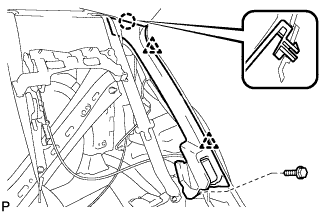
    B131995
  1. Engage the 3 claws and install the lap belt outer anchor cover.


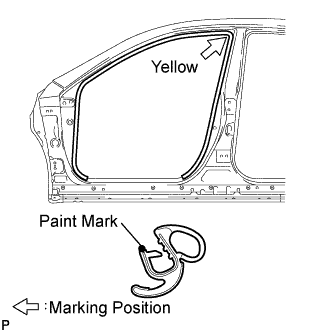
29. INSTALL FRONT DOOR OPENING TRIM WEATHERSTRIP LH


    B132081E01
  1. Install the front door opening trim weatherstrip LH as shown in the illustration.

    NOTICE:
    After installation, check that the corners fit correctly.


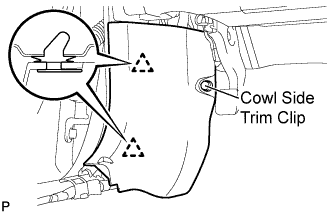
30. INSTALL COWL SIDE TRIM SUB-ASSEMBLY LH


    B132116E01
  1. Engage the 2 clips.

  1. Install the cowl side trim sub-assembly LH with the cowl side trim clip.


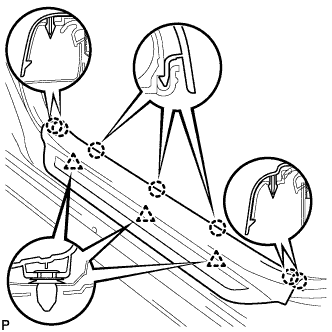
31. INSTALL FRONT DOOR SCUFF PLATE LH


    B132067
  1. Engage the 7 claws and 3 clips, then install the front door scuff plate LH.


32. INSTALL UPPER CENTER PILLAR GARNISH RH

HINT:
Use the same procedures for the RH side and the LH side.


33. INSTALL LOWER CENTER PILLAR GARNISH RH

HINT:
Use the same procedures for the RH side and the LH side.


34. CONNECT FRONT SEAT OUTER BELT ASSEMBLY RH

HINT:
Use the same procedures for the RH side and the LH side.


35. INSTALL LAP BELT OUTER ANCHOR COVER (for RH Side)

HINT:
Use the same procedures for the RH side and the LH side.


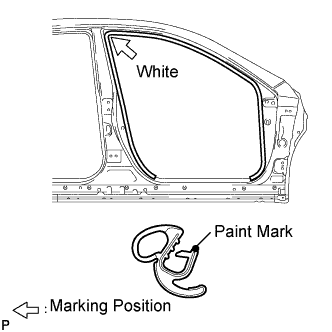
36. INSTALL FRONT DOOR OPENING TRIM WEATHERSTRIP RH


    B132083E01
  1. Install the front door opening trim weatherstrip RH as shown in the illustration.

    NOTICE:
    After installation, check that the corners fit correctly.


37. INSTALL COWL SIDE TRIM SUB-ASSEMBLY RH

HINT:
Use the same procedures for the RH side and the LH side.


38. INSTALL FRONT DOOR SCUFF PLATE RH

HINT:
Use the same procedures for the RH side and the LH side.


39. INSTALL REAR DOOR INNER GLASS WEATHERSTRIP LH


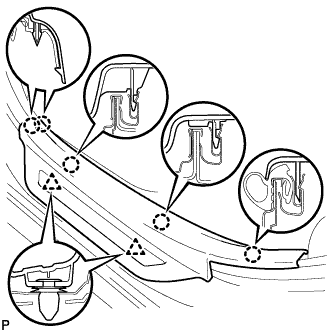
    B136490
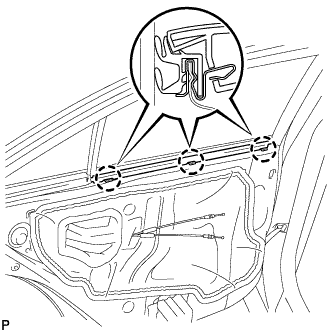
  1. Engage the 3 claws to install the rear door inner glass weatherstrip.


40. INSTALL REAR DOOR TRIM BOARD SUB-ASSEMBLY LH


    B141703
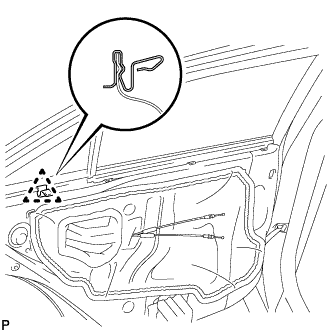
  1. Engage the claw to install the No. 1 door scuff plate clamp.

  1. Connect each connector.


    B136450
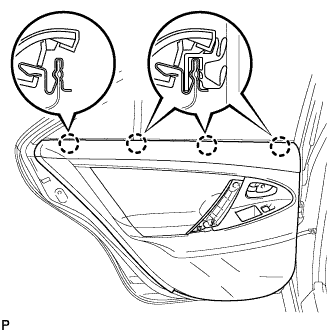
  1. Engage the rear door trim board with the 4 clips of the rear door inner glass weatherstrip.


    B136449
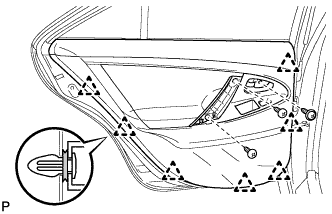
  1. Engage the 7 clips to install the rear door trim board to the rear door panel.

  1. Install the 3 screws.


41. INSTALL DOOR ASSIST GRIP COVER LH


    B136448
  1. Engage the 6 claws and install the door assist grip cover.


42. INSTALL REAR DOOR INSIDE HANDLE BEZEL PLUG LH


    B136446
  1. Engage the 3 claws to install the rear door inside handle bezel plug.


43. INSTALL RECLINING REMOTE CONTROL LEVER SUB-ASSEMBLY LH (for Reclining Seat Type)


    B139084
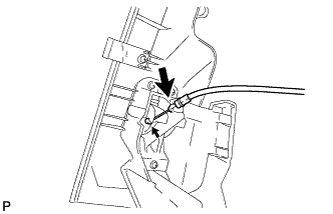
  1. Install the rear seat reclining control cable.


    B139083
  1. Engage the 2 clips and claw and then install the reclining remote control lever sub-assembly.

  1. Install the bolt.

    Torque:
    18 N*m{ 184 kgf*cm , 13 ft.*lbf }


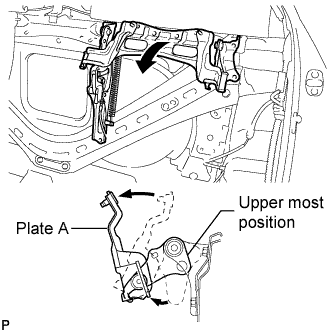
    B144036E01
  1. Adjust the control lever to set the rear reclining adjuster assembly to its upper most position.

  1. Pull plate A toward the front of the vehicle to lock the plate.


44. INSTALL RECLINING REMOTE CONTROL LEVER SUB-ASSEMBLY RH (for Reclining Seat Type)

HINT:
Use the same procedures for the RH side and the LH side.


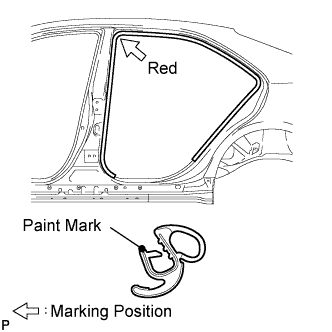
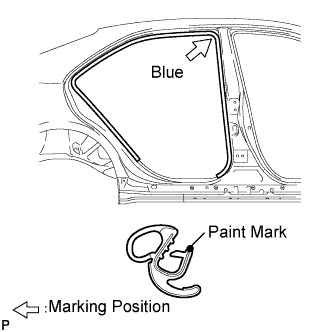
45. INSTALL REAR DOOR OPENING TRIM WEATHERSTRIP LH


    B132080E01
  1. Install the rear door opening trim weatherstrip LH as shown in the illustration.

    NOTICE:
    After installation, check that the corners fit correctly.


46. INSTALL REAR DOOR SCUFF PLATE LH


    B132068
  1. Engage the 5 claws and 2 clips, then install the rear door scuff plate LH.


47. INSTALL REAR DOOR OPENING TRIM WEATHERSTRIP RH


    B132082E01
  1. Install the rear door opening trim weatherstrip RH as shown in the illustration.

    NOTICE:
    After installation, check that the corners fit correctly.


48. INSTALL REAR DOOR SCUFF PLATE RH

HINT:
Use the same procedures for the RH side and the LH side.


49. INSTALL CENTER SEATBACK ASSEMBLY (for Reclining Seat Type)


    B140592
  1. Install the center seatback assembly with the 2 bolts.

    Torque:
    18 N*m{ 184 kgf*cm , 13 ft.*lbf }


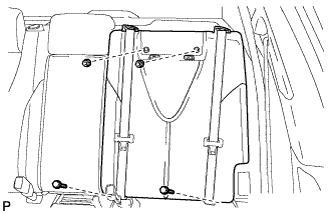
50. INSTALL SEPARATE TYPE REAR SEATBACK ASSEMBLY LH (for Reclining Seat Type)


    B139077
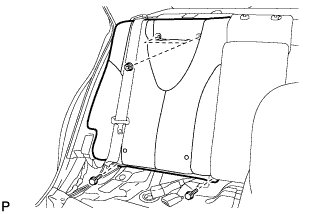
  1. Install the separate type rear seatback assembly LH with the 2bolts and 2 nuts.

    Torque:
    18 N*m{ 184 kgf*cm , 13 ft.*lbf }


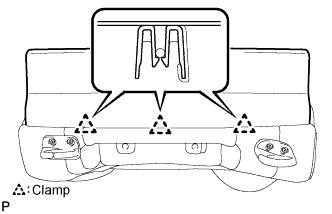
    B139081E01
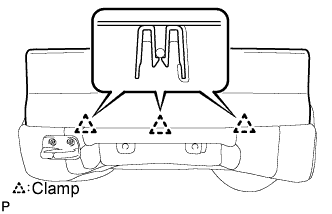
  1. Engage the 3 clamps and install the cover.


    B139076E01
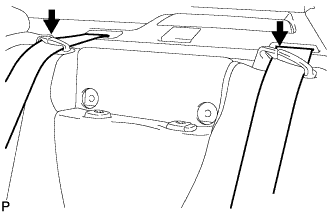
  1. Install the 2 rear seat belts.


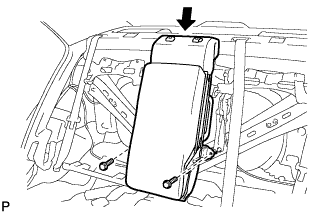
51. INSTALL SEPARATE TYPE REAR SEATBACK ASSEMBLY RH (for Reclining Seat Type)


    B139079
  1. Install the separate type rear seatback assembly RH with the 2 bolts and 2 nuts.

    Torque:
    18 N*m{ 184 kgf*cm , 13 ft.*lbf }


    B139082E01
  1. Engage the 3 clamps and install the cover.


    B139078E01
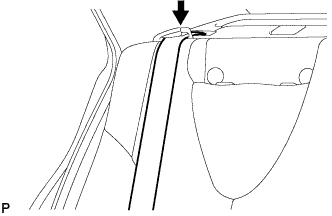
  1. Install the rear seat belt.


52. INSTALL REAR SEATBACK COVER (for Reclining Seat Type)


53. INSTALL REAR SIDE SEATBACK ASSEMBLY LH (for Fold Down Seat Type)


    B136561
  1. Install the rear side seatback assembly with the bolt.

    Torque:
    18 N*m{ 184 kgf*cm , 13 ft.*lbf }


54. INSTALL REAR SIDE SEATBACK ASSEMBLY RH (for Fold Down Seat Type)

HINT:
Use the same procedures for the RH side and the LH side.


55. INSTALL SEPARATE TYPE REAR SEATBACK ASSEMBLY LH (for Fold Down Seat Type)


    B136539
  1. Install the separate type rear seatback assembly with the 2 bolts.

    Torque:
    18 N*m{ 184 kgf*cm , 13 ft.*lbf }


56. INSTALL SEPARATE TYPE REAR SEATBACK ASSEMBLY RH (for Fold Down Seat Type)


    B134700
  1. Install the separate type rear seat back assembly with the 2 bolts.

    Torque:
    18 N*m{ 184 kgf*cm , 13 ft.*lbf }


57. INSTALL REAR CENTER SEAT HEADREST ASSEMBLY


58. INSTALL REAR SEAT HEADREST ASSEMBLY


59. INSTALL REAR SEAT CUSHION ASSEMBLY


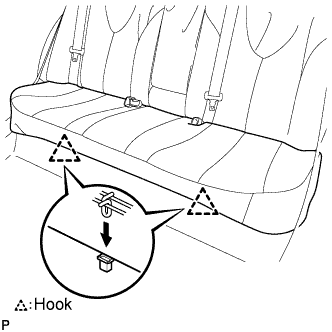
    B140584E01
  1. Attach the front hooks of the bench type rear seat cushion assembly to the vehicle body.

  1. Confirm that the seat cushion is firmly installed.

    NOTICE:
    When installing the bench type rear seat cushion assembly, make sure that the seat belt buckle is not under the bench type rear seat cushion assembly.


60. INSTALL FRONT SEAT ASSEMBLY LH (for Power Seat)
  1. Place the seat in the cabin.

  1. Connect the connectors under the seat.

  1. Connect the cable to the negative (-) battery terminal.

  1. Move the front seat assembly fully forward by operating the slide and vertical power seat switch knob.

    NOTICE:
    Check that the seat is locked.


    B140607
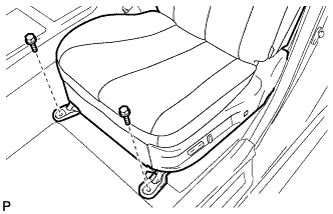
  1. Temporarily install the front side of the front seat assembly with the 2 bolts.

  1. Move the front seat assembly fully forward by operating the slide and vertical power seat switch knob.

    NOTICE:
    Check that the seat is locked.


    B139102
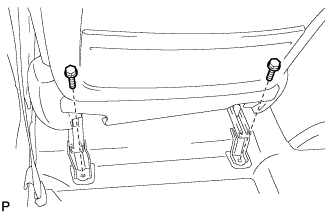
  1. Temporarily install the rear side of the front seat assembly with the 2 bolts.

  1. Move the front seat assembly to the rearmost position by operating the slide and vertical power seat switch knob.

    NOTICE:
    Check that the seat is locked.

  1. Fully tighten the 2 bolts on the front side of the front seat assembly in the order of the inner side bolt and then the outer side bolt.

    Torque:
    37 N*m{ 377 kgf*cm , 27 ft.*lbf }

  1. Move the front seat assembly fully forward by operating the slide and vertical power seat switch knob.

    NOTICE:
    Check that the seat is locked.

  1. Fully tighten the 2 bolts on the rear side of the front seat assembly in the order of the inner side bolt and then the outer side bolt.

    Torque:
    37 N*m{ 377 kgf*cm , 27 ft.*lbf }


61. INSTALL INNER SEAT TRACK BRACKET COVER RH (for Power Seat)


    B139100E01
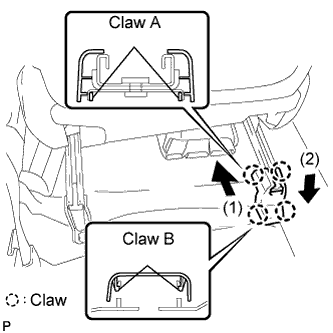
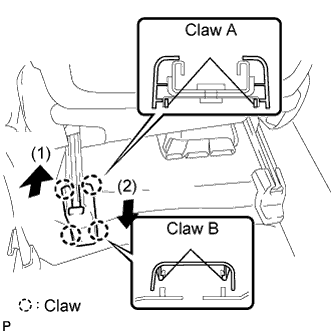
  1. Slide the inner seat track bracket cover along the seat rail toward the front of the vehicle. Engage claw A to the seat rail.

  1. Push the inner seat track bracket cover to engage claw B.


62. INSTALL SEAT TRACK COVER LH (for Power Seat)


    B139099E01
  1. Slide the seat track cover along the seat rail toward the front of the vehicle. Engage claw A to the seat rail.

  1. Push the seat track cover to engage claw B.


63. INSTALL FRONT SEAT HEADREST ASSEMBLY (for Power Seat)


64. INSTALL FRONT SEAT ASSEMBLY LH (for Manual Seat)
  1. Place the front seat assembly in the vehicle and align the adjuster pin with the hole on the vehicle side.

  1. Connect the connector and clamp.

  1. Move the front seat assembly to the rearmost position by operating the slide handle.

    NOTICE:
    Check that the seat is locked.


    B139101
  1. Temporarily install the front seat track bracket with the 2 bolts.

  1. Move the front seat assembly fully forward by operating the slide handle.

    NOTICE:
    Check that the seat is locked.


    B139102
  1. Temporarily install the rear seat track bracket with the 2 bolts.

  1. Move the front seat assembly to the rearmost position by operating the slide handle.

    NOTICE:
    Check that the seat is locked.

  1. Fully tighten the 2 bolts on the front seat track bracket in the order of the inner side bolt and then the outer side bolt.

    Torque:
    37 N*m{ 377 kgf*cm , 27 ft.*lbf }

  1. Move the front seat assembly fully forward by operating the slide handle.

    NOTICE:
    Check that the seat is locked.

  1. Fully tighten the 2 bolts on the rear seat track bracket in the order of the inner side bolt and then the outer side bolt.

    Torque:
    37 N*m{ 377 kgf*cm , 27 ft.*lbf }


65. INSTALL INNER SEAT TRACK BRACKET COVER LH (for Manual Seat)


    B139100E01
  1. Slide the inner seat track bracket cover along the seat rail toward the front of the vehicle. Engage claw A to the seat rail.

  1. Push the seat track bracket cover inner to engage claw B.


66. INSTALL SEAT TRACK COVER LH (for Manual Seat)


    B139099E01
  1. Slide the seat track cover along the seat rail toward the front of the vehicle. Engage claw A to the seat rail.

  1. Push the seat track cover to engage claw B.


67. INSTALL FRONT SEAT HEADREST ASSEMBLY (for Manual Seat)


68. INSTALL FRONT SEAT ASSEMBLY RH (for Power Seat)

HINT:
Use the same procedures for the RH side and the LH side.


69. INSTALL INNER SEAT TRACK BRACKET COVER LH (for Power Seat)

HINT:
Use the same procedures for the RH side and the LH side.


70. INSTALL SEAT TRACK COVER RH (for Power Seat)

HINT:
Use the same procedures for the RH side and the LH side.


71. INSTALL FRONT SEAT HEADREST ASSEMBLY (for Power Seat)


72. INSTALL FRONT SEAT ASSEMBLY RH (for Manual Seat)

HINT:
Use the same procedures for the RH side and the LH side.


73. INSTALL INNER SEAT TRACK BRACKET COVER RH (for Manual Seat)

HINT:
Use the same procedures for the RH side and the LH side.


74. INSTALL SEAT TRACK COVER RH (for Manual Seat)

HINT:
Use the same procedures for the RH side and the LH side.


75. INSTALL FRONT SEAT HEADREST ASSEMBLY (for Manual Seat)


76. CONNECT CABLE TO NEGATIVE BATTERY TERMINAL


77. INSPECT SRS WARNING LIGHT
(Click here)


78. RESET SLIDING ROOF DRIVE GEAR SUB-ASSEMBLY
(Click here)


79. INSPECT SLIDING ROOF SYSTEM
(Click here)


80. INSPECT FRONT SEAT ASSEMBLY (for Power Seat)
  1. Check the power seat operation.

  1. Check the seat heater operation (with seat heater system).

    1. Turn the ignition switch on (IG).

    2. Turn the seat heater switch ON.

    3. Wait 5 minutes or more and confirm that the seat surface becomes warm.


81. INSPECT FRONT SEAT ADJUSTER ASSEMBLY (for Manual Seat)