DOOR / HATCH FRONT DOOR ADJUSTMENT
CAUTION / NOTICE / HINT
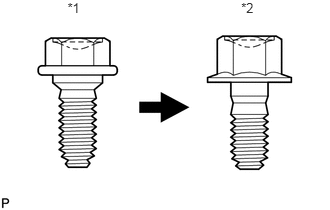
| *1 | Centering Bolt |
| *2 | Standard Bolt |
- CAUTION:
-
Before adjusting the door positions of vehicles equipped with side and curtain shield airbags, be sure to disconnect the battery. After adjustment, check that the SRS warning light is operating normally and there are no SRS DTCs output.
- HINT:
- ·
Use the same procedure for the RH side and LH side.
·The procedure listed below is for the LH side.
·Centering bolts are used to mount the door hinge to the vehicle body and door. The door cannot be adjusted with the centering bolts installed. Substitute the centering bolts with standard bolts when making adjustments.
·Specified torque for standard bolts is shown in the standard bolt chart.
Click hereGeneral>SPECIFICATIONS>STANDARD BOLT>SPECIFIED TORQUE FOR STANDARD BOLTS
PROCEDURE

 1.INSPECT FRONT DOOR
Check that the clearance measurements of areas a through p are within each standard range.
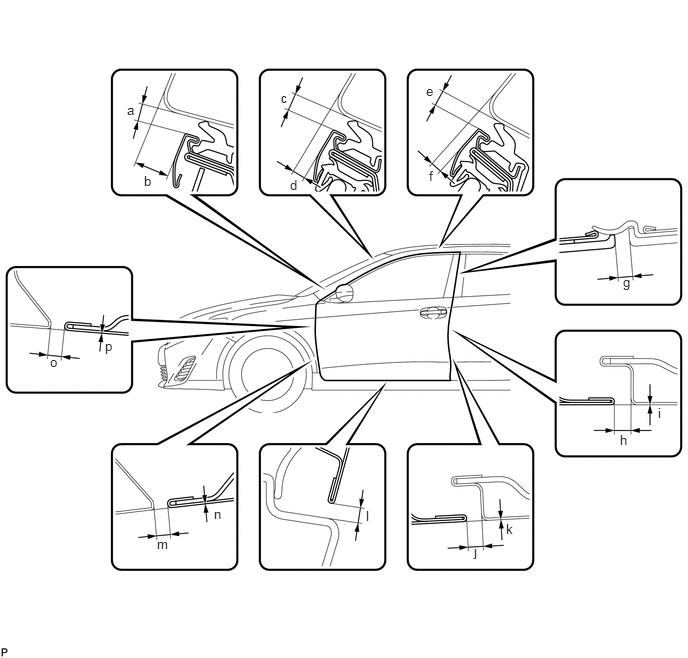
| Area | Measurement | Area | Measurement |
|---|---|---|---|
| a | 3.5 to 6.5 mm (0.138 to 0.256 in.) | b | 9.0 to 12.0 mm (0.354 to 0.472 in.) |
| c | 3.5 to 6.5 mm (0.138 to 0.256 in.) | d | 1.7 to 4.7 mm (0.0609 to 0.185 in.) |
| e | 3.5 to 6.5 mm (0.138 to 0.256 in.) | f | 1.0 to 4.0 mm (0.0394 to 0.157 in.) |
| g | 2.3 to 6.3 mm (0.0906 to 0.248 in.) | h | 2.9 to 5.3 mm (0.114 to 0.209 in.) |
| i | -1.2 to 1.2 mm (-0.0472 to 0.0472 in.) | j | 2.9 to 5.3 mm (0.114 to 0.209 in.) |
| k | -1.2 to 1.2 mm (-0.0472 to 0.0472 in.) | l | 3.2 to 7.4 mm (0.126 to 0.291 in.) |
| m | 2.6 to 5.0 mm (0.102 to 0.197 in.) | n | -1.2 to 1.2 mm (-0.0472 to 0.0472 in.) |
| o | 2.6 to 5.0 mm (0.102 to 0.197 in.) | p | -1.2 to 1.2 mm (-0.0472 to 0.0472 in.) |
2.REMOVE FRONT WHEEL
53852K
3.REMOVE FRONT WHEEL OPENING EXTENSION PAD
- HINT:
-
Use the same procedure for the RH side and LH side.
-
Click hereVehicle Exterior>WIPER / WASHER>WASHER MOTOR>REMOVAL
53876A
4.REMOVE FRONT FENDER LINER
- HINT:
-
Use the same procedure for the RH side and LH side.
-
Click hereVehicle Exterior>WIPER / WASHER>WASHER MOTOR>REMOVAL
53883K
5.REMOVE FRONT FENDER SEAL
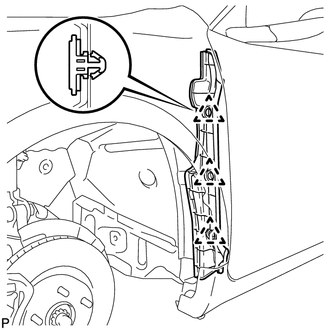
Disengage the 3 clips and remove the front fender seal.
6.ADJUST FRONT DOOR
- NOTICE:
-
Make sure that the turn the ignition switch off when adjusting door lock strikers.
Using SST, loosen the hinge bolts on the vehicle body and adjust the door position.
- SST
- 09812-00010
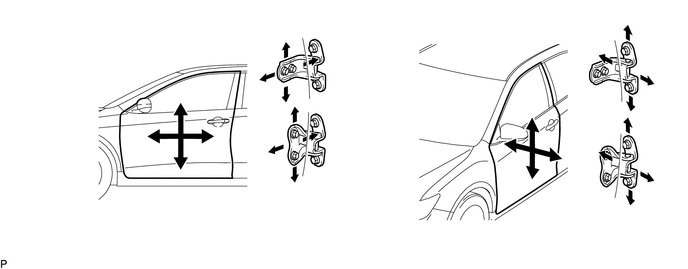
Tighten the hinge bolts on the vehicle body after adjustment.
- Torque:
- 26 N*m (265 kgf*cm, 19 ft.*lbf)
Loosen the hinge bolts on the door and adjust the door position.
Tighten the hinge bolts on the door after adjustment.
- Torque:
- 26 N*m (265 kgf*cm, 19 ft.*lbf)
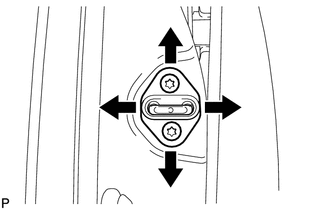
Using a T40 "TORX" socket wrench, slightly loosen the striker mounting screws.
Using a brass bar and a hammer, hit the striker to adjust its position.
Using a T40 "TORX" socket wrench, tighten the striker mounting screws after adjustment.
- Torque:
- 23 N*m (235 kgf*cm, 17 ft.*lbf)
53883K
7.INSTALL FRONT FENDER SEAL
Install the front fender seal with new 3 clips.
53876A
8.INSTALL FRONT FENDER LINER
- HINT:
-
Use the same procedure for the RH side and LH side.
-
Click hereVehicle Exterior>WIPER / WASHER>WASHER MOTOR>INSTALLATION
53852K
9.INSTALL FRONT WHEEL OPENING EXTENSION PAD
- HINT:
-
Use the same procedure for the RH side and LH side.
-
Click hereVehicle Exterior>WIPER / WASHER>WASHER MOTOR>INSTALLATION
10.INSTALL FRONT WHEEL