2AR-FE COOLING COOLING FAN SYSTEM Cooling Fan Circuit
DESCRIPTION
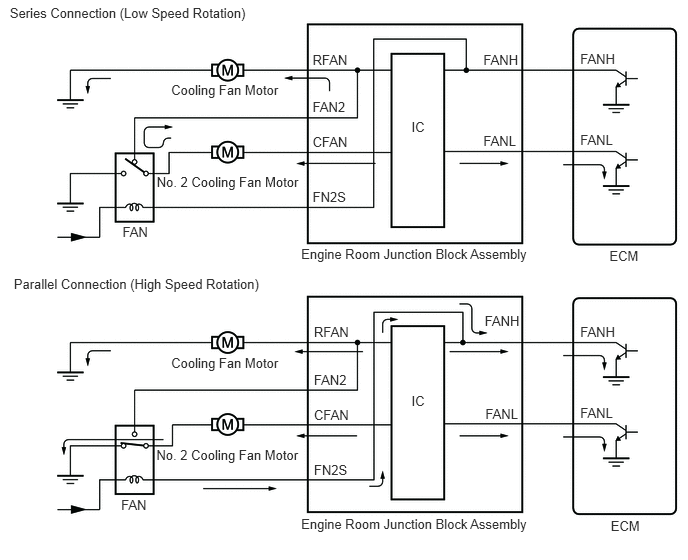
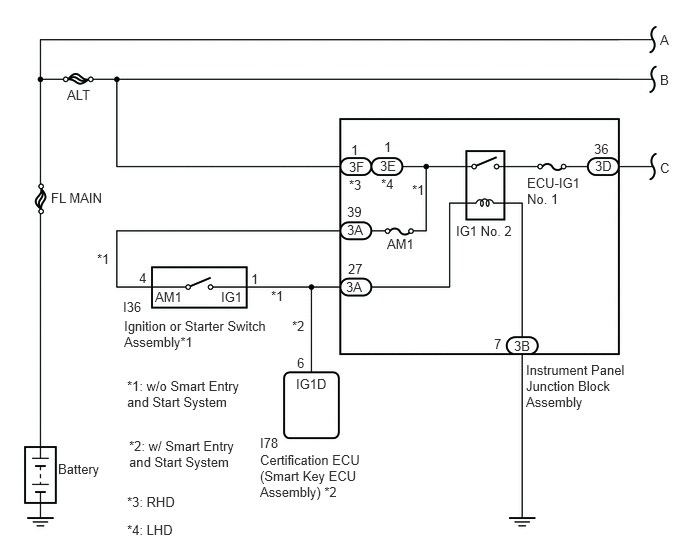
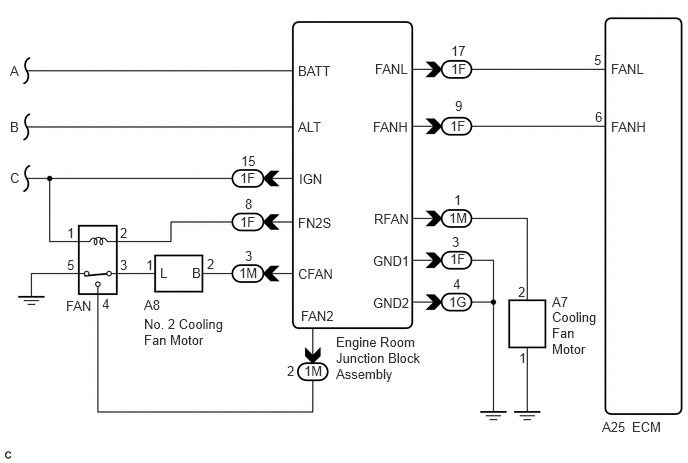
The ECM monitors engine coolant temperature, the air conditioning switch, the air conditioning refrigerant pressure and engine speed. It also sends the FANL and FANH signals to the engine room junction block assembly to operate the cooling fan motor and No. 2 cooling fan motor.
The ECM switches the cooling fan motor and No. 2 cooling fan motor circuits from a series (low speed rotation) to parallel (high speed rotation) connection by changing the FANH signal, thereby controlling the 2 levels of fan speed.
| Input signal | FANL | OFF | ON | ON |
| FANH | OFF | OFF | ON | |
| Condition | Cooling fan motor | OFF | ON (Series connection (Low speed rotation)) | ON (Parallel connection (High speed rotation)) |
| No. 2 cooling fan motor | OFF | ON (Series connection (Low speed rotation)) | ON (Parallel connection (High speed rotation)) |
WIRING DIAGRAM
CAUTION / NOTICE / HINT
- NOTICE:
-
Inspect the fuses for circuits related to this system before performing the following procedure.
PROCEDURE
- HINT:
-
If cooling fan speed does not change, proceed to the next step.
Connect the intelligent tester to the DLC3.
Turn the ignition switch to ON.
Turn the tester on.
Enter the following menus: Powertrain / Engine and ECT / Active Test / Control the Electric Cooling Fan.
- Powertrain > Engine and ECT > Active Test
-
Tester Display Control the Electric Cooling Fan - 50004 234 16
Check the operation of the cooling fans using the intelligent tester.
- OK:
Tester Operation Fan Operation ON Cooling fan operates OFF Cooling fan stops
- Result:
Result Proceed to NG A OK B
A
B
Disconnect the ECM connector.
Remove the engine room junction block assembly from the engine room relay block and junction block assembly.
Disconnect the engine room junction block assembly connector.
Measure the resistance according to the value(s) in the table below.
- Standard Resistance:
Tester Connection Condition Specified Condition A25-5 (FANL) - 1F-17 (FANL) Always Below 1 Ω A25-6 (FANH) - 1F-9 (FANH) Always Below 1 Ω A25-5 (FANL) or 1F-17 (FANL) - Body ground Always 10 kΩ or higher A25-6 (FANH) or 1F-9 (FANH) - Body ground Always 10 kΩ or higher
- Result:
Proceed to OK NG
OK
NG
Using a voltmeter, check the signal reading of the engine room junction block assembly.
Click herePower Source / Network>POWER DISTRIBUTION>INTEGRATION RELAY>ON-VEHICLE INSPECTION
- OK:
Output signal reading is normal.
- Result:
Proceed to OK NG
OK
NG
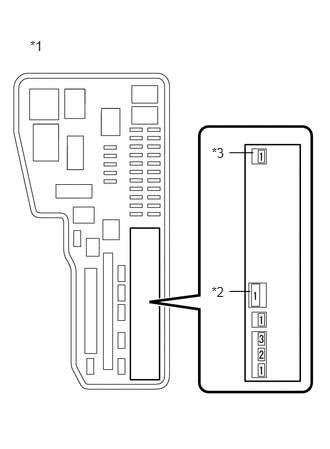
| *1 | Engine Room Relay Block and Junction Block Assembly |
| *2 | ALT |
| *3 | BATT |
Remove the engine room junction block assembly from the engine room relay block and junction block assembly.
Measure the voltage according to the value(s) in the table below.
- Standard Voltage:
Tester Connection Condition Specified Condition (BATT) - Body ground Ignition switch off 11 to 14 V (ALT) - Body ground Ignition switch off 11 to 14 V
- Result:
Proceed to OK NG
OK
NG
Remove the engine room junction block assembly from the engine room relay block and junction block assembly.
Disconnect the engine room junction block assembly connector.
Measure the resistance according to the value(s) in the table below.
- Standard Resistance:
Tester Connection Condition Specified Condition 1F-3 (GND1) - Body ground Always Below 1 Ω 1G-4 (GND2) - Body ground Always Below 1 Ω
- HINT:
-
Make sure that there are no short circuits to the battery.
- Result:
Proceed to OK NG
OK
NG
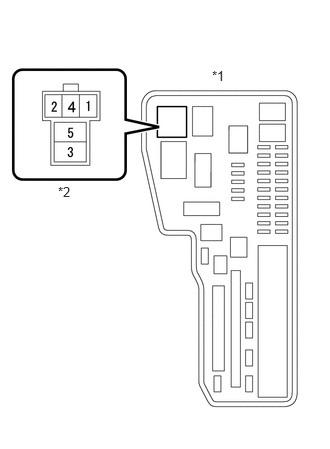
| *1 | Engine Room Relay Block and Junction Block Assembly |
| *2 | FAN Relay |
Remove the FAN relay from the engine room relay block and junction block assembly.
Turn the ignition switch to ON.
Measure the voltage according to the value(s) in the table below.
- Standard Voltage:
Tester Connection Condition Specified Condition 1 (FAN relay) - Body ground Ignition switch ON 11 to 14 V
- Result:
Proceed to OK NG
OK
NG
Remove the engine room junction block assembly from the engine room relay block and junction block assembly.
Disconnect the engine room junction block assembly connector.
Remove the FAN relay from the engine room relay block and junction block assembly.
Disconnect the instrument panel junction block assembly connector.
Measure the resistance according to the value(s) in the table below.
- Standard Resistance:
Tester Connection Condition Specified Condition 1F-15 (IGN) - 1 (FAN relay) Always Below 1 Ω 1F-15 (IGN) or 1 (FAN relay) - Body ground Always 10 kΩ or higher
- HINT:
-
Make sure that there are no short circuits to the battery.
- Result:
Proceed to OK NG
OK
NG
Inspect the FAN relay.
Click hereEngine / Hybrid System>2AR-FE COOLING>RELAY>ON-VEHICLE INSPECTION
- Result:
Proceed to OK NG
OK
NG
Remove the FAN relay from the engine room relay block and junction block assembly.
Remove the engine room junction block assembly from the engine room relay block and junction block assembly.
Disconnect the engine room junction block assembly connector.
Measure the resistance according to the value(s) in the table below.
- Standard Resistance:
Tester Connection Condition Specified Condition 2 (FAN relay) - 1F-8 (FN2S) Always Below 1 Ω 2 (FAN relay) or 1F-8 (FN2S) - Body ground Always 10 kΩ or higher
- HINT:
-
Make sure that there are no short circuits to the battery.
- Result:
Proceed to OK NG
OK
NG
Remove the FAN relay from the engine room relay block and junction block assembly.
Remove the engine room junction block assembly from the engine room relay block and junction block assembly.
Measure the resistance according to the value(s) in the table below.
- Standard Resistance:
Tester Connection Condition Specified Condition 4 (FAN relay) - 1M-2 (FAN2) Always Below 1 Ω 4 (FAN relay) or 1M-2 (FAN2) - Body ground Always 10 kΩ or higher
- HINT:
-
Make sure that there are no short circuits to the battery.
- Result:
Proceed to OK NG
OK
NG
Remove the FAN relay from the engine room relay block and junction block assembly.
Measure the resistance according to the value(s) in the table below.
- Standard Resistance:
Tester Connection Condition Specified Condition 5 (FAN relay) - Body ground Always Below 1 Ω
- HINT:
-
Make sure that there are no short circuits to the battery.
- Result:
Proceed to OK NG
OK
NG
Inspect the No. 2 cooling fan motor.
Click hereEngine / Hybrid System>2AR-FE COOLING>COOLING FAN MOTOR>ON-VEHICLE INSPECTION
- Result:
Proceed to OK NG
OK
NG
Remove the FAN relay from the engine room relay block and junction block assembly.
Disconnect the No. 2 cooling fan motor connector.
Measure the resistance according to the value(s) in the table below.
- Standard Resistance:
Tester Connection Condition Specified Condition 3 (FAN relay) - A8-1 (L) Always Below 1 Ω 3 (FAN relay) or A8-1 (L) - Body ground Always 10 kΩ or higher
- HINT:
-
Make sure that there are no short circuits to the battery.
- Result:
Proceed to OK NG
OK
NG
Disconnect the No. 2 cooling fan motor connector.
Remove the engine room junction block assembly from the engine room relay block and junction block assembly.
Measure the resistance according to the value(s) in the table below.
- Standard Resistance:
Tester Connection Condition Specified Condition A8-2 (B) - 1M-3 (CFAN) Always Below 1 Ω A8-2 (B) or 1M-3 (CFAN) - Body ground Always 10 kΩ or higher
- HINT:
-
Make sure that there are no short circuits to the battery.
- Result:
Proceed to OK NG
OK
NG
Inspect the cooling fan motor.
Click hereEngine / Hybrid System>2AR-FE COOLING>COOLING FAN MOTOR>ON-VEHICLE INSPECTION
- Result:
Proceed to OK NG
OK
NG
Remove the engine room junction block assembly from the engine room relay block and junction block assembly.
Disconnect the cooling fan motor connector.
Measure the resistance according to the value(s) in the table below.
- Standard Resistance:
Tester Connection Condition Specified Condition 1M-1 (RFAN) - A7-2 Always Below 1 Ω 1M-1 (RFAN) or A7-2 - Body ground Always 10 kΩ or higher
- HINT:
-
Make sure that there are no short circuits to the battery.
- Result:
Proceed to OK NG
OK
NG
Disconnect the cooling fan motor connector.
Measure the resistance according to the value(s) in the table below.
- Standard Resistance:
Tester Connection Condition Specified Condition A7-1 - Body ground Always Below 1 Ω
- HINT:
-
Make sure that there are no short circuits to the battery.
- Result:
Proceed to OK NG
OK
NG
Remove the FAN relay from the engine room relay block and junction block assembly.
Disconnect the instrument panel junction block assembly connector.
Remove the engine room junction block assembly from the engine room relay block and junction block assembly.
Disconnect the engine room junction block assembly connector.
Measure the resistance according to the value(s) in the table below.
- Standard Resistance:
Tester Connection Condition Specified Condition 1(FAN relay) - 3D-36 Always Below 1 Ω 1(FAN relay) or 3D-36 - Body ground Always 10 kΩ or higher
- HINT:
-
Make sure that there are no short circuits to the battery.
- Result:
Proceed to OK NG
OK
NG
Disconnect the instrument panel junction block assembly connector.
Measure the resistance according to the value(s) in the table below.
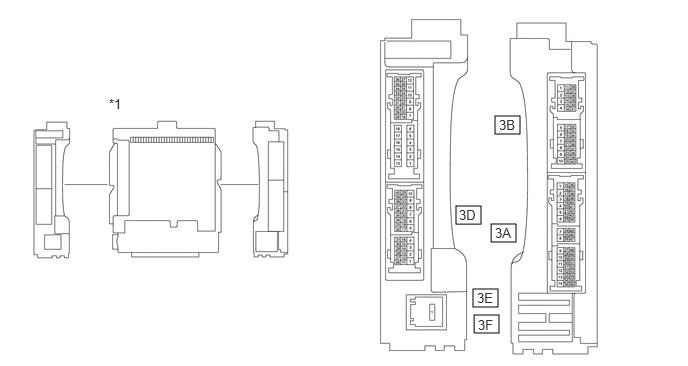
| *1 | Instrument Panel Junction Block Assembly | - | - |
- Standard Resistance (RHD):
Tester Connection Condition Specified Condition 3F-1 - 3D-36 Battery voltage is not applied between terminals 3A-27 and 3B-7 10 kΩ or higher 3F-1 - 3D-36 Battery voltage is applied between terminals 3A-27 and 3B-7 Below 1 Ω
- Standard Resistance (LHD):
Tester Connection Condition Specified Condition 3E-1 - 3D-36 Battery voltage is not applied between terminals 3A-27 and 3B-7 10 kΩ or higher 3E-1 - 3D-36 Battery voltage is applied between terminals 3A-27 and 3B-7 Below 1 Ω
- Result:
Proceed to OK NG
OK
NG
Disconnect the instrument panel junction block assembly connector.
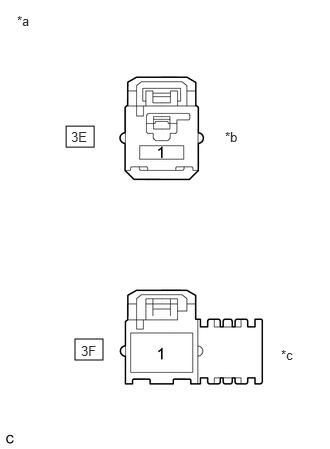
| *a | Front view of wire harness connector (to Instrument Panel Junction Block Assembly) |
| *b | LHD |
| *c | RHD |
Measure the voltage according to the value(s) in the table below.
- Standard Voltage (RHD):
Tester Connection Condition Specified Condition 3F-1 - Body ground Always 11 to 14 V
- Standard Voltage (LHD):
Tester Connection Condition Specified Condition 3E-1 - Body ground Always 11 to 14 V
- Result:
Proceed to OK NG
OK
NG
Disconnect the instrument panel junction block assembly connector.
Measure the resistance according to the value(s) in the table below.
- Standard Resistance:
Tester Connection Condition Specified Condition 3B-7 - Body ground Always Below 1 Ω
- Result:
Result Proceed to OK (w/o Smart Key System) A OK (w/ Smart Key System) B NG C
- HINT:
-
Make sure that there are no short circuits to the battery.
A
B
C
Disconnect the instrument panel junction block assembly connector.
Disconnect the ignition or starter switch assembly connector.
Measure the resistance according to the value(s) in the table below.
- Standard Resistance:
Tester Connection Condition Specified Condition 3A-27 - I36-1 (IG1) Always Below 1 Ω 3A-27 or I36-1 (IG1) - Body ground Always 10 kΩ or higher
- HINT:
-
Make sure that there are no short circuits to the battery.
- Result:
Proceed to OK NG
OK
NG
Inspect the ignition or starter switch assembly.
Click hereEngine / Hybrid System>2AR-FE STARTING>IGNITION SWITCH>INSPECTION
- Result:
Proceed to OK NG
OK
NG
Disconnect the instrument panel junction block assembly connector.
Disconnect the certification ECU (smart key ECU assembly) connector.
Measure the resistance according to the value(s) in the table below.
- Standard Resistance:
Tester Connection Condition Specified Condition 3A-27 - I78-6 (IG1D) Always Below 1 Ω 3A-27 or I78-6 (IG1D) - Body ground Always 10 kΩ or higher
- HINT:
-
Make sure that there are no short circuits to the battery.
- Result:
Proceed to OK NG
OK
NG