2AR-FE ENGINE MECHANICAL ENGINE UNIT INSPECTION
PROCEDURE

 13801
1.INSPECT NO. 1 VALVE ROCKER ARM SUB-ASSEMBLY
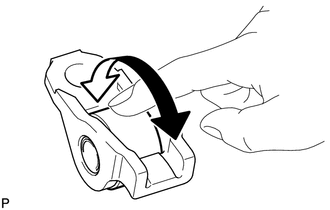
Turn the roller by hand to check that it turns smoothly.
If the roller does not turn smoothly, replace the No. 1 valve rocker arm sub-assembly.
13750
2.INSPECT VALVE LASH ADJUSTER ASSEMBLY
- NOTICE:
- ·
Keep the valve lash adjuster assembly free from dirt and foreign matter.
·Use only clean engine oil.
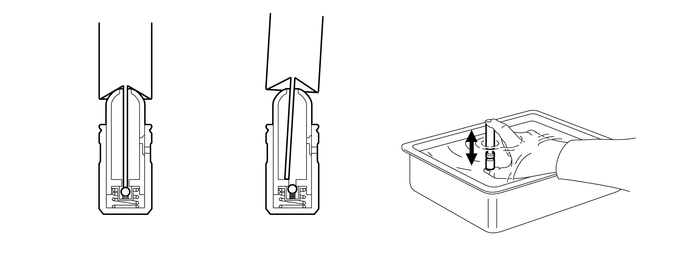
| *1 | Plunger | *2 | Check Ball |
| *a | Correct | *b | Incorrect |
| *c | Taper Part | *d | Low Pressure Chamber |
| *e | High Pressure Chamber | - | - |
Place the valve lash adjuster assembly into a container full of new engine oil.
Insert the tip of SST into the lash adjuster plunger and use the tip to press down on the check ball inside the plunger.
- SST
- 09276-75010
Squeeze SST and the valve lash adjuster assembly together to move the plunger up and down 5 to 6 times.
Check the movement of the plunger and bleed the air.
- OK:
Plunger moves up and down.
- NOTICE:
-
When bleeding high-pressure air from the compression chamber, make sure that the tip of SST is actually pressing the check ball as shown in the illustration. If the check ball is not pressed, air will not bleed.
After bleeding the air, remove SST. Then try to quickly and firmly press the plunger with your fingers.
- OK:
Plunger is very difficult to move.
If the result is not as specified, replace the valve lash adjuster assembly.
3.INSPECT CAMSHAFT OIL CLEARANCE
4.INSPECT CAMSHAFT THRUST CLEARANCE
13511
5.INSPECT CAMSHAFT
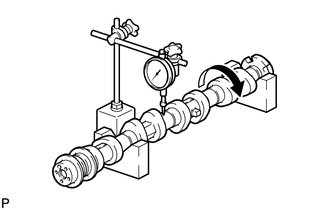
Inspect the camshaft runout.
Place the camshaft on V-blocks.
Using a dial indicator, measure the circle runout at the center journal.
- Maximum Circle Runout:
0.03 mm (0.00118 in.)
If the circle runout is more than the maximum, replace the camshaft.
- HINT:
-
Check the oil clearance after replacing the camshaft.
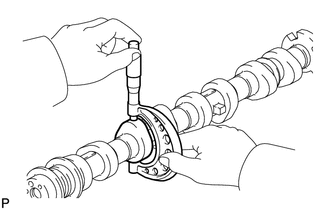
Inspect the camshaft lobes.
Using a micrometer, measure the cam lobe height.
- Standard Cam Lobe Height:
Item Specified Condition Intake 44.163 to 44.305 mm (1.739 to 1.744 in.) Exhaust 44.144 to 44.286 mm (1.738 to 1.744 in.)
- Minimum Cam Lobe Height:
Item Specified Condition Intake 44.013 mm (1.733 in.) Exhaust 43.996 mm (1.732 in.)
If the cam lobe height is less than the minimum, replace the camshaft.
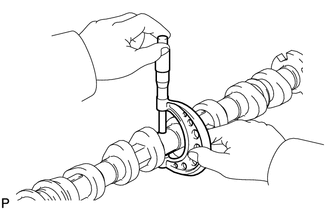
Inspect the camshaft journals.
Using a micrometer, measure the journal diameter.
- Standard Journal Diameter:
Item Specified Condition No. 1 journal 34.449 to 34.465 mm (1.356 to 1.357 in.) Other journals 22.959 to 22.975 mm (0.904 to 0.905 in.)
If the journal diameter is not as specified, check the oil clearance.
Click hereEngine / Hybrid System>2AR-FE ENGINE MECHANICAL>CYLINDER HEAD>INSPECTION
13050
6.INSPECT CAMSHAFT TIMING GEAR ASSEMBLY
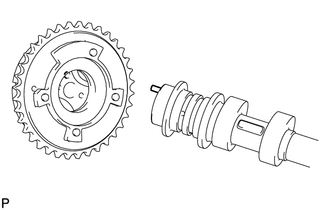
| *1 | Knock Pin |
| *a | Pin Hole |
Align and attach the knock pin of the camshaft with the pin hole of the camshaft timing gear assembly.
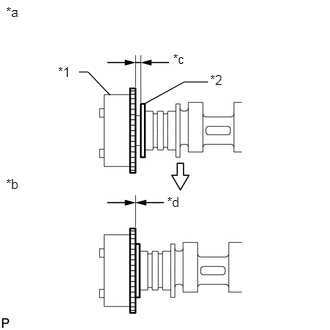
| *1 | Camshaft Timing Gear Assembly |
| *2 | Camshaft Flange |
| *a | Incorrect |
| *b | Correct |
| *c | Clearance |
| *d | No Clearance |
Check that there is no clearance between the camshaft timing gear assembly and camshaft flange.
Secure the camshaft in place by hand, and then install the installation bolt of the camshaft timing gear assembly by hand.
- NOTICE:
-
Do not use any tools to install the bolt. If the bolt is installed using a tool, the lock pin will be damaged.
Check the lock of the camshaft timing gear assembly.
Make sure that the camshaft timing gear assembly is locked.
- NOTICE:
-
Be careful not to damage the camshaft.
Release the lock pin.
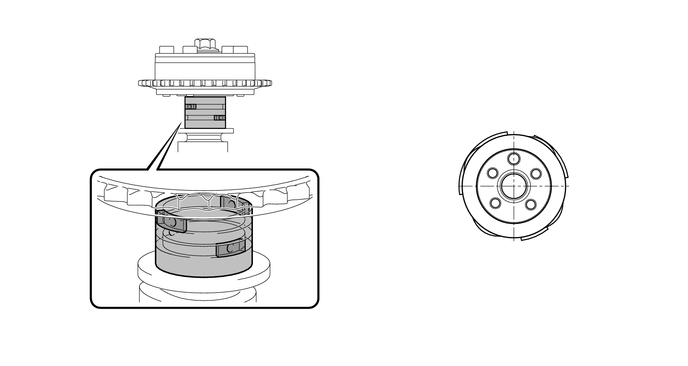
| *1 | Rubber | *2 | Vinyl Tape |
| *3 | Knock Pin | - | - |
| *a | Retard Side Path | *b | Advance Side Path |
| *c | Open | *d | Close |
Clean the camshaft journal with non-residue solvent.
Cover the 4 oil paths of the camshaft journal with vinyl tape as shown in the illustration.
- HINT:
-
There are 4 oil paths in the grooves of the camshaft. Plug three of the paths with pieces of rubber.
Open a hole at port A shown in the illustration.
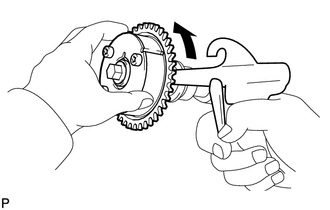
While applying approximately 200 kPa (2.0 kgf/ cm2, 29 psi) of air pressure to the oil path, forcibly turn the camshaft timing gear assembly in the advance direction (counterclockwise).
- CAUTION:
-
Cover the paths with a piece of cloth when applying air pressure to keep oil from spraying.
- NOTICE:
-
Do not allow the camshaft timing gear assembly to lock. If it locks, release the lock pin again.
- HINT:
- ·
The camshaft timing gear assembly may be turned in the advance direction without applying any force.
·If enough air pressure cannot be applied because of air leakage from the port, releasing the lock pin may be difficult.
Check for smooth rotation.
Turn the camshaft timing gear assembly within its movable range (19.0 to 21.0°) 2 or 3 times, but do not turn it to the most retarded position. Make sure that the camshaft timing gear assembly turns smoothly.
- NOTICE:
-
Do not allow the camshaft timing gear assembly to lock.
-
If it locks, release the lock pin again.
Remove the vinyl tape and rubber pieces from the camshaft.
Remove the bolt and camshaft timing gear assembly.
13070A
7.INSPECT CAMSHAFT TIMING EXHAUST GEAR ASSEMBLY
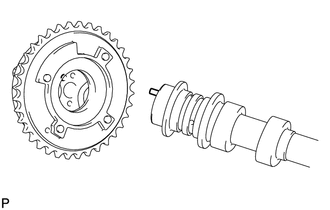
| *1 | Knock Pin |
| *a | Pin Hole |
Align and attach the knock pin of the No. 2 camshaft with the pin hole of the camshaft timing exhaust gear assembly.
| *1 | Camshaft Timing Exhaust Gear Assembly |
| *2 | Camshaft Flange |
| *a | Incorrect |
| *b | Correct |
| *c | Clearance |
| *d | No Clearance |
Check that there is no clearance between the camshaft timing exhaust gear assembly and No. 2 camshaft flange.
Secure the camshaft in place by hand, and then install the installation bolt of the camshaft timing exhaust gear assembly by hand.
Check the lock of the camshaft timing exhaust gear assembly.
Make sure that the camshaft timing exhaust gear assembly is locked.
- NOTICE:
-
Be careful not to damage the No. 2 camshaft.
Release the lock pin.
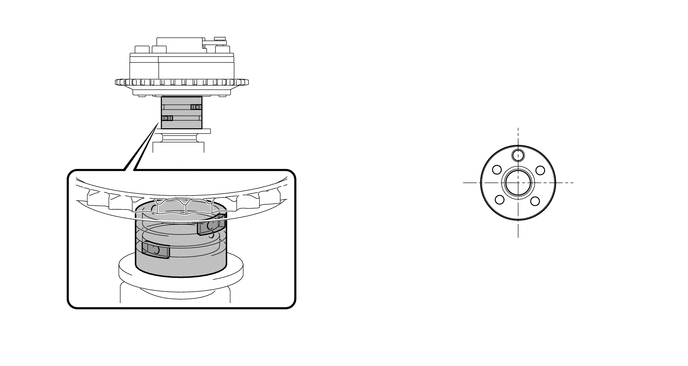
| *1 | Rubber | *2 | Vinyl Tape |
| *3 | Knock Pin | - | - |
| *a | Retard Side Path | *b | Advance Side Path |
| *c | Open | *d | Close |
Clean the No. 2 camshaft journal with non-residue solvent.
Cover the 4 oil paths of the No. 2 camshaft journal with vinyl tape as shown in the illustration.
- HINT:
-
There are 4 oil paths in the grooves of the camshaft. Plug 2 paths with rubber pieces.
Prick a hole in the tape placed on the advance side path. Prick a hole in the tape placed on the retard side path, on the opposite side to that of the advance side path, as shown in the illustration.
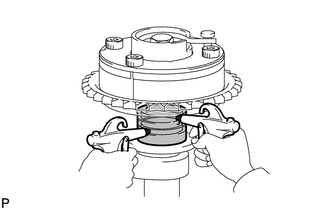
| *a | Retard Side Path |
| *b | Advance Side Path |
Apply approximately 200 kPa (2.0 kgf/cm2, 29 psi) of air pressure to the 2 open paths (the advance side path and retard side path).
- NOTICE:
-
Cover the paths with a piece of cloth when applying air pressure to keep oil from spraying.
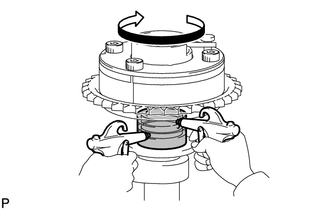
| *a | Retard Side Path |
| *b | Advance Side Path |
| *c | Hold Pressure |
| *d | Decompress |
Check that the camshaft timing exhaust gear assembly turns in the retard direction when reducing the air pressure applied to the advance side path.
- HINT:
-
The lock pin is released and the camshaft timing exhaust gear assembly turns in the retard direction.
When the camshaft timing exhaust gear assembly moves to the most retarded position, release the air pressure from the advance side path, and then release the air pressure from the retard side path.
- NOTICE:
-
Be sure to release the air pressure from the advance side path first. If the air pressure of the retard side path is released first, the camshaft timing exhaust gear assembly may abruptly shift in the advance direction and break the lock pin or other parts.
Check for smooth rotation.
Turn the camshaft timing exhaust gear assembly within its movable range (19.0 to 21.0°) 2 or 3 times, but do not turn it to the most advanced position. Make sure that the camshaft timing exhaust gear assembly turns smoothly.
- NOTICE:
-
When the air pressure is released from the advance side path and then from the retard side path, the camshaft timing exhaust gear assembly automatically returns to the most advanced position due to the advance assist spring operation, and locks. Gradually release the air pressure from the retard side path before performing the smooth rotation check.
Check the lock at the most advanced position.
Make sure that the camshaft timing exhaust gear assembly locks at the most advanced position.
Remove the vinyl tape and rubber pieces from the No. 2 camshaft.
Remove the bolt and camshaft exhaust timing gear assembly.
13506
8.INSPECT CHAIN SUB-ASSEMBLY
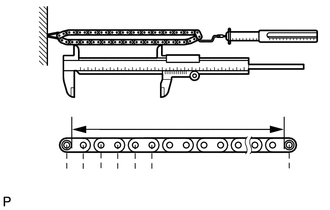
| *a | Measurement Area |
Using a spring scale, pull the chain sub-assembly with a force of 147 N (15 kgf, 33.0 lbf) as shown in the illustration.
Using a vernier caliper, measure the length of 15 pins.
- Maximum Chain Elongation:
137.7 mm (5.42 in.)
- HINT:
-
Perform the measurement at 3 random places. Use the average of the measurements.
If the elongation is more than the maximum, replace the chain sub-assembly.
13521
9.INSPECT CRANKSHAFT TIMING SPROCKET
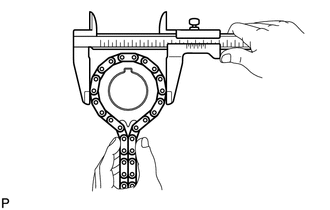
Place the chain sub-assembly around the crankshaft timing sprocket.
Using a vernier caliper, measure the crankshaft timing sprocket diameter with the chain sub-assembly.
- Minimum Sprocket Diameter (with Chain sub-assembly):
59.94 mm (2.36 in.)
If the diameter is less than the minimum, replace the chain sub-assembly and crankshaft timing sprocket.
- HINT:
-
The vernier caliper must contact the chain sub-assembly rollers for the measurement.
13540
10.INSPECT NO. 1 CHAIN TENSIONER ASSEMBLY
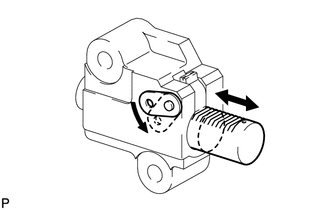
Move the stopper plate counterclockwise to release the lock. Push the plunger and check that it moves smoothly.
If necessary, replace the No. 1 chain tensioner assembly.
13559
11.INSPECT CHAIN TENSIONER SLIPPER
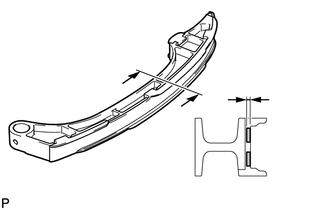
| *a | Depth |
Measure the wear depth of the chain tensioner slipper.
- Maximum Depth:
1.0 mm (0.0394 in.)
If the depth is more than the maximum, replace the chain tensioner slipper.
13561
12.INSPECT NO. 1 CHAIN VIBRATION DAMPER
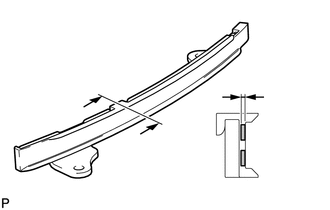
| *a | Depth |
Measure the wear depth of the No. 1 chain vibration damper.
- Maximum Depth:
1.0 mm (0.0394 in.)
If the depth is more than the maximum, replace the No. 1 chain vibration damper.
13566B
13.INSPECT TIMING CHAIN GUIDE
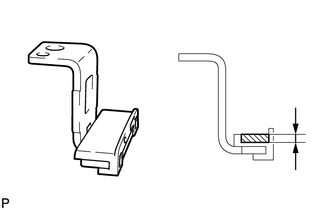
| *a | Depth |
Measure the wear depth of the timing chain guide.
- Maximum Depth:
1.0 mm (0.0394 in.)
If the depth is more than the maximum, replace the timing chain guide.
13620B
14.INSPECT NO. 1 BALANCE SHAFT THRUST CLEARANCE
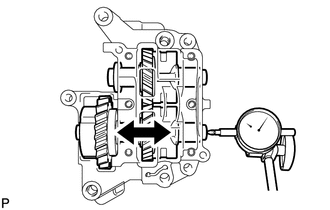
Using a dial indicator, measure the thrust clearance while moving the No. 1 balance shaft back and forth.
- Standard Thrust Clearance:
0.05 to 0.09 mm (0.00197 to 0.00354 in.)
- Maximum Thrust Clearance:
0.09 mm (0.00354 in.)
If the thrust clearance is more than the maximum, replace the engine balancer assembly.
13620B
15.INSPECT NO. 2 BALANCE SHAFT THRUST CLEARANCE
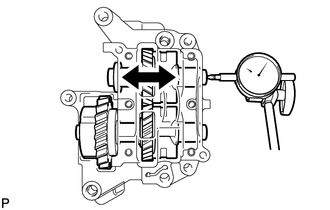
Using a dial indicator, measure the thrust clearance while moving the No. 2 balance shaft back and forth.
- Standard Thrust Clearance:
0.05 to 0.09 mm (0.00197 to 0.00354 in.)
- Maximum Thrust Clearance:
0.09 mm (0.00354 in.)
If the thrust clearance is more than the maximum, replace the engine balancer assembly.
13620B
16.INSPECT BALANCE SHAFT BACKLASH
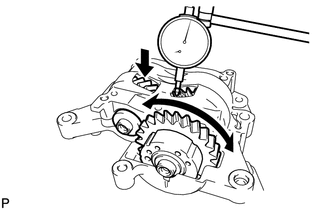
| *a | Secure |
Secure the No. 2 balance shaft in place, and then using a dial indicator, measure the backlash of the No. 1 balance shaft and No. 2 balance shaft as shown in the illustration.
- Standard Backlash:
0.04 to 0.17 mm (0.00157 to 0.00669 in.)
- Maximum Backlash:
0.17 mm (0.00669 in.)
- NOTICE:
-
Measure at 3 or more areas around the circumference of the No. 1 balance shaft and No. 2 balance shaft.
If the backlash is more than the maximum, replace the engine balancer assembly.
11101A
17.INSPECT CYLINDER HEAD BOLT
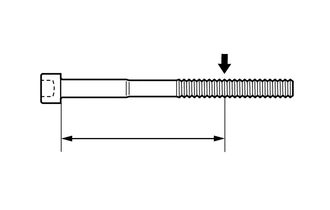
| *a | Measurement Point |
Using a vernier caliper, measure the diameter of the threads at the measurement point.
- Standard Diameter:
10.85 to 11.00 mm (0.427 to 0.433 in.)
- Minimum Diameter:
10.6 mm (0.417 in.)
- Measurement Point (Distance from the Seat):
106 mm (4.17 in.)
- HINT:
- ·
If the diameter is less than the minimum, replace the cylinder head bolt with a new one. Failure to do so may lead to engine damage.
·If there is any thread deformation, replace the cylinder head bolt with a new one.
25051
18.INSPECT EXHAUST MANIFOLD CONVERTER SUB-ASSEMBLY
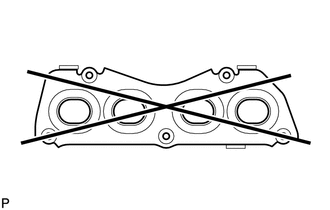
Using a precision straightedge and feeler gauge, check the surface that contacts the cylinder head sub-assembly for warpage.
- Maximum Warpage:
0.7 mm (0.0276 in.)
If the warpage is more than the maximum, replace the exhaust manifold converter sub-assembly.