EXTERIOR PANELS / TRIM REAR DOOR WINDOW FRAME MOULDING REMOVAL
CAUTION / NOTICE / HINT
- HINT:
- ·
Use the same procedure for the RH side and LH side.
·The following procedure is for the LH side.
PROCEDURE

 1. PRECAUTION
- NOTICE:
-
After turning the ignition switch off, waiting time may be required before disconnecting the cable from the negative (-) battery terminal. Therefore, make sure to read the disconnecting the cable from the negative (-) battery terminal notices before proceeding with work.
-
Click hereGeneral>INTRODUCTION>REPAIR INSTRUCTION>PRECAUTION
2.DISCONNECT CABLE FROM NEGATIVE BATTERY TERMINAL
- NOTICE:
-
When disconnecting the cable, some systems need to be initialized after the cable is reconnected.
-
Click hereGeneral>INTRODUCTION>REPAIR INSTRUCTION>INITIALIZATION
69284D
3.REMOVE REAR DOOR INSIDE HANDLE BEZEL PLUG
4.REMOVE REAR POWER WINDOW REGULATOR SWITCH ASSEMBLY WITH REAR DOOR ARMREST BASE PANEL
74260
5.REMOVE REAR ARMREST ASSEMBLY
67604
6.REMOVE REAR DOOR TRIM BOARD SUB-ASSEMBLY
68174A
7.REMOVE REAR DOOR INNER GLASS WEATHERSTRIP
67842E
8.REMOVE REAR DOOR SERVICE HOLE COVER
68640A
9.REMOVE REAR DOOR CHECK ASSEMBLY
67872
10.REMOVE REAR DOOR WEATHERSTRIP
68152C
11.REMOVE REAR DOOR GLASS RUN
67408F
12.REMOVE REAR DOOR LOWER WINDOW FRAME SUB-ASSEMBLY
68124B
13.REMOVE REAR DOOR QUARTER WINDOW GLASS
68104
14.REMOVE REAR DOOR GLASS SUB-ASSEMBLY
75740
15.REMOVE REAR DOOR BELT MOULDING ASSEMBLY
75762A
16.REMOVE REAR DOOR FRONT WINDOW FRAME MOULDING
- HINT:
-
When removing the rear door front window frame moulding, heat the vehicle body and rear door front window frame moulding using a heat light.
| Item | Temperature |
|---|---|
| Vehicle Body | 40 to 60°C (104 to 140°F) |
| Rear Door Front Window Frame Moulding | 20 to 30°C (68 to 86°F) |
- NOTICE:
-
Do not heat the vehicle body or rear door front window frame moulding excessively.
Using a heat light, heat the rear door front window frame moulding.
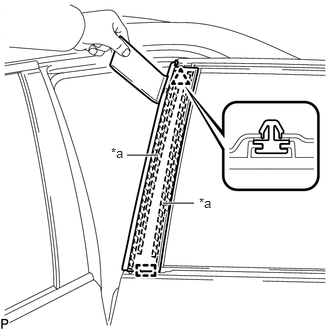
| *a | Caulking Sponge |

|
Double-sided Tape |
Using a moulding remover, disengage the clip and guide, and separate the double-sided tape and caulking sponge to remove the rear door front window frame moulding.
75764A
17.REMOVE REAR DOOR UPPER WINDOW FRAME MOULDING
Insert a 4.0 mm (0.157 in.) drill bit into a drill.
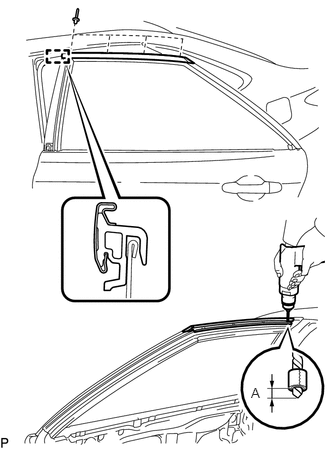
Tape a 4.0 mm (0.157 in.) drill bit 5.0 mm (0.197 in.) from the tip as shown in the illustration.
- Standard Measurement:
Area Measurement A 5.0 mm (0.197 in.)
- NOTICE:
-
Tape the 4.0 mm (0.157 in.) drill bit to prevent the drill bit from going too deep.
Lightly press the drill bit against the rivets to drill off the rivet flanges, and remove the 4 rivets.
- NOTICE:
- ·
Pressing the drill too firmly will cause the rivet to turn and result in the rivet not being drilled through.
·Prying the rivets with the drill may damage the rivet installation holes or drill bit.
·Be careful of the drilled rivets, as they may be hot.
Using a vacuum cleaner, remove the rivet fragments and shavings from the drilled areas.
Disengage the guide and remove the rear door upper window frame moulding from the door frame.
18.REMOVE REAR DOOR REAR WINDOW FRAME MOULDING
Insert a 4.0 mm (0.157 in.) drill bit into a drill.
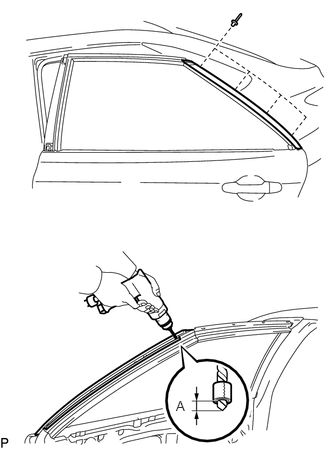
Tape a 4.0 mm (0.157 in.) drill bit 5.0 mm (0.197 in.) from the tip as shown in the illustration.
- Standard Measurement:
Area Measurement A 5.0 mm (0.197 in.)
- NOTICE:
-
Tape the 4.0 mm (0.157 in.) drill bit to prevent the drill bit from going too deep.
Lightly press the drill bit against the rivets to drill off the rivet flanges, and remove the 4 rivets.
- NOTICE:
- ·
Pressing the drill too firmly will cause the rivet to turn and result in the rivet not being drilled through.
·Prying the rivets with the drill may damage the rivet installation holes or drill bit.
·Be careful of the drilled rivets, as they may be hot.
Using a vacuum cleaner, remove the rivet fragments and shavings from the drilled areas.
Remove the rear door rear window frame moulding from the door frame.