 |
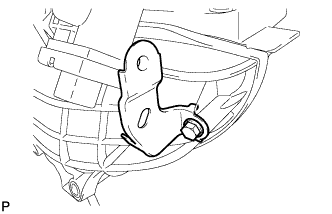
Install the wire harness clamp bracket with the bolt.
- Torque:
- 8.0 N*m{ 82 kgf*cm , 71 in.*lbf }
INTAKE MANIFOLD > INSTALLATION |
| 1. INSTALL INTAKE MANIFOLD |
|
Install the wire harness clamp bracket with the bolt.
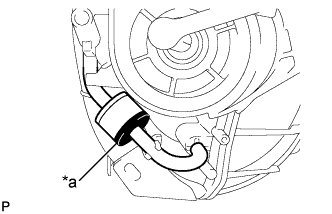 |
Connect the 2 vacuum hoses and check that the No. 1 check valve is installed as shown in the illustration.
| *a | Black |
Check the tumble control valves (w/ TCV).
Install a new intake manifold gasket to the intake manifold.
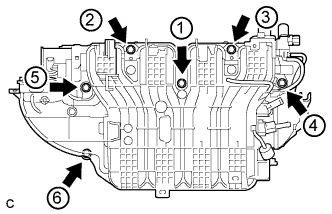 |
Install the intake manifold by tightening the 6 bolts in the sequence shown in the illustration (w/ TCV).
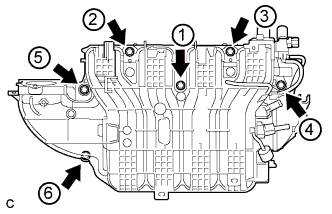 |
Install the intake manifold by tightening the 6 bolts in the sequence shown in the illustration (w/o TCV).
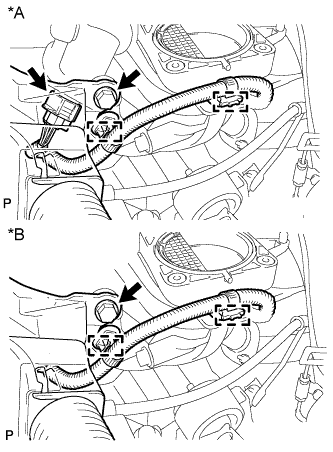 |
Connect the intake air control actuator connector and 2 wire harness clamps (w/ TCV).
Connect the 2 wire harness clamps (w/o TCV).
Install the wire harness clamp with the bolt.
| *A | w/ TCV |
| *B | w/o TCV |
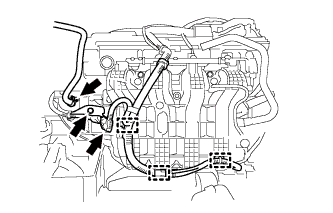 |
Install the wire harness clamp bracket with the bolt.
Connect the 3 wire harness clamps and connector.
Connect the fuel vapor feed hose.
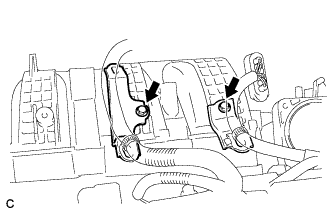 |
Install the 2 wire harness clamp brackets with the 2 bolts.
| 2. INSTALL FUEL DELIVERY PIPE SUB-ASSEMBLY |
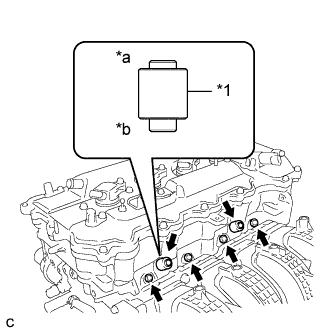 |
Install 4 new injector vibration insulators to the cylinder head.
| *1 | Fuel Delivery Spacer |
| *a | Fuel Delivery Pipe Side |
| *b | Cylinder Head Side |
Install the 2 fuel delivery spacers onto the cylinder head.
Install the fuel delivery pipe sub-assembly with the 4 fuel injector assemblies and install the 2 bolts.
| 3. CONNECT FUEL TUBE SUB-ASSEMBLY |
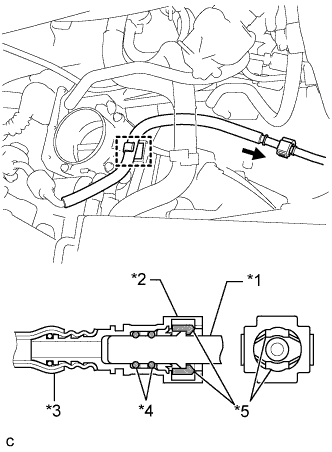 |
Push the fuel tube connector to the fuel pipe until the fuel tube connector makes a "click" sound.
| *1 | Fuel Pipe |
| *2 | Fuel Tube Connector |
| *3 | Nylon Tube |
| *4 | O-ring |
| *5 | Retainer |
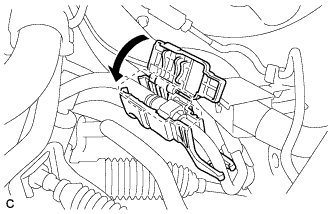 |
Install the No. 1 fuel pipe clamp.
Install the fuel tube sub-assembly to the fuel hose clamp.
| 4. CONNECT UNION TO CONNECTOR TUBE HOSE |
Connect the union to connector tube hose to the intake manifold.
| 5. CONNECT NO. 2 VENTILATION HOSE |
Connect the No. 2 ventilation hose to the intake manifold.
| 6. INSTALL VACUUM SWITCHING VALVE ASSEMBLY (for ACIS) |
Install the vacuum switching valve assembly with the bolt.
Connect the 2 vacuum hoses and connector.
Connect the union to connector tube hose and wire harness clamp.
| 7. INSTALL THROTTLE WITH MOTOR BODY ASSEMBLY |
| 8. INSTALL FRONT OUTER COWL TOP PANEL SUB-ASSEMBLY (for RHD) |
Install the front outer cowl top panel sub-assembly with the 10 bolts.
Engage the 2 clamps to install the wire harness to the front outer cowl top panel sub-assembly.
| 9. INSTALL FRONT OUTER COWL TOP PANEL SUB-ASSEMBLY (for LHD) |
Install the front outer cowl top panel sub-assembly with the 10 bolts.
Engage the 2 clamps to install the wire harness to the front outer cowl top panel sub-assembly.
| 10. INSTALL WINDSHIELD WIPER MOTOR AND LINK ASSEMBLY |
| 11. CONNECT CABLE FROM NEGATIVE BATTERY TERMINAL |
| 12. INSPECT FOR FUEL LEAK |
Check fuel pump operation.
Connect the intelligent tester to the DLC3.
Turn the ignition switch to ON and turn the intelligent tester on.
Enter the following menus: Powertrain / Engine / Active Test / Control the Fuel Pump / Speed.
Check for pressure in the fuel inlet tube from the fuel line. Check that sounds of fuel flowing from the fuel tank can be heard. If no sounds can be heard, check the integration relay, fuel pump, ECM and wiring connectors.
Inspect for fuel leaks.
Check that there are no fuel leaks from the fuel system after doing any maintenance or repairs. If there is a fuel leak, repair or replace parts as necessary.
Turn the ignition switch off.
Disconnect the intelligent tester from the DLC3.