 |
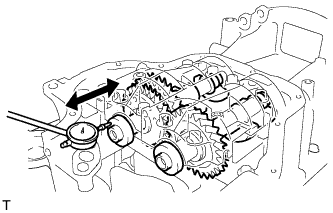
Using a dial indicator, measure the thrust clearance while moving the balance shaft back and forth.
- Standard thrust clearance:
- 0.05 to 0.09 mm (0.00197 to 0.00354 in.)
- Maximum thrust clearance:
- 0.09 mm (0.00354 in.)
ENGINE UNIT > INSPECTION |
| 1. INSPECT BALANCE SHAFT THRUST CLEARANCE |
Install the balance shafts (Click here).
|
Using a dial indicator, measure the thrust clearance while moving the balance shaft back and forth.
| 2. INSPECT BALANCE SHAFT OIL CLEARANCE |
Clean each bearing and journal.
Check each bearing and journal for pitting and scratches.
If a bearing or journal is damaged, replace the bearings. If necessary, replace the balance shaft.
Place the No. 1 and No. 2 balance shafts onto the stiffening crankcase assembly.
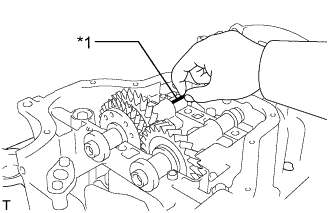 |
Lay a strip of Plastigage across each journal.
| *1 | Plastigage |
Install the balance shaft housing .
Remove the balance shaft housing .
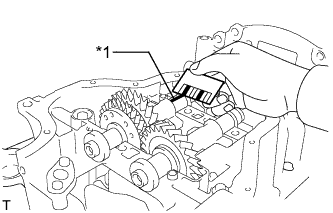 |
Measure the Plastigage at its widest point.
| *1 | Plastigage |
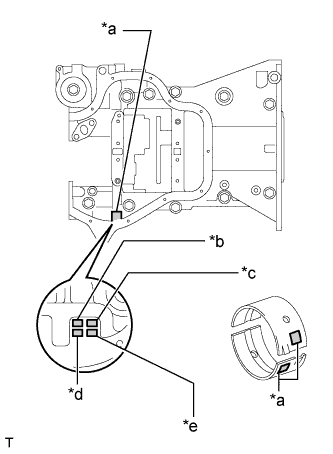 |
If replacing a bearing, select a new one with the same number.
| *a | Number Mark |
| *b | Front No. 1 Journal Bore |
| *c | Rear No. 1 Journal Bore |
| *d | Front No. 2 Journal Bore |
| *e | Rear No. 2 Journal Bore |
| Item | Specified Condition |
| Mark 1 | 26.000 to 26.006 mm (1.0236 to 1.0239 in.) |
| Mark 2 | 26.007 to 26.012 mm (1.0239 to 1.0241 in.) |
| Mark 3 | 26.013 to 26.018 mm (1.0241 to 1.0243 in.) |
| Item | Specified Condition |
| Mark 1 | 1.486 to 1.489 mm (0.05850 to 0.05862 in.) |
| Mark 2 | 1.490 to 1.492 mm (0.05866 to 0.05874 in.) |
| Mark 3 | 1.493 to 1.495 mm (0.0588 to 0.0589 in.) |
Inspect the balance shaft housing bolts.
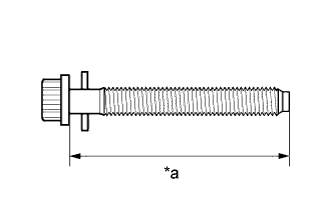 |
Using a vernier caliper, measure the length of the balance shaft housing bolts from the seat to the end.
| *a | Measurement Length |
| 3. INSPECT CHAIN SUB-ASSEMBLY |
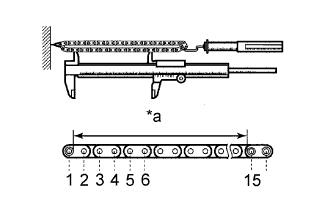 |
Pull the chain with a force of 140 N (14 kgf, 31.5 lbf) as shown in the illustration.
| *a | Measurement Area |
Using a vernier caliper, measure the length of 15 links.
| 4. INSPECT NO. 2 CHAIN SUB-ASSEMBLY |
|
Pull the chain with a force of 140 N (14 kgf, 31.5 lbf) as shown in the illustration.
| *a | Measurement Area |
Using a vernier caliper, measure the length of 15 links.
| 5. INSPECT OIL PUMP DRIVE GEAR |
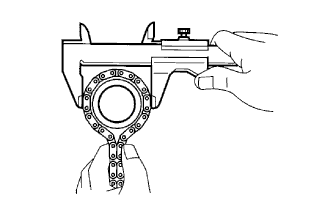 |
Place the chain around the oil pump drive gear.
Using a vernier caliper, measure the oil pump drive gear diameter of the oil pump drive gear and No. 2 chain sub-assembly.
| 6. INSPECT OIL PUMP DRIVE SHAFT GEAR |
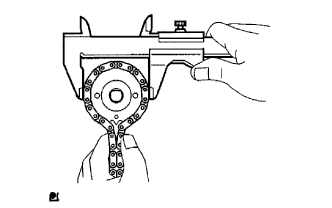 |
Place the chain around the oil pump drive shaft gear.
Using a vernier caliper, measure the sprocket diameter of the oil pump drive shaft gear and No. 2 chain sub-assembly.
| 7. INSPECT CAMSHAFT TIMING GEAR ASSEMBLY |
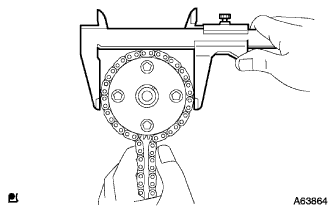 |
Place the chain sub-assembly around the camshaft timing gear assembly.
Using a vernier caliper, measure the sprocket diameter of the camshaft timing gear assembly and chain sub-assembly.
| 8. INSPECT CAMSHAFT TIMING SPROCKET |
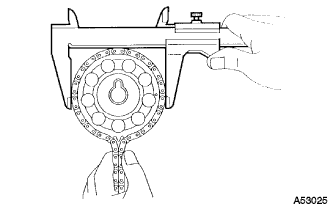 |
Place the chain sub-assembly around the camshaft timing sprocket.
Using a vernier caliper, measure the sprocket diameter of the camshaft timing sprocket and chain sub-assembly.
| 9. INSPECT CRANKSHAFT TIMING SPROCKET |
|
Place the chain sub-assembly around the crankshaft timing sprocket.
Using a vernier caliper, measure the timing gear diameter of the camshaft timing sprocket and chain sub-assembly.
| 10. INSPECT CHAIN TENSIONER SLIPPER |
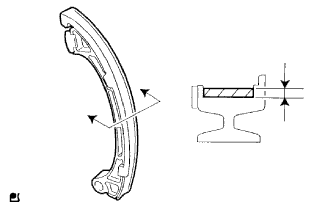 |
Using a vernier caliper, measure the tensioner slipper wear.
| 11. INSPECT NO. 1 CHAIN VIBRATION DAMPER |
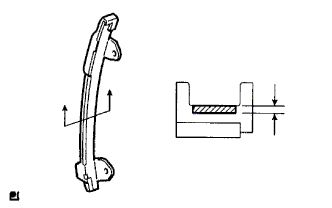 |
Using a vernier caliper, measure the No. 1 chain vibration damper wear.
| 12. INSPECT CHAIN TENSIONER PLATE |
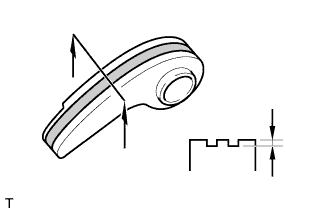 |
Using a vernier caliper, measure the chain tensioner plate wear.
| 13. INSPECT NO. 1 CHAIN TENSIONER ASSEMBLY |
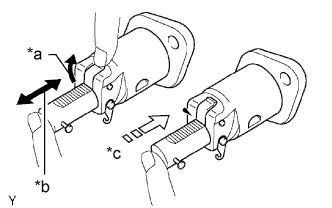 |
Check that the plunger moves smoothly when the ratchet pawl is raised with your finger.
| *a | Raise |
| *b | Move |
| *c | Lock |
Release the ratchet pawl, then check that the plunger is locked in place by the ratchet pawl and does not move when pushed with your finger.
If operation is not as specified, replace the No. 1 chain tensioner assembly.
| 14. INSPECT CAMSHAFT |
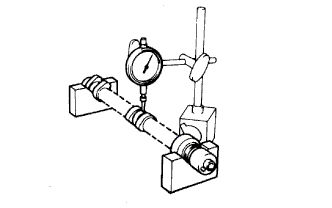 |
Inspect the camshaft for runout.
Place the camshaft on V-blocks.
Using a dial indicator, measure the circle runout at the center journal.
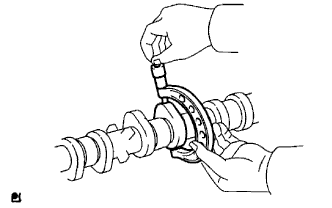 |
Inspect the cam lobes.
Using a micrometer, measure the cam lobe heights.
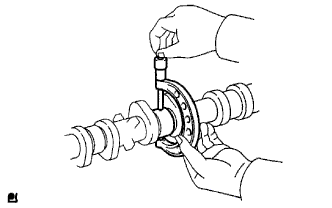 |
Inspect the camshaft journals.
Using a micrometer, measure the camshaft journal diameter.
| Journal Position | Specified Condition |
| No. 1 | 35.971 to 35.985 mm (1.4162 to 1.4167 in.) |
| Others | 22.959 to 22.975 mm (0.9039 to 0.9045 in.) |
| 15. INSPECT NO. 2 CAMSHAFT |
|
Inspect the No. 2 camshaft for runout.
Place the camshaft on V-blocks.
Using a dial indicator, measure the circle runout at the center journal.
|
Inspect the cam lobes.
Using a micrometer, measure the cam lobe heights.
|
Inspect the camshaft No. 2 camshaft.
Using a micrometer, measure the No. 2 camshaft journal diameter.
| Journal Position | Specified Condition |
| No. 1 | 35.971 to 35.985 mm (1.4162 to 1.4167 in.) |
| Others | 22.959 to 22.975 mm (0.9039 to 0.9045 in.) |
| 16. INSPECT EXHAUST MANIFOLD CONVERTER SUB-ASSEMBLY |
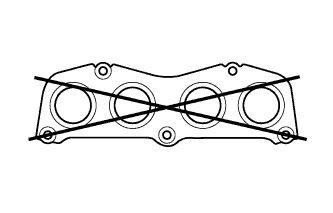 |
Using a precision straightedge and feeler gauge, measure the surface contacting the exhaust manifold converter sub-assembly for warpage.