ENGINE UNIT > REASSEMBLY |
| 1. INSTALL NO. 1 BALANCE SHAFT BEARING |
![]() |
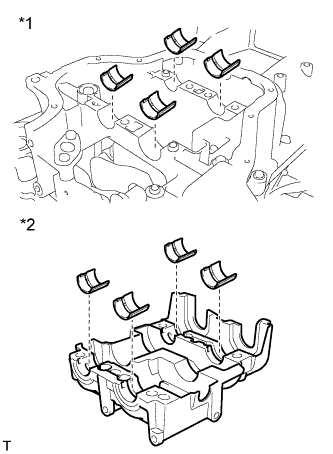
Align the bearing claw with the claw groove, and push in the 8 No. 1 balance shaft bearing.
| *1 | Stiffening Crankcase |
| *2 | Balance Shaft Housing |
Apply a light coat of engine oil to the bearings.
| 2. INSTALL NO. 1 AND NO. 2 BALANCE SHAFTS |
![]() |
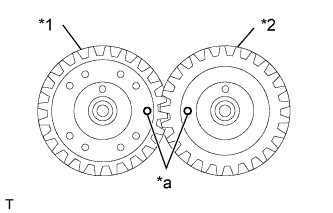
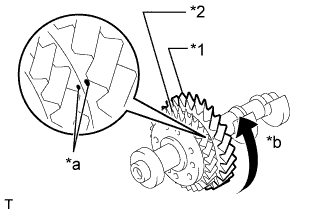
Rotate the No. 1 driven gear of the No. 1 balance shaft in the rotating direction until it hits the stopper.
| *1 | No. 1 Driven Gear |
| *2 | No. 2 Driven Gear |
| *a | Matchmark |
| *b | Rotating Direction |
![]() |
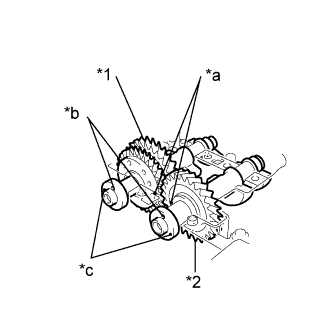
Confirm that the alignment marks on the No. 1 and No. 2 balance shafts are aligned.
| *1 | No. 1 Balance Shaft |
| *2 | No. 2 Balance Shaft |
| *a | Alignment Mark |
![]() |
Align the alignment marks on the No. 1 and No. 2 balance shafts as shown in the illustration.
| *1 | No. 1 Balance Shaft |
| *2 | No. 2 Balance Shaft |
| *a | Alignment Mark |
| *b | Adjusting Hole |
| *c | Timing Mark |
Place the No. 1 and No. 2 balance shafts onto the stiffening crankcase assembly.
Apply a light coat of engine oil to the threads and under the heads of the bolts.
| 3. INSTALL BALANCE SHAFT HOUSING |
![]() |
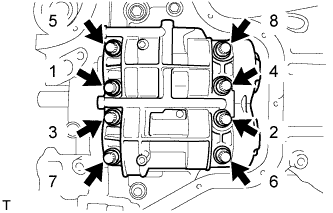
Using several steps, uniformly install and tighten the 8 bolts in the sequence shown in the illustration.
![]() |
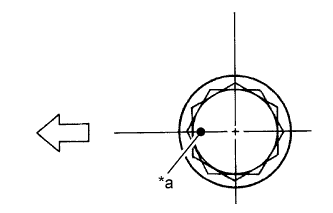
Mark the front of the bolts with paint.
| *a | Paint Mark |
![]() | Engine Front |
![]() |
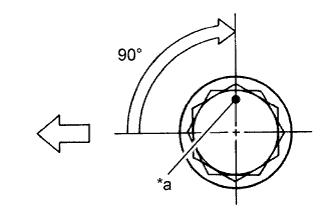
Further tighten the bolts 90° as shown in the illustration.
| *a | Paint Mark |
![]() | Engine Front |
Check that the paint mark is now at a 90° angle to the front.
| 4. INSTALL STIFFENING CRANKCASE ASSEMBLY |
Temporarily tighten the pulley set bolt.
![]() |
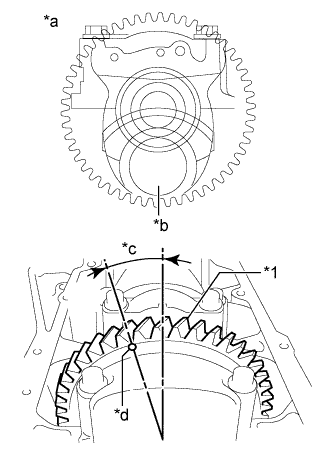
Turn the crankshaft to set the No. 1 cylinder to the TDC position.
| *1 | Drive Gear |
| *a | Front View |
| *b | No. 1 and No. 4 Crank Pin |
| *c | Approx. 16° |
| *d | Timing Mark |
![]() |
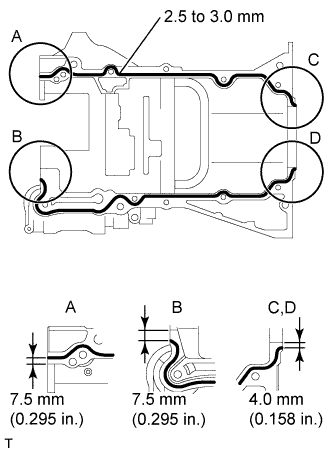
Apply seal packing in a continuous bead (diameter: 2.5 to 3.0 mm (0.098 to 0.118 in.)) to the places shown in the illustration.
![]() |
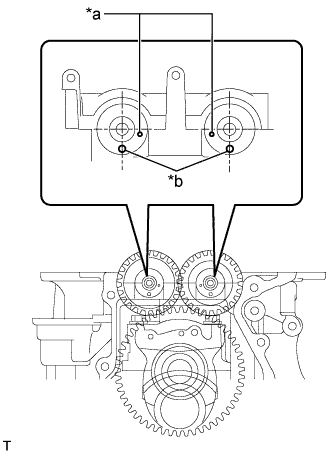
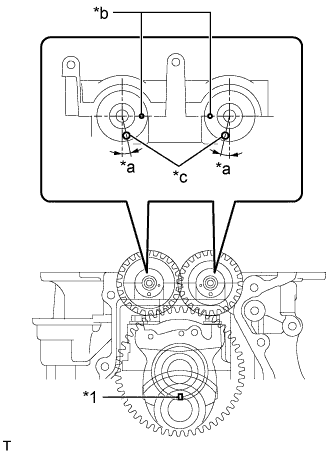
Install the stiffening crankcase so that the adjusting holes on the balance shafts are positioned as shown in the illustration.
| *a | Timing Mark |
| *b | Adjusting Hole |
![]() |
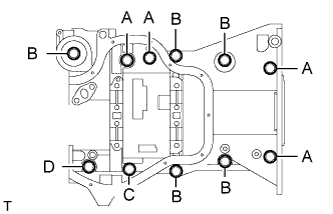
Apply adhesive to the threads of bolts C and D.
| Item | Bolt Length |
| A, C | 125 mm (4.92 in.) |
| B, D | 45 mm (1.77 in.) |
Temporarily install the stiffening crankcase assembly with the 11 bolts.
![]() |
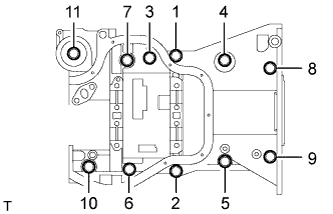
Uniformly tighten the 11 bolts in the sequence shown in the illustration.
Wipe off the excess seal packing with a clean piece of cloth.
![]() |
Turn the crankshaft to set the No. 1 cylinder to the TDC position. Make sure that the timing marks are aligned as shown in the illustration.
| *1 | Key Groove |
| *a | Approx. 5° |
| *b | Timing Mark |
| *c | Adjusting Hole |
Remove the pulley set bolt.
| 5. INSTALL OIL PUMP ASSEMBLY |
Install a new oil pump gasket and the oil pump assembly with the 3 bolts.
| 6. INSTALL REAR ENGINE OIL SEAL |
Apply MP grease to the lip of a new rear engine oil seal.
![]() |
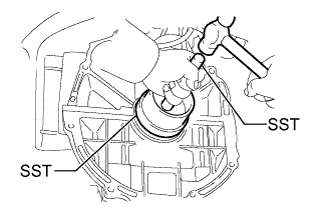
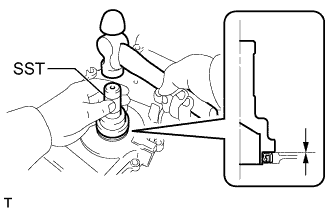
Using SST and a hammer, tap in the rear engine oil seal until its surface is flush with the edges of the cylinder block and crankcase.
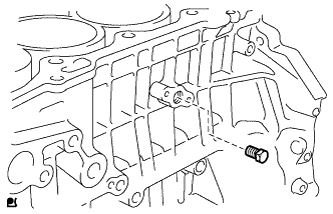
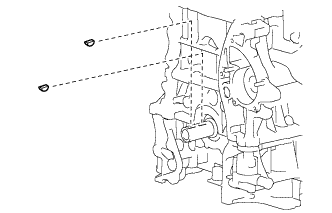
| 7. INSTALL NO. 1 TAPER SCREW PLUG |
Apply adhesive to 2 or 3 threads of the No. 1 taper screw plug.
![]() |
Install the No. 1 taper screw plug to the cylinder block.
| 8. INSTALL OIL CONTROL VALVE FILTER |
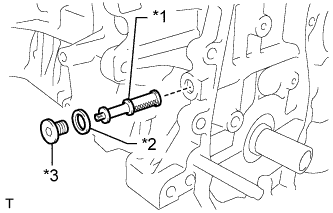
Check that there are no foreign objects on the mesh part of the oil control valve filter.
![]() |
Using an 8 mm socket hexagon wrench, install a new gasket and the oil control valve filter with the screw plug.
| *1 | Oil Control Valve Filter |
| *2 | Gasket |
| *3 | Screw Plug |
| 9. INSTALL WATER INLET HOUSING |
![]() |
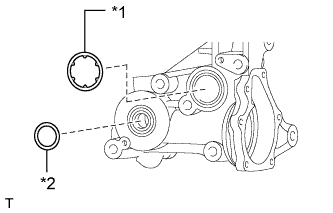
Install a new water inlet housing O-ring and water inlet housing gasket to the water inlet housing.
| *1 | Water Inlet Housing O-ring |
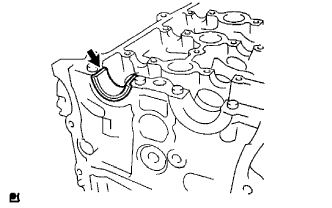
| *2 | Water Inlet Housing Gasket |
![]() |
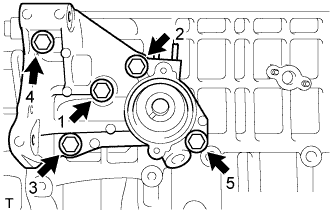
Install the water inlet housing to the cylinder block with the 5 bolts in the order shown in the illustration.
| 10. REPLACE STUD BOLT |
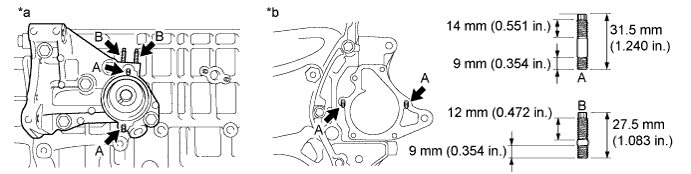
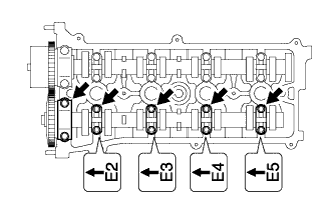
Using an E5 "TORX" socket, remove the stud bolts.
Using an E5 "TORX" socket, install the stud bolts as shown the illustration.

| *a | LH Side | *b | Front Side |
| 11. INSTALL WATER INLET HOUSING DRAIN COCK ASSEMBLY |
![]() |
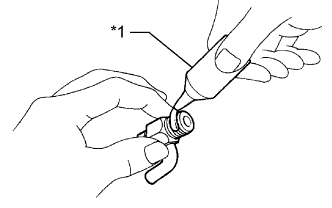
Apply adhesive to 2 or 3 threads of the water inlet housing drain cock assembly.
| *1 | Adhesive |
![]() |
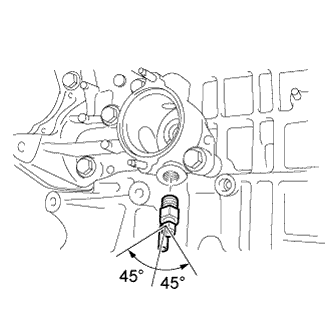
Install the water inlet housing drain cock assembly within the range shown in the illustration.
Install the water inlet housing drain cock plug to the water inlet housing drain cock assembly.
| 12. INSTALL CYLINDER BLOCK WATER JACKET SPACER |
![]() |
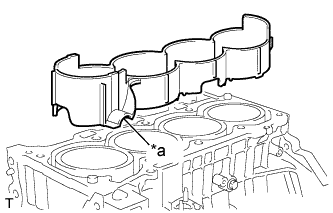
Install the cylinder block water jacket spacer as shown in the illustration.
| *a | Slope |
| 13. INSTALL CYLINDER HEAD GASKET |
![]() |
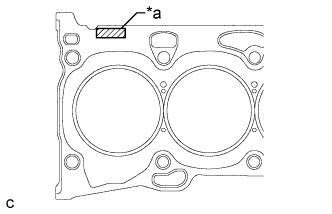
Place a new cylinder head gasket on the cylinder block surface with the lot No. stamp facing upward.
| *a | Lot No. |
| 14. INSTALL CYLINDER HEAD SUB-ASSEMBLY |
Place the cylinder head sub-assembly on the cylinder head gasket.
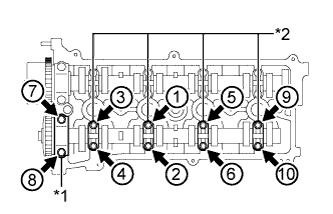
Apply a light coat of engine oil to the threads and under the heads of the 10 cylinder head set bolts.
Set the 10 plate washers and 10 cylinder head set bolts.
Step 1:
![]() |
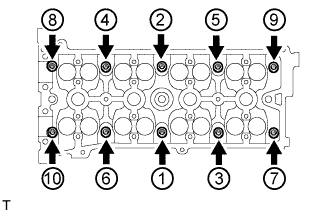
Using a 10 mm bi-hexagon wrench, uniformly tighten the 10 cylinder head set bolts in several steps, in the order shown in the illustration.
Step 2:
![]() |
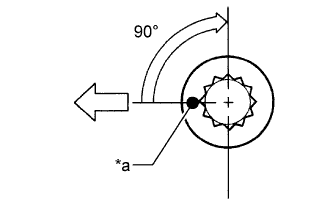
Mark the front of the cylinder head set bolts with paint.
| *a | Paint Mark |
![]() | Engine Front |
Tighten the cylinder head set bolts 90° in the sequence shown in step 1.
Check that the paint mark is now at a 90° angle to the front.
| 15. INSTALL CAMSHAFT TIMING OIL CONTROL VALVE ASSEMBLY |
Apply a light coat of engine oil onto a new O-ring.
![]() |
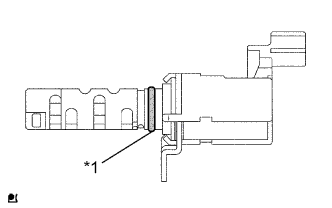
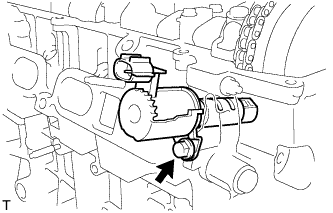
Install the O-ring to the camshaft timing oil control valve assembly.
| *1 | O-ring |
![]() |
Install the camshaft timing oil control valve assembly with the bolt.
| 16. INSTALL CAMSHAFT TIMING GEAR ASSEMBLY |
![]() |
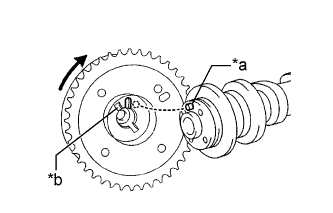
Put the camshaft timing gear assembly and camshaft together with the straight pin and key groove misaligned as shown in the illustration.
| *a | Straight Pin |
| *b | Key Groove |
![]() |
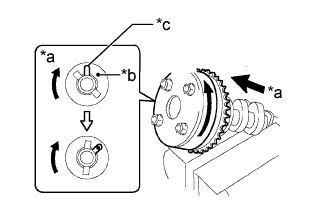
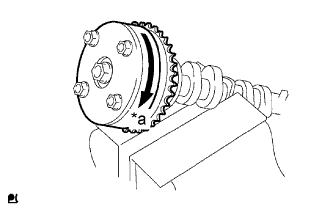
Turn the camshaft timing gear assembly as shown in the illustration while pushing it gently against the camshaft. Push further at the position where the pin fits into the groove.
| *a | View A |
| *b | Straight Pin |
| *c | Key Groove |
![]() |
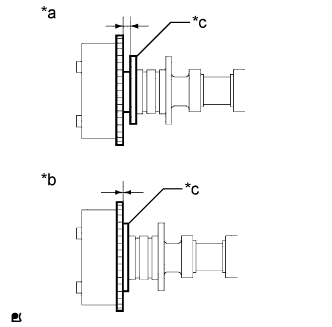
Check that there is no clearance between the camshaft timing gear assembly and camshaft flange.
| *a | INCORRECT |
| *b | CORRECT |
| *c | Flange |
![]() |
Tighten the bolt with the camshaft timing gear assembly secured in place.
![]() |
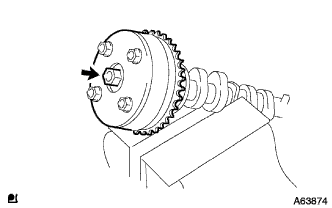
Check that the camshaft timing gear assembly can move to the retard direction (clockwise) and is locked in the most retarded position.
| *a | Lock |
| 17. INSTALL CAMSHAFT TIMING SPROCKET |
![]() |
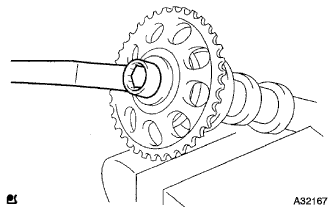
Clamp the camshaft in a vise, then install the camshaft timing sprocket with the bolt.
| 18. INSTALL NO. 1 CAMSHAFT BEARING |
Clean the installation surfaces of the cap and the inner and outer surfaces of the bearing.
![]() |
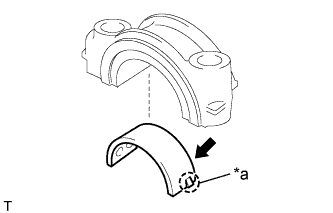
Align the claws and install the No. 1 camshaft bearing onto the No. 1 camshaft bearing cap.
| *a | Claw |
| 19. INSTALL NO. 2 CAMSHAFT BEARING |
Clean the installation surfaces of the cap and the inner and outer surfaces of the bearing.
![]() |
Install the No. 2 camshaft bearing onto the cylinder head sub-assembly.
| 20. INSTALL CAMSHAFT |
Apply a light coat of engine oil to the journal portion.
![]() |
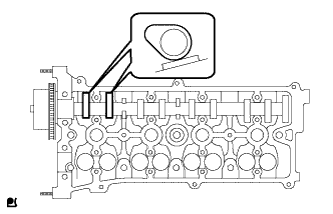
Place the camshaft on the cylinder head sub-assembly with the No. 1 cam lobes facing the direction shown in the illustration.
Apply a light coat of engine oil to the threads and under the heads of the bearing cap bolts.
![]() |
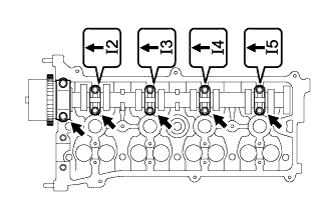
Examine the front marks and numbers, and check that the order is as shown in the illustration. Then install the bearing caps to the cylinder head sub-assembly.
![]() |
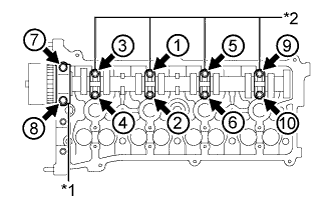
Using several steps, uniformly tighten the 10 bearing cap bolts in the sequence shown in the illustration.
| *1 | No. 1 Camshaft Bearing Cap |
| *2 | No. 3 Camshaft Bearing Cap |
| 21. INSTALL NO. 2 CAMSHAFT |
Apply a light coat of engine oil to the journal portion of the No. 2 camshaft.
![]() |
Place the camshaft on the cylinder head sub-assembly with the No. 2 cam lobes facing the direction shown in the illustration.
Apply a light coat of engine oil to the threads and under the heads of the bearing cap bolts.
![]() |
Examine the front marks and numbers, and check that the order is as shown in the illustration. Then install the bearing caps to the cylinder head sub-assembly.
![]() |
Using several steps, uniformly tighten the 10 bearing cap bolts in the sequence shown in the illustration.
| *1 | No. 2 Camshaft Bearing Cap |
| *2 | No. 3 Camshaft Bearing Cap |
| 22. INSTALL CRANKSHAFT PULLEY SET KEY |
![]() |
Install the 2 crankshaft pulley set keys to the crankshaft.
| 23. INSTALL NO. 2 CHAIN SUB-ASSEMBLY |
![]() |
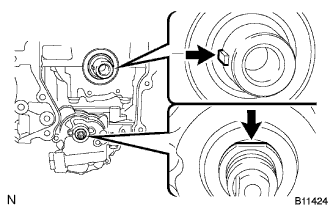
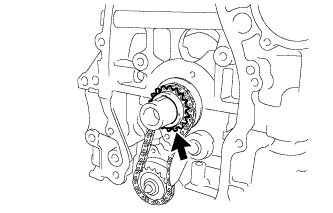
Set the crankshaft key into the left horizontal position.
Turn the oil pump drive shaft so that the cutout faces upward.
![]() |
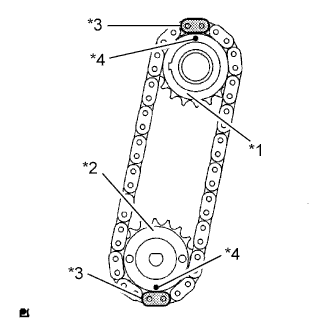
Align the yellow mark links with the timing marks of each gear as shown in the illustration.
| *1 | Oil Pump Drive Gear |
| *2 | Oil Pump Drive Shaft Gear |
| *3 | Mark Link |
| *4 | Timing Mark |
Install the sprockets onto the crankshaft and oil pump shaft with the No. 2 chain sub-assembly on the gears.
Temporarily tighten the oil pump drive shaft gear with the nut.
![]() |
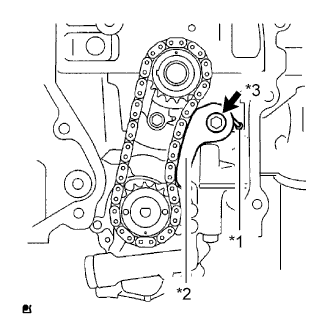
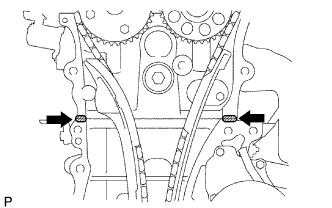
Insert the chain damper spring into the adjusting hole, and then install the chain tensioner plate with the bolt.
| *1 | Spring |
| *2 | Chain Tensioner Plate |
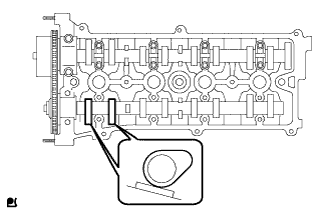
| *3 | Bolt |
![]() |
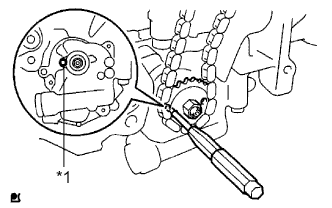
Align the adjusting hole of the oil pump drive shaft gear with the groove of the oil pump assembly.
| *1 | Groove |
Insert a 4 mm diameter bar into the adjusting hole of the oil pump drive shaft gear to lock the gear in position, and then tighten the nut.
![]() |
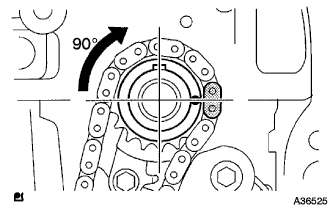
Rotate the crankshaft 90° clockwise, and position the crankshaft key to face up as shown in the illustration.
| 24. INSTALL CRANKSHAFT TIMING SPROCKET |
![]() |
Install the crankshaft timing sprocket to the crankshaft.
| 25. INSTALL NO. 1 CHAIN VIBRATION DAMPER |
Install the No. 1 chain vibration damper with the 2 bolts.
| 26. INSTALL CHAIN SUB-ASSEMBLY |
Set the No. 1 cylinder to TDC/compression.
![]() |
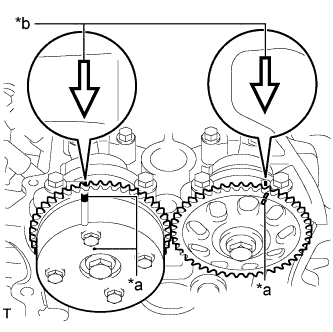
Using the hexagonal portion of the camshafts, rotate the camshafts with a wrench, align the timing marks on the camshaft timing gear assembly and camshaft timing sprocket with the front marks located on the No. 1 camshaft bearing cap and No. 2 camshaft bearing cap as shown in the illustration.
| *a | Timing Mark |
| *b | Front Mark |
![]() |
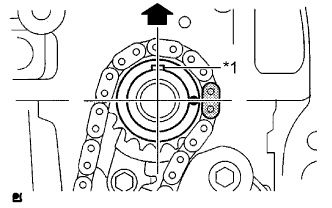
Check that the crankshaft is positioned with the crankshaft key facing up as shown in the illustration.
| *1 | Crankshaft Key |
![]() | Up |
![]() |
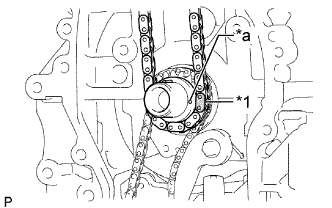
Install the chain onto the crankshaft timing sprocket with the gold or pink mark link aligned with the timing mark on the crankshaft.
| *1 | Mark Link |
| *a | Timing Mark |
![]() |
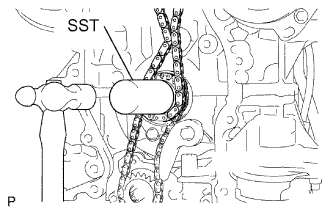
Using SST and a hammer, tap in the crankshaft timing sprocket.
![]() |
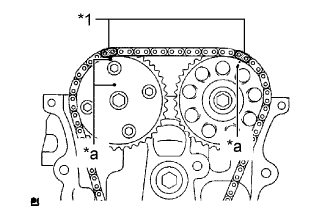
Align the gold or yellow links with the timing marks located on the camshaft timing gear assembly and camshaft timing sprocket, then install the chain sub-assembly.
| *1 | Mark Link |
| *a | Timing Mark |
| 27. INSTALL CHAIN TENSIONER SLIPPER |
Install the chain tensioner slipper with the bolt.
| 28. INSTALL TIMING CHAIN GUIDE |
Install the timing chain guide with the bolt.
| 29. INSTALL NO. 1 CRANKSHAFT POSITION SENSOR PLATE |
![]() |
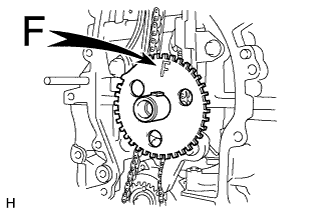
Install the No. 1 crankshaft position sensor plate with the "F" mark facing forward.
| 30. INSTALL TIMING CHAIN COVER OIL SEAL |
![]() |
Using SST, tap in a new timing chain cover oil seal until its surface is flush with the timing chain cover sub-assembly edge.
Apply a light coat of MP grease to the lip of the timing chain cover oil seal.
| 31. INSTALL TIMING CHAIN COVER SUB-ASSEMBLY |
Remove any old packing material and be careful not to drop any oil on the contact surfaces of the timing chain cover sub-assembly, cylinder head and cylinder block.
![]() |
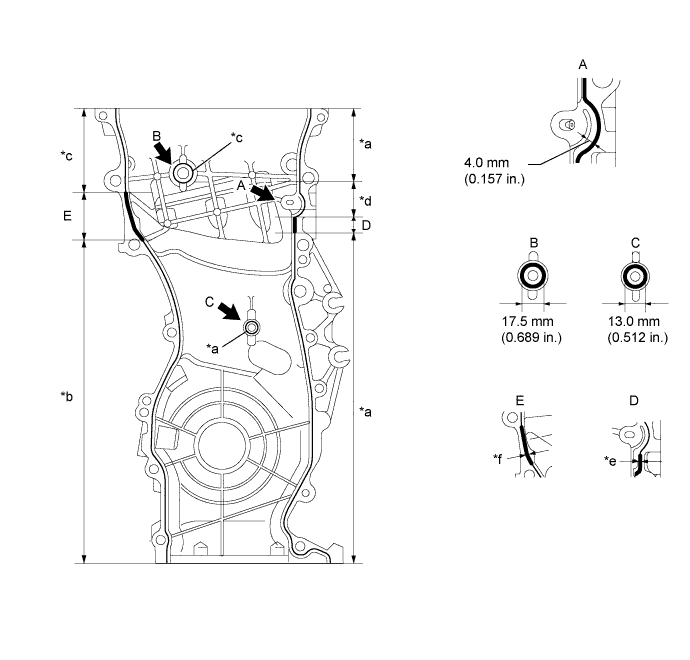
Apply seal packing (diameter 4.0 to 4.5 mm (0.157 to 0.177 in.)) as shown in the illustration.
![]() | Seal Packing |
Apply a continuous bead of seal packing as shown in the illustration.

| *a | Seal Diameter: 2.5 to 3.0 mm (0.0984 to 0.118 in.) | *b | Seal Diameter: 3.0 mm (0.118 in.) |
| *c | Seal Diameter: 4.0 mm (0.157 in.) | *d | Seal Diameter: 4.0 to 4.5 mm (0.157 to 0.177 in.) |
| *e | Seal Diameter: 4.5 to 5.0 mm (0.177 to 0.197 in.) | *f | Seal Diameter: 5.5 to 6.0 mm (0.217 to 0.236 in.) |
![]() | Seal Packing | - | - |
Apply adhesive to the threads of the bolt A.
![]() |
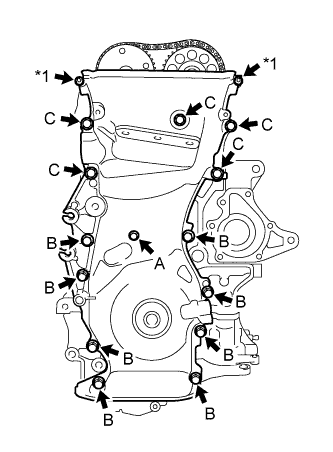
Temporarily install the timing chain cover sub-assembly with the 12 bolts and 2 nuts.
| *1 | Nut |
| Item | Length |
| Bolt A | 30 mm (1.18 in.) length for 10 mm head |
| Bolt B | 30 mm (1.18 in.) length for 12 mm head |
| Bolt C | 40 mm (1.57 in.) length for 14 mm head |
![]() |
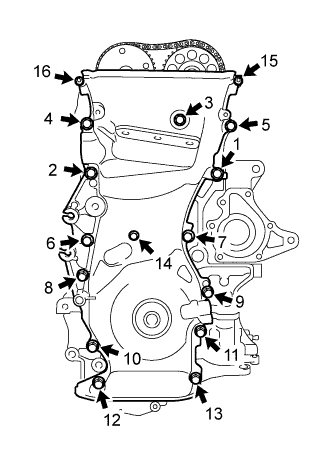
Fully tighten the bolts and nuts in the order shown in the illustration.
![]() |
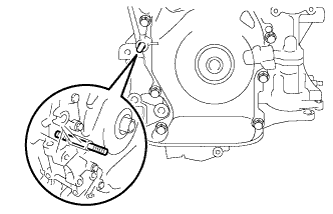
Using an E10 "TORX" socket wrench, install the stud bolt for the V-ribbed belt tensioner assembly.
| 32. INSTALL V-RIBBED BELT TENSIONER ASSEMBLY |
![]() |
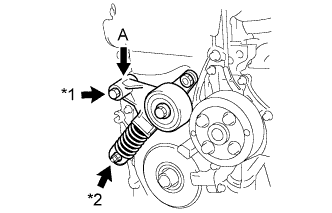
Temporarily install the V-ribbed belt tensioner assembly with the nut.
| *1 | Bolt |
| *2 | Nut |
Slightly push down on the V-ribbed belt tensioner assembly at part (A) to align the holes of the engine and tensioner as shown in the illustration, and temporarily install the bolt.
![]() |
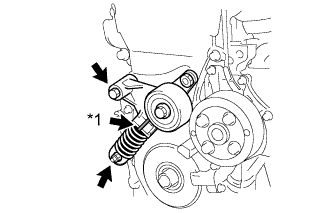
Tighten the bolt and nut to install the V-ribbed belt tensioner.
| *1 | Pin |
| 33. INSTALL NO. 1 CHAIN TENSIONER ASSEMBLY |
![]() |
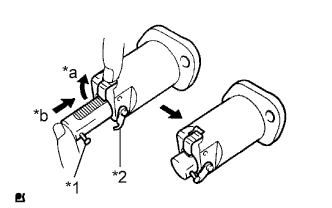
Release the ratchet pawl, then fully push in the plunger and set the hook to the pin so that the plunger is in the position shown in the illustration.
| *1 | Pin |
| *2 | Hook |
| *a | Raise |
| *b | Push |
![]() |
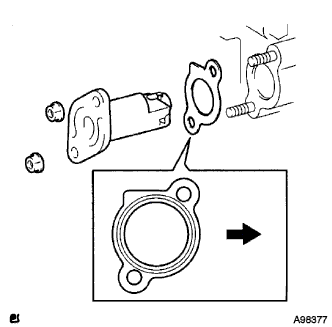
Install a new chain tensioner gasket and the No. 1 chain tensioner assembly with the 2 nuts.
![]() | Engine Front |
| 34. INSTALL CRANK POSITION SENSOR |
![]() |
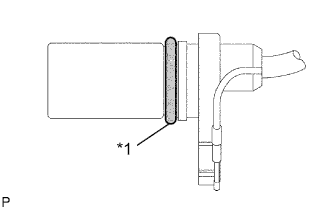
Apply a light coat of engine oil to the O-ring on the crank position sensor.
| *1 | New O-ring |
![]() |
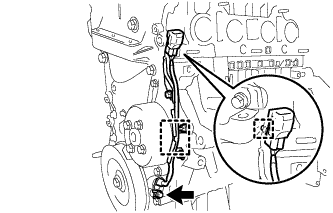
Install the crank position sensor with the bolt.
Install the 2 wire harness clamps.
| 35. INSTALL OIL PAN SUB-ASSEMBLY |
Remove any old packing material and be careful not to drop any oil on the contact surfaces of the cylinder block and oil pan sub-assembly.
![]() |
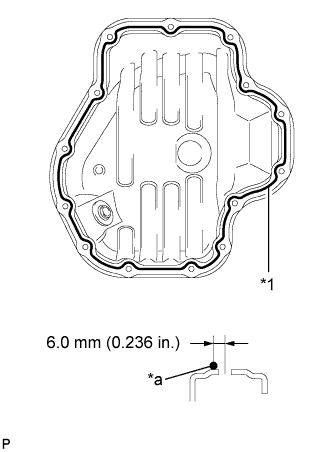
Apply a continuous bead of seal packing (diameter 3.0 to 4.0 mm (0.118 to 0.157 in.)) as shown in the illustration.
| *1 | Seal Packing |
| *a | Seal Diameter: 4.0 to 4.5 mm |
Install the oil pan sub-assembly onto the cylinder block.
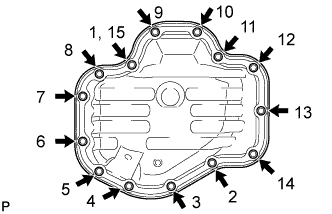
![]() |
Uniformly tighten the 12 bolts and 2 nuts in the sequence shown in the illustration.
| 36. INSTALL OIL PAN DRAIN PLUG |
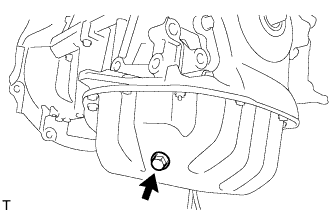
![]() |
Install the oil pan drain plug with a new gasket.
| 37. INSTALL ENGINE WATER PUMP ASSEMBLY |
Remove any old seal packing material from the contact surfaces.
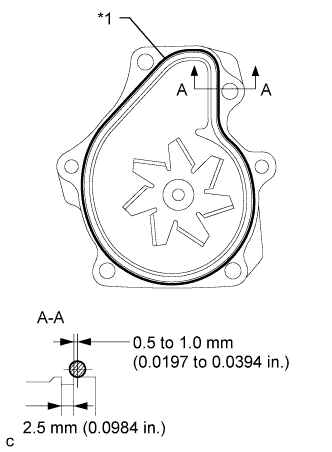
![]() |
Apply a continuous line of seal packing as shown in the illustration.
| *1 | Seal Packing |
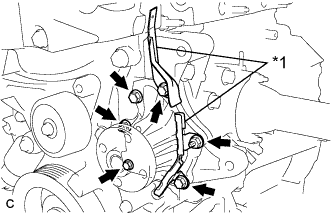
![]() |
Install the engine water pump assembly and 2 wire harness clamp brackets with the 4 bolts and 2 nuts.
| *1 | Wire Harness Clamp Bracket |
| 38. INSTALL WATER PUMP PULLEY |
![]() |
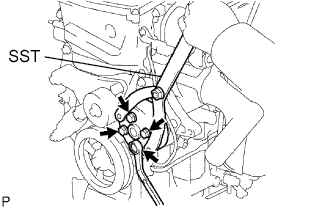
Using SST, install the water pump pulley with the 4 bolts.
| 39. INSTALL CRANKSHAFT PULLEY |
![]() |
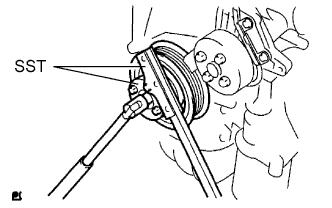
Using SST, secure the pulley in place and tighten the bolt.
![]() |
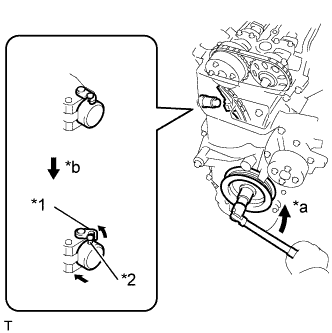
Turn the crankshaft counterclockwise, then disconnect the hook from the pin.
| *1 | Hook |
| *2 | Pin |
| *a | Turn |
| *b | Disconnect |
![]() |
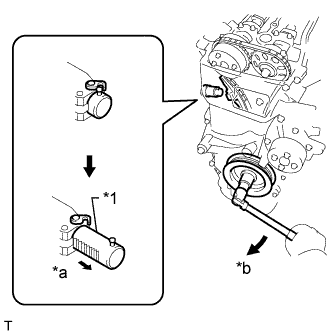
Turn the crankshaft clockwise, then check that the plunger is extended.
| *1 | Plunger |
| *a | Extend |
| *b | Turn |
| 40. CHECK VALVE CLEARANCE |
![]() |
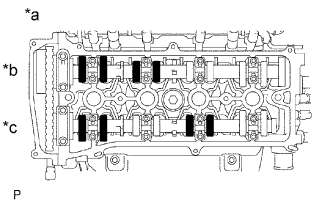
Check only the valves indicated.
| *a | No. 1 Cylinder TDC/Compression |
| *b | Intake Side |
| *c | Exhaust Side |
Using a feeler gauge, measure the clearance between the valve lifter and camshaft.
| Item | Specified Condition |
| Intake | 0.19 to 0.29 mm (0.00748 to 0.0114 in.) |
| Exhaust | 0.38 to 0.48 mm (0.0150 to 0.0189 in.) |
Record any out-of-specification valve clearance measurements. They will be used later to determine the required replacement valve lifters.
Turn the crankshaft 1 revolution (360°) and set the No. 4 cylinder to TDC/compression.
![]() |
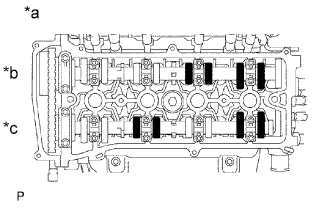
Check only the valves indicated.
| *a | No. 4 Cylinder TDC/Compression |
| *b | Intake Side |
| *c | Exhaust Side |
Using a feeler gauge, measure the clearance between the valve lifter and camshaft.
| Item | Specified Condition |
| Intake | 0.19 to 0.29 mm (0.00748 to 0.0114 in.) |
| Exhaust | 0.38 to 0.48 mm (0.0150 to 0.0189 in.) |
Record any out-of-specification valve clearance measurements. They will be used later to determine the required replacement valve lifters.
| 41. ADJUST VALVE CLEARANCE |
Remove the camshaft (Click here).
Remove the valve lifters.
![]() |
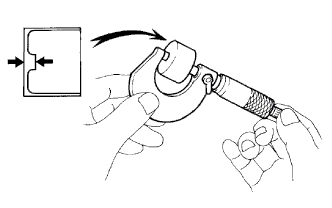
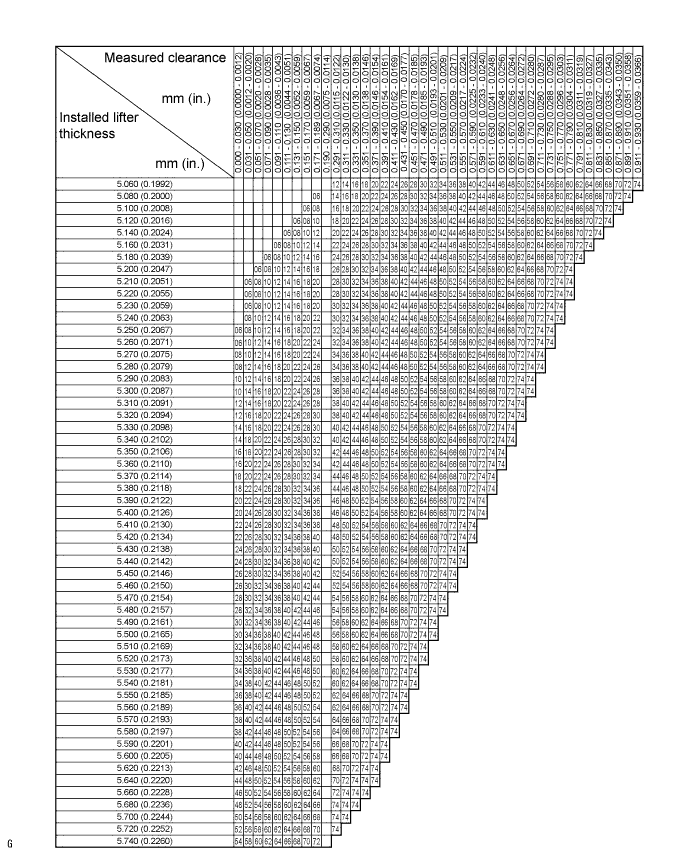
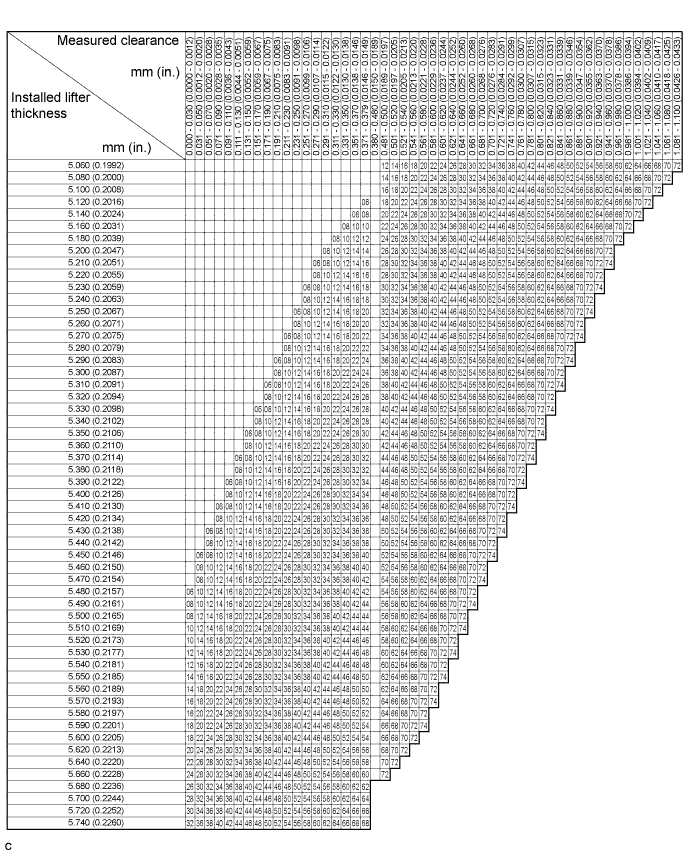
Using a micrometer, measure the thickness of the removed valve lifters.
Calculate the thickness of a new lifter so that the valve clearance comes within the specified range.
| Item | Specification |
| Intake | A = B + (C - 0.24 mm (0.00945 in.)) |
| Exhaust | A = B + (C - 0.43 mm (0.0169 in.)) |
| A | New lifter thickness |
| B | Used lifter thickness |
| C | Measured valve clearance |
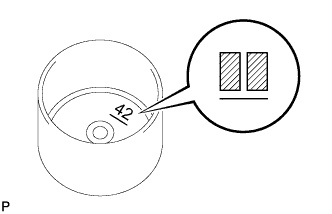
![]() |
Select a new lifter with a thickness as close as possible to the calculated values.
Valve lifter selection chart (intake).

| Lifter No. | Thickness mm (in.) | Lifter No. | Thickness mm (in.) | Lifter No. | Thickness mm (in.) |
| 06 | 5.060 (0.1992) | 30 | 5.300 (0.2087) | 54 | 5.540 (0.2181) |
| 08 | 5.080 (0.2000) | 32 | 5.320 (0.2094) | 56 | 5.560 (0.2189) |
| 10 | 5.100 (0.2008) | 34 | 5.340 (0.2102) | 58 | 5.580 (0.2197) |
| 12 | 5.120 (0.2016) | 36 | 5.360 (0.2110) | 60 | 5.600 (0.2205) |
| 14 | 5.140 (0.2024) | 38 | 5.380 (0.2118) | 62 | 5.620 (0.2213) |
| 16 | 5.160 (0.2031) | 40 | 5.400 (0.2126) | 64 | 5.640 (0.2220) |
| 18 | 5.180 (0.2039) | 42 | 5.420 (0.2134) | 66 | 5.660 (0.2228) |
| 20 | 5.200 (0.2047) | 44 | 5.440 (0.2142) | 68 | 5.680 (0.2236) |
| 22 | 5.220 (0.2055) | 46 | 5.460 (0.2150) | 70 | 5.700 (0.2244) |
| 24 | 5.240 (0.2063) | 48 | 5.480 (0.2157) | 72 | 5.720 (0.2252) |
| 26 | 5.260 (0.2071) | 50 | 5.500 (0.2165) | 74 | 5.740 (0.2260) |
| 28 | 5.280 (0.2079) | 52 | 5.520 (0.2173) | - | - |
Valve lifter selection chart (exhaust).

| Lifter No. | Thickness mm (in.) | Lifter No. | Thickness mm (in.) | Lifter No. | Thickness mm (in.) |
| 06 | 5.060 (0.1992) | 30 | 5.300 (0.2087) | 54 | 5.540 (0.2181) |
| 08 | 5.080 (0.2000) | 32 | 5.320 (0.2094) | 56 | 5.560 (0.2189) |
| 10 | 5.100 (0.2008) | 34 | 5.340 (0.2102) | 58 | 5.580 (0.2197) |
| 12 | 5.120 (0.2016) | 36 | 5.360 (0.2110) | 60 | 5.600 (0.2205) |
| 14 | 5.140 (0.2024) | 38 | 5.380 (0.2118) | 62 | 5.620 (0.2213) |
| 16 | 5.160 (0.2031) | 40 | 5.400 (0.2126) | 64 | 5.640 (0.2220) |
| 18 | 5.180 (0.2039) | 42 | 5.420 (0.2134) | 66 | 5.660 (0.2228) |
| 20 | 5.200 (0.2047) | 44 | 5.440 (0.2142) | 68 | 5.680 (0.2236) |
| 22 | 5.220 (0.2055) | 46 | 5.460 (0.2150) | 70 | 5.700 (0.2244) |
| 24 | 5.240 (0.2063) | 48 | 5.480 (0.2157) | 72 | 5.720 (0.2252) |
| 26 | 5.260 (0.2071) | 50 | 5.500 (0.2165) | 74 | 5.740 (0.2260) |
| 28 | 5.280 (0.2079) | 52 | 5.520 (0.2173) | - | - |
Install the selected valve lifter.
Install the camshaft (Click here).
| 42. INSTALL CAMSHAFT POSITION SENSOR |
![]() |
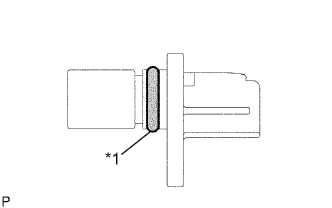
Apply a light coat of engine oil onto the O-ring of the camshaft position sensor.
| *1 | O-ring |
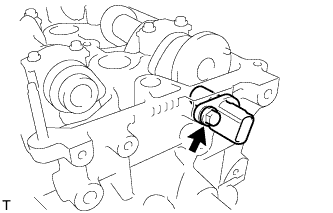
![]() |
Install the camshaft position sensor with the bolt.
| 43. INSTALL CYLINDER HEAD COVER GASKET |
![]() |
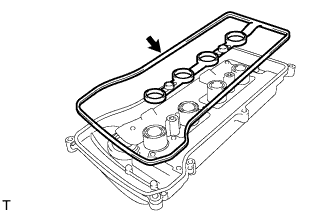
Install a new cylinder head cover gasket onto the cylinder head cover sub-assembly.
| 44. INSTALL CYLINDER HEAD COVER SUB-ASSEMBLY |
Remove any old packing material from the contact surfaces.
![]() |
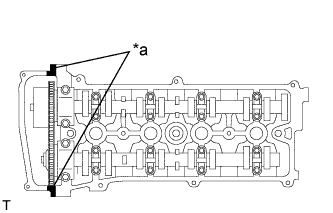
Apply seal packing to the 2 locations shown in the illustration.
| *a | Seal Packing |
![]() |
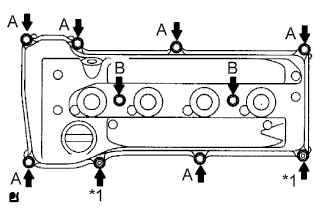
Install the cylinder head cover sub-assembly with the 8 bolts and 2 nuts.
| *1 | Nut |
| 45. INSTALL OIL FILTER UNION |
![]() |
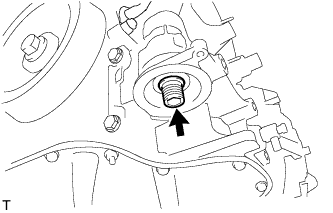
Using a 12 mm socket hexagon wrench, install the oil filter union.
| 46. INSTALL OIL FILTER SUB-ASSEMBLY |
Check and clean the oil filter sub-assembly installation surface.
Apply clean engine oil to the gasket of a new oil filter sub-assembly.
Lightly screw the oil filter sub-assembly into place by hand. Tighten it until the gasket contacts the seat.
Using SST, tighten the oil filter sub-assembly.
Depending on the work space available, choose from the following:
| 47. INSTALL SPARK PLUG |
Using a spark plug wrench, install the 4 spark plugs.
| 48. INSTALL VENTILATION VALVE SUB-ASSEMBLY |
Apply adhesive to 2 or 3 threads of the ventilation valve sub-assembly.
Using a ball joint lock nut wrench (22 mm), install the ventilation valve sub-assembly.
| 49. INSTALL OIL FILLER CAP GASKET |
![]() |
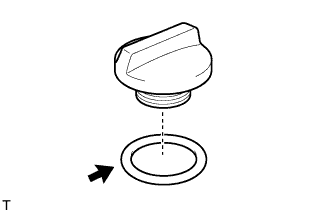
Install the oil filler cap gasket onto the oil filler cap sub-assembly.
| 50. INSTALL OIL FILLER CAP SUB-ASSEMBLY |
![]() |
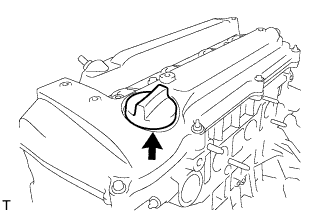
Install the oil filler cap sub-assembly onto the cylinder head cover sub-assembly.