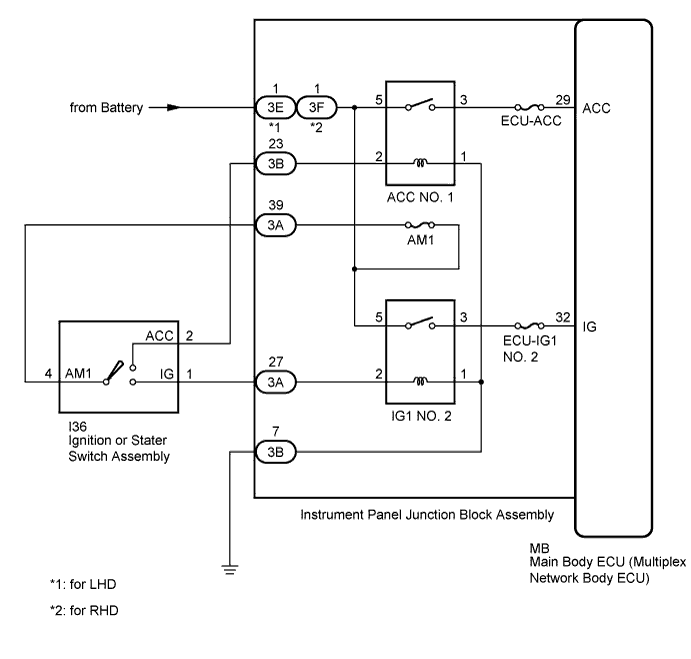
THEFT DETERRENT SYSTEM > Ignition Switch Circuit |
| 1.READ VALUE USING INTELLIGENT TESTER |
Connect the intelligent tester to the DLC3.
Turn the ignition switch to ON.
Turn intelligent tester on.
Enter the following menus: Body / Main Body / Data List.
According to the display on the intelligent tester, read the Data List.
| Tester Display | Measurement Item/Range | Normal Condition | Diagnostic Note |
| ACC SW | Ignition switch/ON or OFF | ON: Ignition switch ACC OFF: Ignition switch LOCK or ON | - |
| IG SW | Ignition switch/ON or OFF | ON: Ignition switch ON OFF: Ignition switch LOCK or ACC | - |
|
| ||||
| OK | ||
 | ||
| ||
| 2.INSPECT IGNITION OR STARTER SWITCH ASSEMBLY |
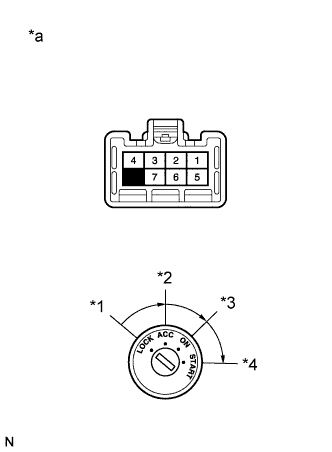 |
Remove the ignition or starter switch assembly (Click here). (for 2AR-FE)
Remove the ignition or starter switch assembly (Click here). (for 1AZ-FE)
Measure the resistance according to the value(s) in the table below.
| Tester Connection | Condition | Specified Condition |
| 1 - 4 | Ignition switch ON | Below 1 Ω |
| 2 - 4 | Ignition switch ACC | Below 1 Ω |
| *1 | LOCK |
| *2 | ACC |
| *3 | ON |
| *4 | START |
| *a | Component without harness connected (Ignition or Starter Switch Assembly) |
| Result | Proceed to |
| OK | A |
| NG (for 2AR-FE) | B |
| NG (for 1AZ-FE) | C |
|
| ||||
|
| ||||
| A | |
 |
| 3.CHECK HARNESS AND CONNECTOR (BATTERY - INSTRUMENT PANEL JUNCTION BLOCK ASSEMBLY) |
Disconnect the 3E*1 or 3F*2 instrument panel junction block assembly connector.
Measure the voltage according to the value(s) in the table below.
| Tester Connection | Condition | Specified Condition |
| 3E-1 - Body ground | Always | 11 to 14 V |
| Tester Connection | Condition | Specified Condition |
| 3F-1 - Body ground | Always | 11 to 14 V |
|
| ||||
| OK | |
|
| 4.CHECK HARNESS AND CONNECTOR (INSTRUMENT PANEL JUNCTION BLOCK ASSEMBLY - BODY GROUND) |
Disconnect the 3B instrument panel junction block assembly connector.
Measure the resistance according to the value(s) in the table below.
| Tester Connection | Condition | Specified Condition |
| 3B-7 - Body ground | Always | Below 1 Ω |
|
| ||||
| OK | |
|
| 5.CHECK HARNESS AND CONNECTOR (IGNITION SWITCH ASSEMBLY - INSTRUMENT PANEL JUNCTION BLOCK ASSEMBLY) |
Disconnect the 3A instrument panel junction block assembly connector.
Measure the resistance according to the value(s) in the table below.
| Tester Connection | Condition | Specified Condition |
| I36-1 (IG1) - 3A-27 | Always | Below 1 Ω |
| I36-1 (IG1) - Body ground | Always | 10 kΩ or higher |
| I36-2 (ACC) - 3B-23 | Always | Below 1 Ω |
| I36-2 (ACC) - Body ground | Always | 10 kΩ or higher |
| I36-4 (AM1) - 3A-39 | Always | Below 1 Ω |
| I36-4 (AM1) - Body ground | Always | 10 kΩ or higher |
|
| ||||
| OK | ||
| ||
| ||

