 |
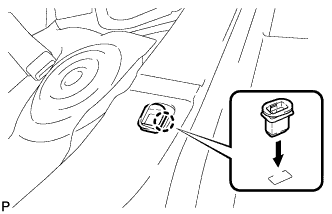
Engage the claw to install a new rear seat cushion lock hook.
- NOTICE:
- Rear seat cushion lock hooks must not be reused.
- HINT:
- Use the same procedure as for the LH side.
REAR DOOR COURTESY SWITCH > INSTALLATION |
| 1. INSTALL REAR DOOR COURTESY LIGHT SWITCH ASSEMBLY |
Using a T30 "TORX" socket wrench, install the rear door courtesy light switch assembly with the screw.
Connect the connector.
| 2. INSTALL REAR SIDE SEATBACK ASSEMBLY (for Fold Down Seat Type) |
Place the rear side seatback assembly LH in the cabin.
Engage the hook to install the rear side seatback assembly LH with the bolt.
Connect the rear seat outer belt to the rear seat shoulder belt guide LH.
| 3. INSTALL REAR SEAT CUSHION LOCK HOOK (for Fold Down Seat Type) |
|
Engage the claw to install a new rear seat cushion lock hook.
| 4. INSTALL REAR SEAT CUSHION ASSEMBLY (for Fold Down Seat Type) |
Place the rear seat cushion assembly in the cabin.
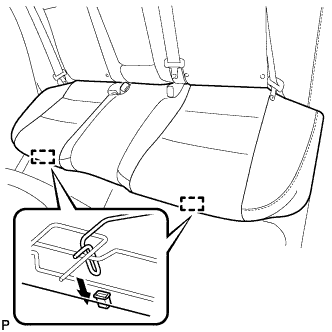 |
Engage the 2 hooks of the rear seat cushion assembly to the vehicle body as shown in the illustration.
Confirm that the rear seat cushion assembly is firmly installed.
| 5. INSTALL REAR SEATBACK ASSEMBLY (for Reclining Seat Type) |
Place the rear seatback assembly LH in the cabin.
Install the rear seatback assembly LH with the 2 bolts and 2 nuts.
Engage the 2 hooks to install the cover.
Connect the 2 rear seat belts to the 2 rear seat shoulder belt guides.
w/ Rear Seat Side Airbag:
Connect each connector and clamp to the child restraint anchor bracket sub-assembly LH.
| 6. INSTALL REAR SEATBACK COVER (for Reclining Seat Type) |
Engage the 4 claws to install the 2 rear seatback covers.
| 7. INSTALL REAR SEAT CUSHION LOCK HOOK (for Reclining Seat Type) |
|
Engage the claw to install a new rear seat cushion lock hook.
| 8. INSTALL REAR SEAT CUSHION ASSEMBLY (for Reclining Seat Type) |
Place the rear seat cushion assembly in the cabin.
w/ Seat Heater System:
Connect the 2 seat heater connectors.
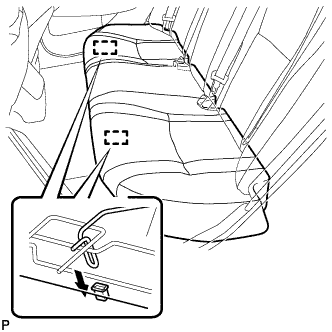 |
Engage the 2 hooks of the rear seat cushion assembly to the vehicle body as shown in the illustration.
Confirm that the rear seat cushion assembly is firmly installed.
| 9. INSTALL REAR SEAT HEADREST ASSEMBLY (for Reclining Seat Type) |
| 10. CONNECT CABLE TO NEGATIVE BATTERY TERMINAL (w/ Rear Seat Side Airbag) |
| 11. INSPECT SRS WARNING LIGHT (w/ Rear Seat Side Airbag) |