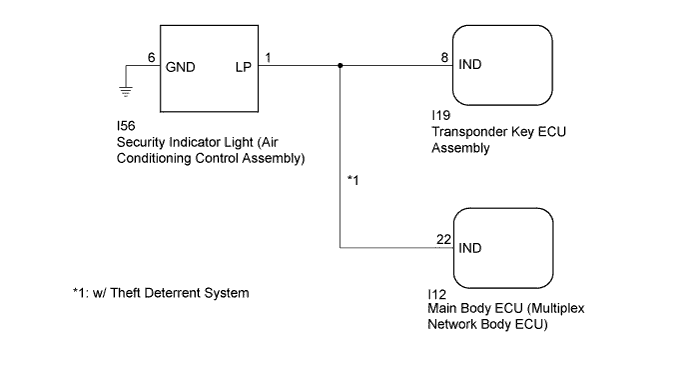
ENGINE IMMOBILISER SYSTEM (w/o Smart Key System) > Security Indicator Light Does not Blink |
| 1.SYSTEM CHECK |
Check the vehicle specification.
| Result | Proceed to |
| w/o Theft Deterrent System | A |
| w/ Theft Deterrent System | B |
|
| ||||
| A | |
 |
| 2.PERFORM ACTIVE TEST USING TECHSTREAM |
Connect the Techstream to the DLC3.
Turn the ignition switch to ON.
Turn the Techstream on.
Enter the following menus: Body Electrical / Immobiliser / Active Test.
Perform the Active Test according to the display on the Techstream.
| Tester Display | Test Part | Control Range | Diagnostic Note |
| Security Indicator | Security indicator light | ON/OFF | - |
|
| ||||
| OK | ||
 | ||
| ||
| 3.CHECK HARNESS AND CONNECTOR (AIR CONDITIONING CONTROL ASSEMBLY - TRANSPONDER KEY ECU) |
Disconnect the security indicator light (air conditioning control assembly) connector.
Disconnect the transponder key ECU assembly connector.
Measure the resistance according to the value(s) in the table below.
| Tester Connection | Condition | Specified Condition |
| I19-8 (IND) - I56-1 (LP) | Always | Below 1 Ω |
| I19-8 (IND) - Body ground | Always | 10 kΩ or higher |
| I56-6 (GND) - Body ground | Always | Below 1 Ω |
|
| ||||
| OK | |
|
| 4.CHECK TRANSPONDER KEY ECU ASSEMBLY |
Reconnect the transponder key ECU assembly connector.
Measure the voltage and check the pulse according to the value(s) in the table below.
| Tester Connection | Condition | Specified Condition |
| I56-1 (LP) - Body ground | No key in ignition key cylinder (engine immobiliser system set) | Pulse generation |
| I56-1 (LP) - Body ground | Key in ignition key cylinder (engine immobiliser system unset) | Below 1 V |
|
| ||||
| OK | ||
| ||
| ||
| 5.PERFORM ACTIVE TEST USING TECHSTREAM (SECURITY INDICATOR LIGHT) |
Connect the Techstream to the DLC3.
Turn the ignition switch to ON.
Turn the Techstream on.
Enter the following menus: Body Electrical / Immobiliser or Main Body / Active Test.
Perform the Active Test according to the display on the Techstream.
| Tester Display | Test Part | Control Range | Diagnostic Note |
| Security Indicator | Security indicator light | ON/OFF | - |
| Tester Display | Test Part | Control Range | Diagnostic Note |
| Security Indicator | Security indicator light | OFF/ON | - |
| Result | Proceed to |
| Security indicator light operation is normal when performing the "Main Body" and "Immobiliser" Active Test | A |
| B |
| C |
| Security indicator light operation is not normal when performing the "Main Body" and "Immobiliser" Active Test | D |
|
| ||||
|
| ||||
|
| ||||
| A | |
|
| 6.CHECK SECURITY INDICATOR LIGHT OPERATION |
When the immobiliser is set, check that the security indicator light blinks.*1
When the theft deterrent system is in the arming preparation state, check that the security indicator light on (Click here).*2
| Result | Proceed to |
| Both *1 and *2 are OK | A |
| *1 is NG (*2 is OK) | B |
| *2 is NG (*1 is OK) | C |
| Both *1 and *2 are NG | D |
|
| ||||
|
| ||||
|
| ||||
| A | ||
| ||
| ||
| 7.CHECK HARNESS AND CONNECTOR (AIR CONDITIONING CONTROL ASSEMBLY - TRANSPONDER KEY ECU) |
Disconnect the security indicator light (air conditioning control assembly) connector.
Disconnect the transponder key ECU assembly connector.
Measure the resistance according to the value(s) in the table below.
| Tester Connection | Condition | Specified Condition |
| I19-8 (IND) - I56-1 (LP) | Always | Below 1 Ω |
| I19-8 (IND) - Body ground | Always | 10 kΩ or higher |
|
| ||||
| OK | ||
| ||
| ||
| 8.CHECK HARNESS AND CONNECTOR (AIR CONDITIONING CONTROL ASSEMBLY - MAIN BODY ECU) |
Disconnect the security indicator light (air conditioning control assembly) connector.
Disconnect the main body ECU (multiplex network body ECU) connector.
Measure the resistance according to the value(s) in the table below.
| Tester Connection | Condition | Specified Condition |
| I12-22 (IND) - I56-1 (LP) | Always | Below 1 Ω |
| I12-22 (IND) - Body ground | Always | 10 kΩ or higher |
|
| ||||
| OK | ||
| ||
| ||
| 9.CHECK HARNESS AND CONNECTOR (AIR CONDITIONING CONTROL ASSEMBLY - MAIN BODY ECU OR TRANSPONDER KEY ECU) |
Disconnect the security indicator light (air conditioning control assembly) connector.
Disconnect transponder key ECU assembly connector.
Disconnect the main body ECU (multiplex network body ECU) connector.
Measure the resistance according to the value(s) in the table below.
| Tester Connection | Condition | Specified Condition |
| I19-8 (IND) - I56-1 (LP) | Always | Below 1 Ω |
| I12-22 (IND) - I56-1 (LP) | Always | Below 1 Ω |
| I56-1 (LP) - Body ground | Always | 10 kΩ or higher |
| I56-6 (GND) - Body ground | Always | Below 1 Ω |
|
| ||||
| OK | |
|
| 10.REPLACE SECURITY INDICATOR LIGHT (AIR CONDITIONING CONTROL ASSEMBLY) |
Temporarily replace the security indicator light (air conditioning control assembly) with a new or known good one (Click here).
When the immobiliser is set or theft deterrent system is in the arming preparation state, check that the security indicator light blinks.
|
| ||||
| OK | ||
| ||
| ||
| 11.REPLACE TRANSPONDER KEY ECU ASSEMBLY |
Temporarily replace the transponder key ECU assembly with a new or known good one (Click here).
When the immobiliser is set or theft deterrent system is in the arming preparation state, check that the security indicator light blinks.
|
| ||||
| OK | ||
| ||
| ||

