 |
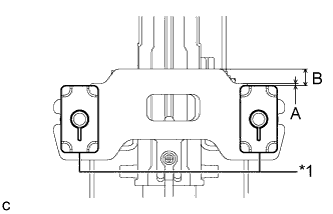
Check that the 2 capsules are securely installed to the steering column assembly as shown in the illustration.
- Minimum Dimension:
A B 1 mm (0.0394 in.) 12 mm (0.473 in.)
| *1 | Capsule |
STEERING COLUMN ASSEMBLY > INSTALLATION |
| 1. INSPECT STEERING COLUMN ASSEMBLY |
|
Check that the 2 capsules are securely installed to the steering column assembly as shown in the illustration.
| A | B |
| 1 mm (0.0394 in.) | 12 mm (0.473 in.) |
| *1 | Capsule |
Check the 2 capsules for deformation and damage.
If either of the capsules is deformed, loose, missing or damaged, replace the electric power steering column sub-assembly with a new one.
| 2. INSTALL STEERING INTERMEDIATE SHAFT ASSEMBLY |
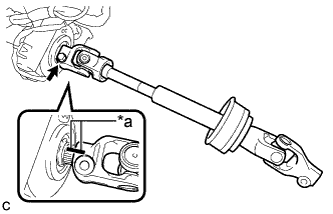 |
Install the steering intermediate shaft assembly to the steering column assembly.
| *a | Matchmark |
Install the bolt.
| 3. INSTALL STEERING POST ASSEMBLY |
Install the steering post assembly with the 4 nuts.
Install the ground wire with the bolt.
Engage the clamp.
Connect the 2 connectors.
Connect the connectors and engage the wire harness clamps to the steering post assembly.
| 4. INSTALL NO. 2 AIR DUCT SUB-ASSEMBLY |
Engage the 2 claws and guide to install the No. 2 air duct sub-assembly.
| 5. CONNECT STEERING INTERMEDIATE SHAFT ASSEMBLY |
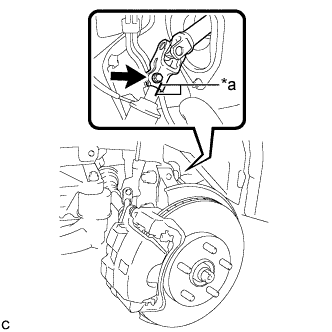 |
Connect the steering intermediate shaft assembly to the steering link assembly.
| *a | Matchmark |
Install the bolt.
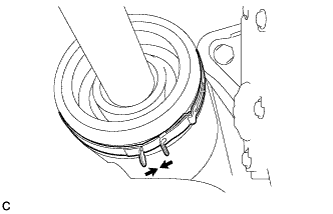 |
Tighten the clamp.
| 6. INSTALL TURN SIGNAL SWITCH ASSEMBLY WITH SPIRAL CABLE SUB-ASSEMBLY |
Engage the 3 claws to install the turn signal switch assembly with spiral cable sub-assembly to the steering post assembly.
Connect the connectors to the turn signal switch assembly with spiral cable sub-assembly.
| 7. INSTALL UPPER STEERING COLUMN COVER |
Engage the 2 claws to install the upper steering column cover.
Engage the 4 clips and 2 guides to the upper steering column cover.
| 8. INSTALL LOWER STEERING COLUMN COVER |
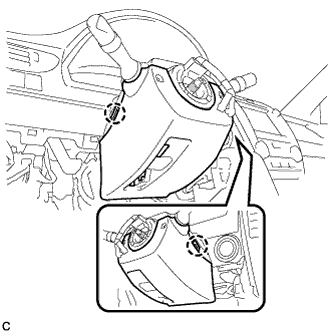 |
Engage the 2 claws to install the lower steering column cover.
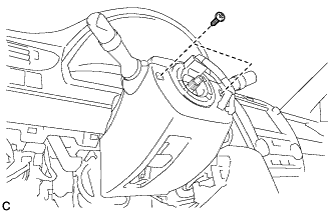 |
Install the 2 screws.
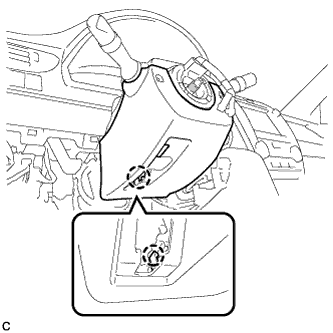 |
Engage the claw.
| 9. TURN FRONT WHEELS TO FACE STRAIGHT AHEAD |
| 10. INSPECT AND ADJUST SPIRAL CABLE WITH SENSOR SUB-ASSEMBLY |
Check that the ignition switch is off.
Check that the cable is disconnected from the negative (-) battery terminal.
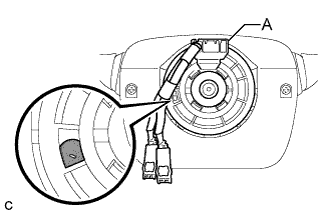 |
Check if the spiral cable sub-assembly is centered.
 | Colored Part |
If the spiral cable sub-assembly is not centered, center it.
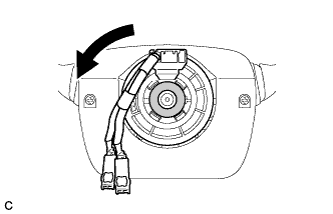 |
While pushing on the interlock indicated in the illustration, rotate the spiral cable sub-assembly counterclockwise slowly by hand until it stops.
 | Interlock |
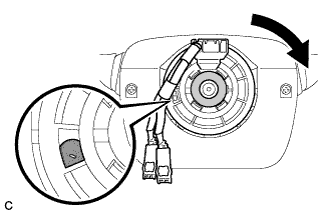 |
Rotate the spiral cable sub-assembly clockwise approximately 2.5 turns to the position where the colored part shown in the illustration is visible.
| Colored Part |
| Interlock |
| 11. INSTALL STEERING WHEEL ASSEMBLY (for 3 Spoke) |
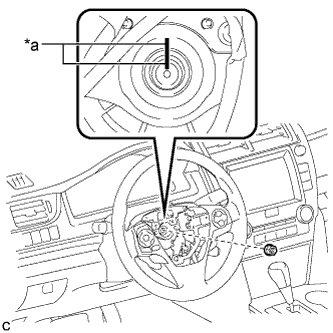 |
Install the steering wheel assembly aligning the matchmarks on the steering wheel assembly and steering main shaft.
| *a | Matchmark |
Install the steering wheel assembly set nut.
Connect the connectors to the spiral cable sub-assembly and steering wheel assembly.
| 12. INSTALL STEERING WHEEL ASSEMBLY (for 4 Spoke) |
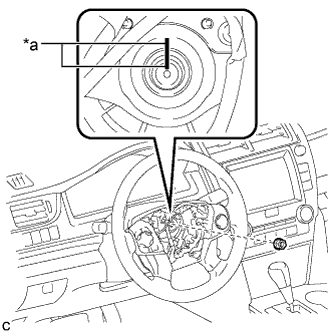 |
Install the steering wheel assembly aligning the matchmarks on the steering wheel assembly and steering main shaft.
| *a | Matchmark |
Install the steering wheel assembly set nut.
Connect the connectors to the spiral cable sub-assembly.
| 13. INSPECT STEERING WHEEL CENTER POINT |
| 14. INSTALL HORN BUTTON ASSEMBLY |
| 15. INSTALL LOWER NO. 1 INSTRUMENT PANEL AIRBAG ASSEMBLY |
| 16. INSTALL FRONT WHEEL LH |
| 17. TORQUE SENSOR ZERO POINT CALIBRATION (for 2AR-FE without Wireless Door Lock) |
| 18. TORQUE SENSOR ZERO POINT CALIBRATION (for 2AR-FE with Wireless Door Lock) |