Home › Vehicle Exterior › EXTERIOR PANELS / TRIM › FRONT DOOR BELT MOULDING

FRONT DOOR BELT MOULDING > REMOVAL

for Preparation Click here


1. PRECAUTION

NOTICE:
After turning the ignition switch off, waiting time may be required before disconnecting the cable from the negative (-) battery terminal. Therefore, make sure to read the disconnecting the cable from the negative (-) battery terminal notices before proceeding with work (Click here).


2. DISCONNECT CABLE FROM NEGATIVE BATTERY TERMINAL

CAUTION:
Wait at least 90 seconds after disconnecting the cable from the negative (-) battery terminal to disable the SRS system.

NOTICE:
When disconnecting the cable, some systems need to be initialized after the cable is reconnected (Click here).


3. REMOVE OUTER REAR VIEW MIRROR ASSEMBLY
(Click here)


4. REMOVE DOOR SIDE AIRBAG SENSOR
  1. Check that the ignition switch is off.

  1. Check that the cable is disconnected from the negative (-) battery terminal.

    CAUTION:
    Wait at least 90 seconds after disconnecting the cable from the negative (-) battery terminal to disable the SRS system.


  1. Disconnect the connector from the door side airbag sensor.

    NOTICE:
    When disconnecting any airbag connector, take care not to damage the airbag wire harness.


    1. Push down the white housing lock and slide the yellow CPA. (At this time, the connector cannot be disconnected yet.)
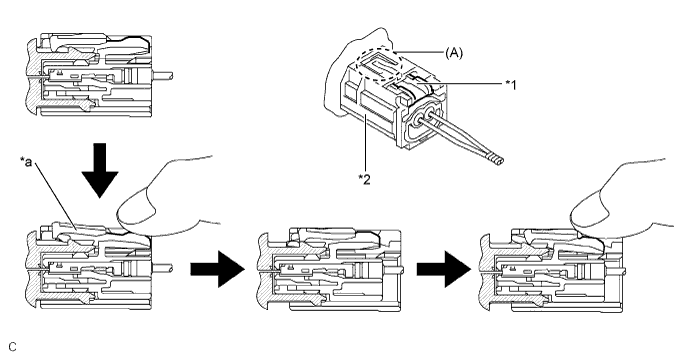

      H043302E12


      Text in Illustration 
      *1
      White Housing Lock
      *2
      Yellow CPA
      *a
      Connector Lock is Released
      -
      -

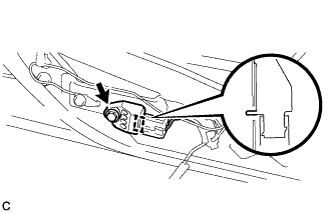
    2. Push down the white housing lock again and disconnect the connector.

      NOTICE:
      Do not push down the part (A) shown in the illustration when disconnecting.


    B278819
  1. Remove the bolt and door side airbag sensor from the front door panel.

    NOTICE:
    Loosen the bolt while holding the door side airbag sensor because the door side airbag sensor pin (stopper) is easily damaged.


  1. After disconnecting the connector, check that the position of the white housing lock is correct as shown in the illustration.


    B296255E01


    Text in Illustration 
    *a
    Incorrect
    *b
    Correct


5. REMOVE FRONT DOOR SERVICE HOLE COVER


    B277198
  1. Remove the bolt.

  1. Disconnect each connector.

  1. Disengage the 5 clamps.

  1. Remove the front door service hole cover.

    HINT:
    Remove any remaining butyl tape from the door.


6. REMOVE FRONT DOOR GLASS SUB-ASSEMBLY


    B277200
  1. Remove the grommet.

  1. Connect the cable to the negative (-) battery terminal.

  1. Connect the power window regulator master switch assembly and move the front door glass sub-assembly so that the door glass bolts can be seen.

  1. Disconnect the cable from the negative (-) battery terminal.

    CAUTION:
    Wait at least 90 seconds after disconnecting the cable from the negative (-) battery terminal to disable the SRS system.

    NOTICE:
    When disconnecting the cable, some systems need to be initialized after the cable is reconnected (Click here).

  1. Disconnect the power window regulator master switch assembly.


    B280340
  1. Remove the 2 bolts.

    NOTICE:
    After the bolts are removed, do not allow the door glass to fall.


    B280342E01
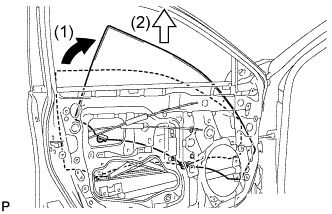
  1. Remove the front door glass sub-assembly as indicated by the arrows, in the order shown in the illustration.

    NOTICE:
    Do not damage the door glass.


7. REMOVE FRONT DOOR BELT MOULDING ASSEMBLY


    B280066E01
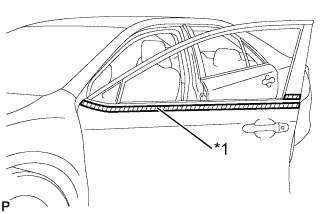
  1. Put protective tape around the front door belt moulding assembly.
    Text in Illustration 
    *1
    Protective Tape


    B280067E01
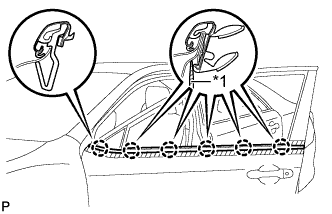
  1. Using a screwdriver with the tip wrapped with protective tape, disengage the 6 claws and remove the front door belt moulding assembly.
    Text in Illustration 
    *1
    Protective Tape

    HINT:
    Tape the screwdriver tip before use.