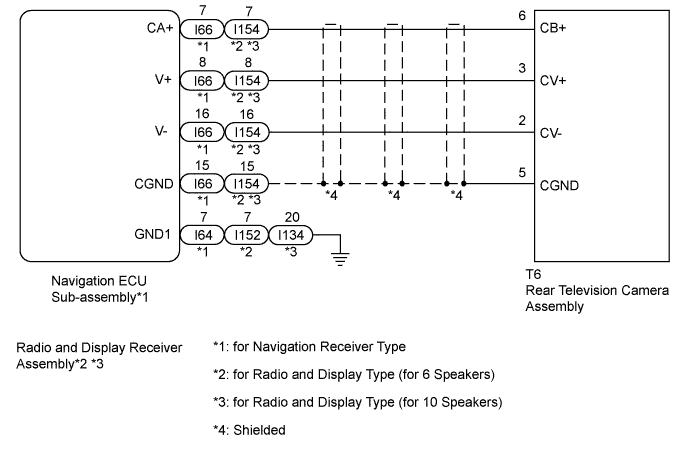
REAR VIEW MONITOR SYSTEM > Image from Camera for Rear View Monitor is Abnormal |
| 1.CONFIRM MODEL |
Chose the model to be inspected.
| Result | Proceed to |
| for Navigation Receiver Type | A |
| for Radio and Display Type | B |
|
| ||||
| A | |
 |
| 2.CHECK HARNESS AND CONNECTOR (NAVIGATION ECU SUB-ASSEMBLY - REAR TELEVISION CAMERA ASSEMBLY) |
Disconnect the I66 connector from the navigation ECU sub-assembly.
Disconnect the T6 connector from the rear television camera assembly.
Measure the resistance according to the value(s) in the table below.
| Tester Connection | Condition | Specified Condition |
| I66-7 (CA+) - T6-6 (CB+) | Always | Below 1 Ω |
| I66-8 (V+) - T6-3 (CV+) | Always | Below 1 Ω |
| I66-15 (CGND) - T6-5 (CGND) | Always | Below 1 Ω |
| I66-16 (V-) - T6-2 (CV-) | Always | Below 1 Ω |
| I66-7 (CA+) - Body ground | Always | 10 kΩ or higher |
| I66-8 (V+) - Body ground | Always | 10 kΩ or higher |
| I66-15 (CGND) - Body ground | Always | 10 kΩ or higher |
| I66-16 (V-) - Body ground | Always | 10 kΩ or higher |
|
| ||||
| OK | |
|
| 3.CHECK NAVIGATION ECU SUB-ASSEMBLY |
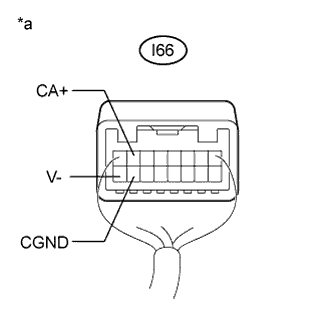 |
Reconnect the I66 connector to the navigation ECU sub-assembly.
Measure the resistance according to the value(s) in the table below.
| Tester Connection | Condition | Specified Condition |
| I66-15 (CGND) - Body ground | Always | Below 1 Ω |
| I66-16 (V-) - Body ground | Always | Below 1 Ω |
Measure the voltage according to the value(s) in the table below.
| Tester Connection | Condition | Specified Condition |
| I66-7 (CA+) - I66-15 (CGND) | Ignition switch ON Shift lever in R | 5.5 to 7.05 V |
| *a | Component with harness connected (Navigation ECU Sub-assembly) |
|
| ||||
| OK | |
|
| 4.CHECK REAR TELEVISION CAMERA ASSEMBLY |
Reconnect the T6 connector to the rear television camera assembly.
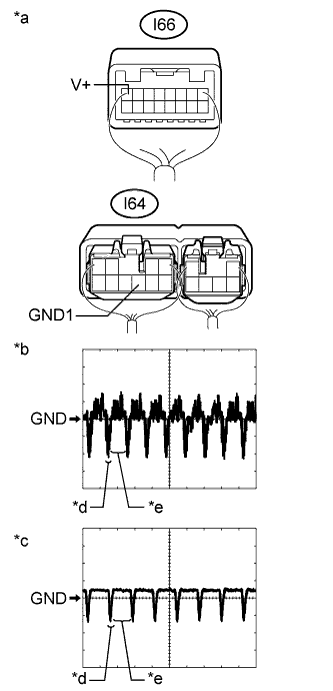 |
Check the waveform of the rear television camera assembly using an oscilloscope.
| Item | Content |
| Terminal No. (Symbol) | I66-8 (V+) - I64-7 (GND1) |
| Tool Setting | 200 mV/DIV., 50 μs./DIV. |
| Condition | Ignition switch ON, shift lever in R |
| *a | Component with harness connected (Navigation ECU Sub-assembly) |
| *b | Waveform 1 (camera lens not covered, displaying an image) |
| *c | Waveform 2 (camera lens covered, blacking out the screen) |
| *d | Synchronization Signal |
| *e | Video Waveform |
|
| ||||
| OK | ||
 | ||
| ||
| 5.CHECK HARNESS AND CONNECTOR (RADIO AND DISPLAY RECEIVER ASSEMBLY - REAR TELEVISION CAMERA ASSEMBLY) |
Disconnect the I154 connector from the radio and display receiver assembly.
Disconnect the T6 connector from the rear television camera assembly.
Measure the resistance according to the value(s) in the table below.
| Tester Connection | Condition | Specified Condition |
| I154-7 (CA+) - T6-6 (CB+) | Always | Below 1 Ω |
| I154-8 (V+) - T6-3 (CV+) | Always | Below 1 Ω |
| I154-15 (CGND) - T6-5 (CGND) | Always | Below 1 Ω |
| I154-16 (V-) - T6-2 (CV-) | Always | Below 1 Ω |
| I154-7 (CA+) - Body ground | Always | 10 kΩ or higher |
| I154-8 (V+) - Body ground | Always | 10 kΩ or higher |
| I154-15 (CGND) - Body ground | Always | 10 kΩ or higher |
| I154-16 (V-) - Body ground | Always | 10 kΩ or higher |
|
| ||||
| OK | |
|
| 6.CHECK RADIO AND DISPLAY RECEIVER ASSEMBLY |
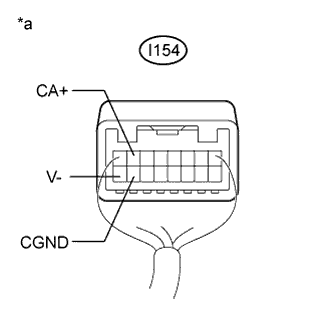 |
Reconnect the I154 connector to the radio and display receiver assembly.
Measure the resistance according to the value(s) in the table below.
| Tester Connection | Condition | Specified Condition |
| I154-15 (CGND) - Body ground | Always | Below 1 Ω |
| I154-16 (V-) - Body ground | Always | Below 1 Ω |
Measure the voltage according to the value(s) in the table below.
| Tester Connection | Condition | Specified Condition |
| I154-7 (CA+) - I154-15 (CGND) | Within 60 seconds of turning the ignition switch to ACC | 5.5 to 7.05 V |
| *a | Component with harness connected (Radio and Display Receiver Assembly) |
|
| ||||
| OK | |
|
| 7.CHECK REAR TELEVISION CAMERA ASSEMBLY |
for 10 speakers
Reconnect the T6 connector to the rear television camera assembly.
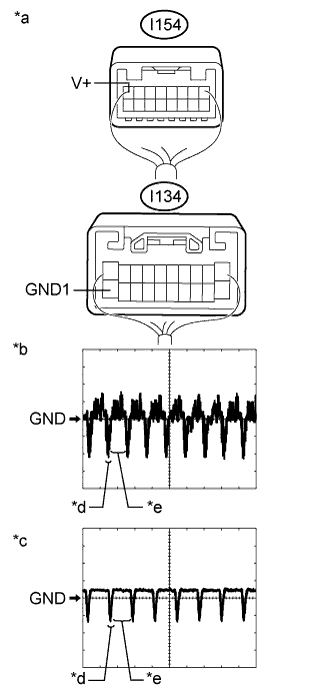 |
Check the waveform of the rear television camera assembly using an oscilloscope.
| Item | Content |
| Terminal No. (Symbol) | I154-8 (V+) - I134-20 (GND1) |
| Tool Setting | 200 mV/DIV., 50 μs/DIV. |
| Condition | Ignition switch ON, shift lever in R |
| *a | Component with harness connected (Radio and Display Receiver Assembly) |
| *b | Waveform 1 (camera lens not covered, displaying an image) |
| *c | Waveform 2 (camera lens covered, blacking out the screen) |
| *d | Synchronization Signal |
| *e | Video Waveform |
for 6 speakers
Reconnect the T6 connector to the rear television camera assembly.
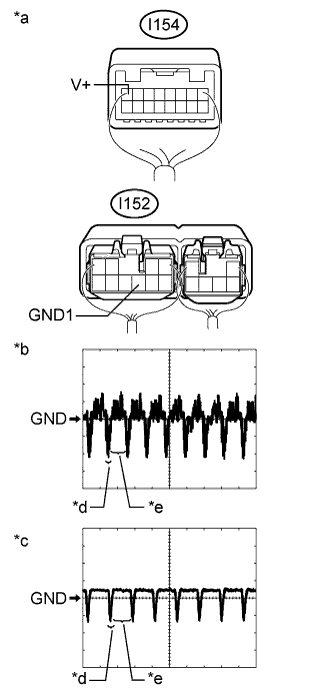 |
Check the waveform of the rear television camera assembly using an oscilloscope.
| Item | Content |
| Terminal No. (Symbol) | I154-8 (V+) - I152-7 (GND1) |
| Tool Setting | 200 mV/DIV., 50 μs/DIV. |
| Condition | Ignition switch ON, shift lever in R |
| *a | Component with harness connected (Radio and Display Receiver Assembly) |
| *b | Waveform 1 (camera lens not covered, displaying an image) |
| *c | Waveform 2 (camera lens covered, blacking out the screen) |
| *d | Synchronization Signal |
| *e | Video Waveform |
|
| ||||
| OK | ||
| ||
| ||

