 |
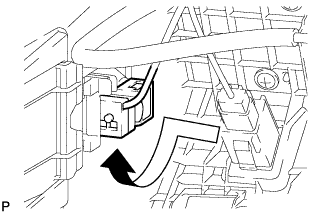
Engage the glove compartment light as shown in the illustration.
AIR CONDITIONING AMPLIFIER > INSTALLATION |
| 1. INSTALL AIR CONDITIONING AMPLIFIER ASSEMBLY |
Engage the 2 guides.
Install the air conditioning amplifier assembly with the 2 screws.
Connect each connector.
| 2. INSTALL CERTIFICATION ECU (SMART KEY ECU ASSEMBLY) (w/o ECU Integration Box RH) |
w/ ECU Integration Box RH:
Engage the 2 claws and install the certification ECU (smart key ECU assembly).
w/o ECU Integration Box RH:
Install the certification ECU (smart key ECU assembly) with the nut and bolt.
Connect each connector.
| 3. INSTALL ECU INTEGRATION BOX RH (w/ ECU Integration Box RH) |
Install the ECU integration box RH with the 2 nuts and bolt.
Engage the clamp.
Connect each connector.
| 4. INSTALL LOWER INSTRUMENT PANEL SUB-ASSEMBLY |
Connect each connector.
|
Engage the glove compartment light as shown in the illustration.
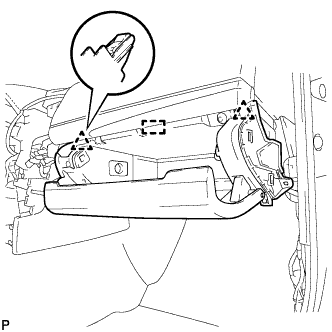 |
Engage the guide and 2 clips.
Install the lower instrument panel sub-assembly with the 5 screws <C> or <D>.
| 5. INSTALL LOWER NO. 2 INSTRUMENT PANEL AIRBAG ASSEMBLY |
Check that the ignition switch is off.
Check that the cable is disconnected from the negative (-) battery terminal.
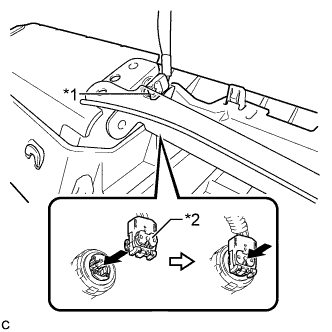 |
Connect the airbag connector to the lower No. 2 instrument panel airbag assembly.
| *1 | Airbag Connector |
| *2 | Airbag Connector Lock |
Push in the lock to install the airbag connector.
Temporarily install the lower No. 2 instrument panel airbag assembly with the 3 claws.
Install the 3 bolts.
| 6. INSTALL NO. 2 INSTRUMENT PANEL UNDER COVER SUB-ASSEMBLY |
Engage the 2 guides and 4 claws to install the No. 2 instrument panel under cover sub-assembly.
| 7. INSTALL FRONT PANEL GARNISH RH |
Engage the 3 claws, 2 clips and 8 guides to install the front panel garnish RH.
| 8. INSTALL INSTRUMENT SIDE PANEL RH |
Engage the 3 guides.
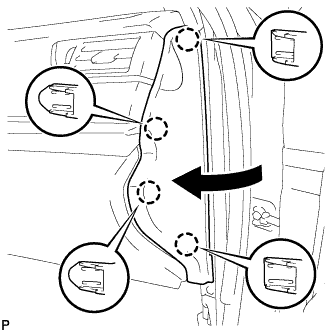 |
Engage the 4 claws to install the instrument side panel RH as shown in the illustration.
| 9. CONNECT FRONT DOOR OPENING TRIM WEATHERSTRIP RH |
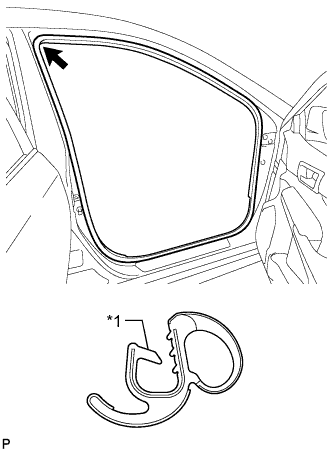 |
Align the alignment mark (White) on the weatherstrip with the protruding portion on the body indicated by the arrow in the illustration, and install the front door opening trim weatherstrip RH.
| *1 | Alignment Mark (White) |
| 10. INSTALL COWL SIDE TRIM SUB-ASSEMBLY RH |
| 11. INSTALL FRONT DOOR SCUFF PLATE RH |
| 12. CONNECT CABLE TO NEGATIVE BATTERY TERMINAL |
| 13. SRS WARNING LIGHT |