 |
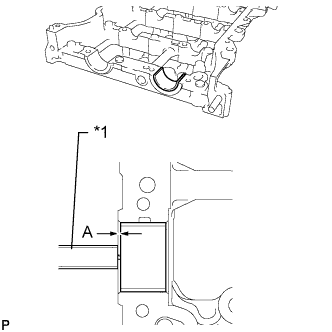
Using a vernier caliper, measure the distance between the camshaft housing edge and the camshaft bearing edge.
- Standard distance:
- 1.15 to 1.85 mm (0.0453 to 0.0728 in.)
| *1 | Vernier Caliper |
CAMSHAFT > INSTALLATION |
| 1. INSTALL NO. 2 CAMSHAFT BEARING |
Clean the No. 2 camshaft bearing.
Install the camshaft bearing to the camshaft housing.
|
Using a vernier caliper, measure the distance between the camshaft housing edge and the camshaft bearing edge.
| *1 | Vernier Caliper |
| 2. INSTALL NO. 1 CAMSHAFT BEARING |
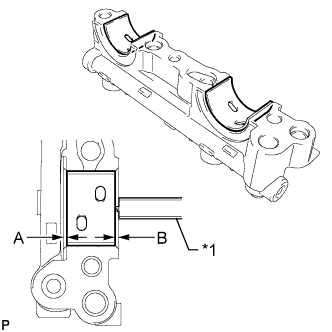 |
Clean the No. 1 camshaft bearing.
| *1 | Vernier Caliper |
Install the camshaft bearing to the No. 1 camshaft bearing cap.
Using a vernier caliper, measure the distance between the camshaft bearing cap edge and the camshaft bearing edge.
| 3. INSTALL OIL CONTROL VALVE FILTER |
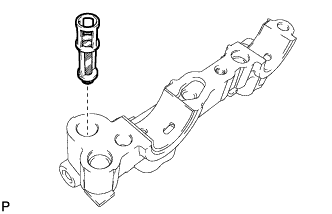 |
Install the oil control valve filter to the No. 1 camshaft bearing cap.
| 4. INSTALL CAMSHAFT TIMING EXHAUST GEAR ASSEMBLY |
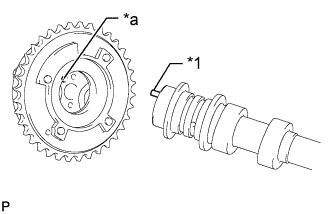 |
Align and attach the knock pin of the No. 2 camshaft with the pin hole of the camshaft timing exhaust gear assembly.
| *1 | Knock Pin |
| *a | Knock Pin Hole |
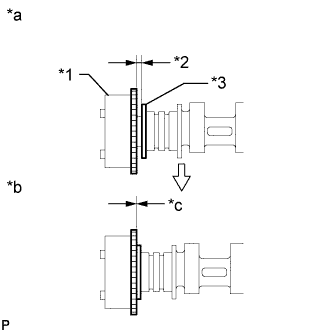 |
Check that there is no clearance between the camshaft timing exhaust gear assembly and camshaft flange.
| *1 | Camshaft Timing Exhaust Gear Assembly |
| *2 | Clearance |
| *3 | Camshaft Flange |
| *a | INCORRECT |
| *b | CORRECT |
| *c | No Clearance |
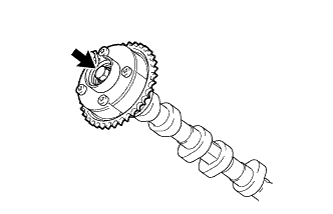 |
Fix the camshaft timing exhaust gear assembly with the bolt.
| 5. SET TDC/COMPRESSION |
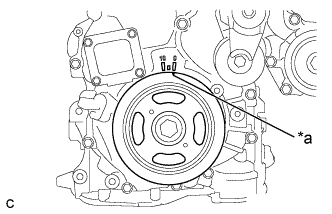 |
Turn the crankshaft pulley until its timing notch (groove) and the timing mark "0" of the timing chain cover are aligned.
| *a | Timing Notch |
| 6. INSTALL NO. 2 CAMSHAFT |
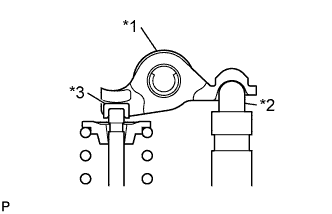 |
Make sure that the valve rocker arms are installed as shown in the illustration.
| *1 | Valve Rocker Arm |
| *2 | Valve Lash Adjuster |
| *3 | Valve Stem Cap |
Clean the camshaft journals.
Apply a light coat of engine oil to the camshaft journals, camshaft housings and bearing caps.
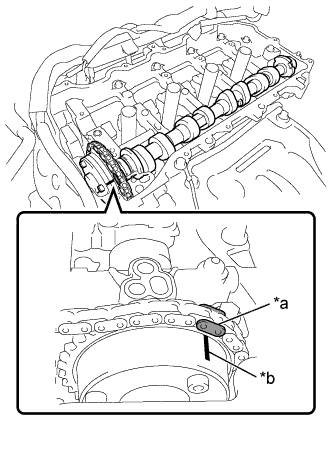 |
Hold up the chain and align the timing mark and the paint mark, and install the camshaft.
| *a | Paint Mark |
| *b | Timing Mark |
| 7. INSTALL CAMSHAFT |
|
Make sure that the valve rocker arms are installed as shown in the illustration.
| *1 | Valve Rocker Arm |
| *2 | Valve Lash Adjuster |
| *3 | Valve Stem Cap |
Clean the camshaft journals.
Apply a light coat of engine oil to the camshaft journals, camshaft housings and bearing caps.
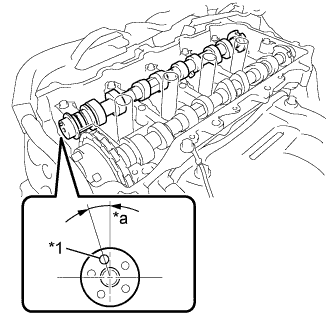 |
Install the camshaft to the camshaft housing as shown in the illustration.
| *1 | Knock Pin |
| *a | Approximately 17° |
| 8. INSTALL CAMSHAFT BEARING CAP |
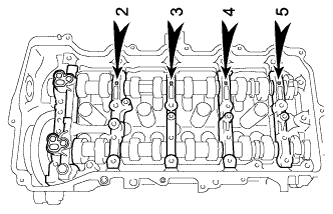 |
Confirm the marks and numbers on the camshaft bearing caps and place them in their proper positions and directions.
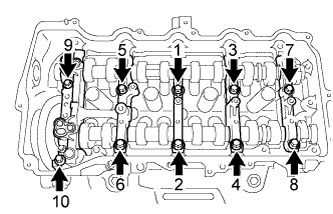 |
Using several steps, uniformly tighten the 10 bolts in the sequence shown in the illustration.
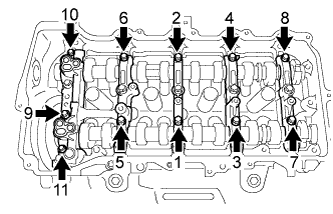 |
Using several steps, uniformly tighten the 11 bolts in the sequence shown in the illustration.
Check the torque of each bolt again.
| 9. INSTALL CAMSHAFT TIMING GEAR ASSEMBLY |
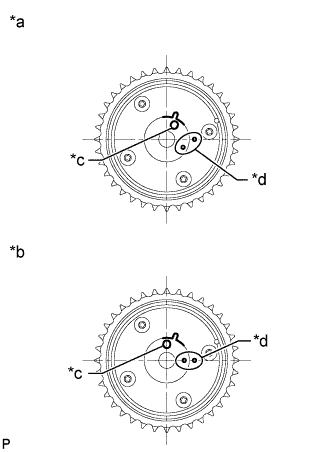 |
Check the camshaft timing gear position.
| *a | Advanced Position |
| *b | Retarded Position |
| *c | Knock Pin Hole |
| *d | Alignment Mark |
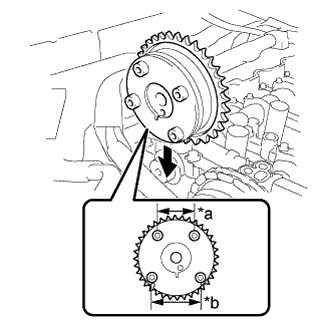 |
Install the camshaft timing gear assembly as shown in the illustration.
| *a | Narrow |
| *b | Wide |
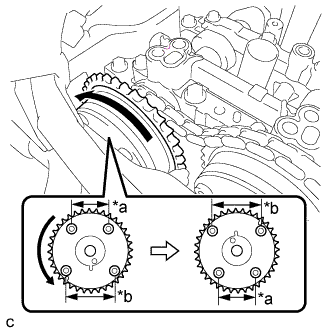 |
Turn the camshaft timing gear assembly approximately 180° counterclockwise.
| *a | Narrow |
| *b | Wide |
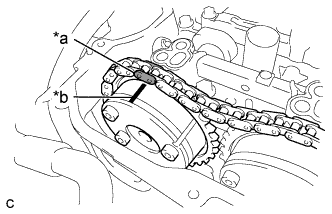 |
Align the paint mark with the timing mark to install the chain.
| *a | Paint Mark |
| *b | Timing Mark |
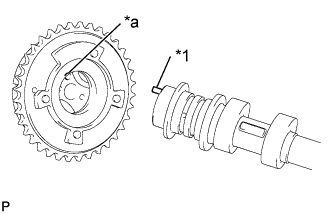 |
Align and attach the knock pin of the No. 1 camshaft with the pin hole of the camshaft timing gear.
| *1 | Knock Pin |
| *a | Knock Pin Hole |
|
Check that there is no clearance between the camshaft timing gear and camshaft flange.
| *1 | Camshaft Timing Gear |
| *2 | Clearance |
| *3 | Camshaft Flange |
| *a | INCORRECT |
| *b | CORRECT |
| *c | No Clearance |
Secure the camshaft in place by hand, and then install the installation bolt of the camshaft timing gear assembly by hand.
If the lock pin has not been released, release it.
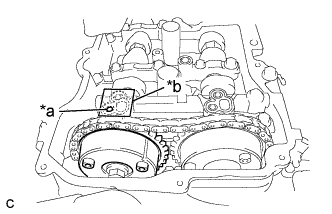 |
After cleaning and degreasing the intake side VVT oil hole on the No. 1 camshaft bearing cap, completely seal the oil hole with adhesive tape or equivalent as shown in the illustration to prevent air from leaking.
| *a | Make a Hole |
| *b | Adhesive Tape Sealing Area |
Make a hole in the adhesive tape covering the oil hole as shown in the illustration. (Procedure A)
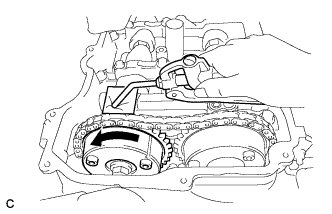 |
Apply approximately 200 kPa (2.0 kgf/ cm2, 29 psi) of air pressure to the hole made in procedure A to release the lock pin.
Forcibly turn the camshaft timing gear in the advance direction (counterclockwise).
Remove the adhesive tape from the No. 1 camshaft bearing cap.
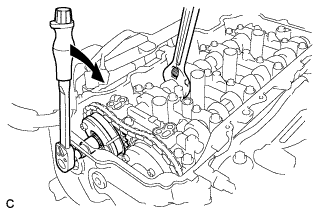 |
Using a wrench to hold the hexagonal portion of the No. 1 camshaft, install the bolt.
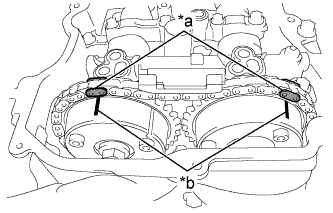 |
Check that each matchmark of the camshaft timing gear and camshaft timing exhaust gear are aligned with each matchmark located as shown in the illustration.
| *a | Paint Mark |
| *b | Timing Mark |
| 10. ADD ENGINE OIL |
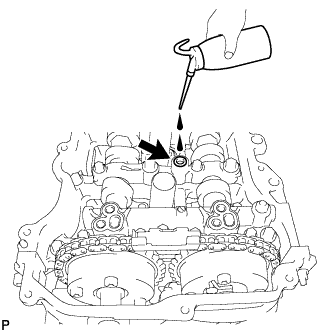 |
Add 50 cc (3.1 cu. in) of engine oil into the oil hole shown in the illustration.
| 11. INSTALL TIMING CHAIN GUIDE |
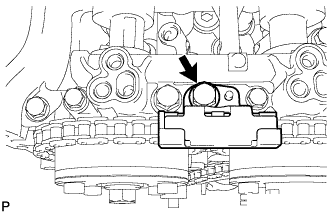 |
Install the timing chain guide with the bolt.
| 12. INSTALL NO. 1 CHAIN TENSIONER ASSEMBLY |
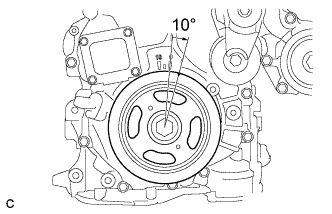 |
Turn the crankshaft approximately 10° clockwise.
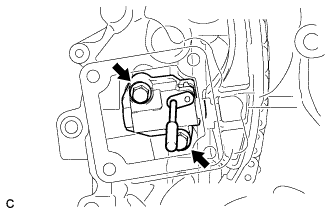 |
Install a new gasket and the chain tensioner with the 2 bolts.
Remove the pin from the stopper plate.
| 13. CHECK NO. 1 CYLINDER TO TDC/COMPRESSION |
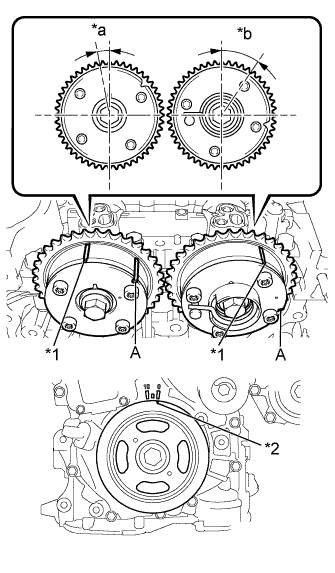 |
Turn the crankshaft pulley until its timing notch (groove) and the timing mark "0" of the timing chain cover are aligned.
| *1 | Timing Mark |
| *2 | Timing Notch |
| *a | Approximately 7° |
| *b | Approximately 32° |
Check that the timing marks of the camshaft timing gears are as shown in the illustration. If not, turn the crankshaft 1 revolution (360°) to align the timing marks as shown in the illustration.
| 14. INSTALL TIMING CHAIN COVER PLATE |
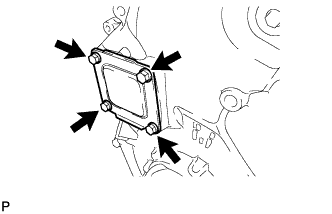 |
Install a new gasket and the timing chain cover plate with the 4 bolts.
| 15. INSTALL TIMING CHAIN COVER TIGHT PLUG |
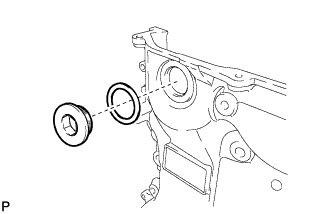 |
Using a 14 mm hexagon wrench, install a new gasket and the plug.
| 16. INSTALL CYLINDER HEAD COVER SUB-ASSEMBLY |
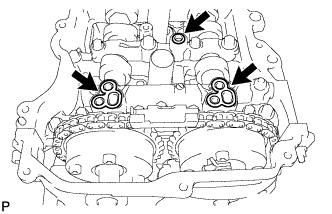 |
Apply a light coat of engine oil to 3 new gaskets.
Install the 3 gaskets to the camshaft bearing caps.
Install a new gasket to the cylinder head cover.
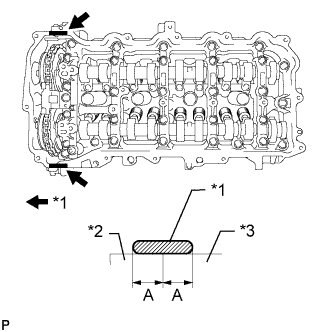 |
Apply seal packing as shown in the illustration.
| *1 | Seal packing |
| *2 | Timing Chain Cover |
| *3 | Camshaft Housing |
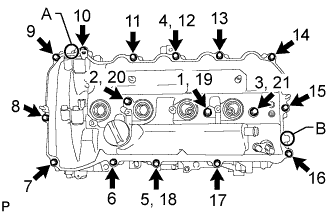 |
Align the cylinder head cover with pin A. Then align the cylinder head cover with pin B and install the cylinder head cover.
Install 3 new seal washers and the 16 bolts, and then tighten the bolts in the order shown in the illustration.
| 17. INSTALL IGNITION COIL ASSEMBLY |
Install the 4 ignition coil assemblies with the 4 bolts.
Connect the 4 ignition coil assembly connectors.
| 18. CONNECT ENGINE WIRE |
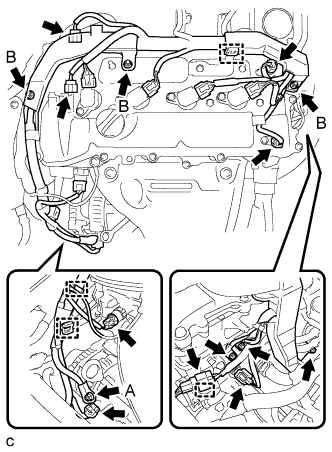 |
Install the engine wire to the engine with the bolts and nuts.
Connect the connectors and clamps.
| 19. INSTALL ENGINE MOVING CONTROL ROD |
When the engine moving control rod has been replaced.
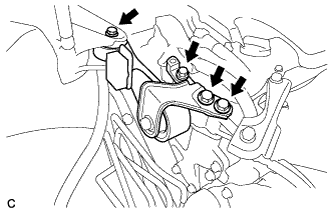 |
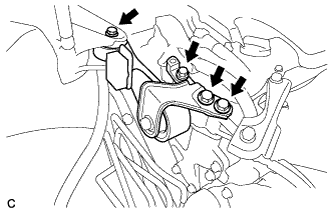
Temporarily install the engine moving control rod bracket with the 4 bolts.
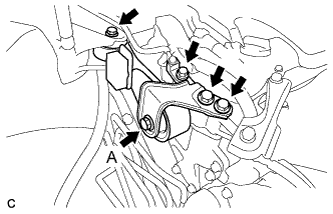 |
Fully tighten the engine moving control rod bracket with the bolts except bolt A.
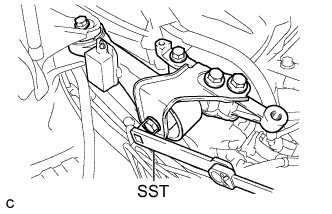 |
Fully tighten the bolt A.
 |
When the engine moving control rod has been reused.
Temporarily install the engine moving control rod bracket with the 4 bolts.
Fully tighten the engine moving control rod bracket with the 4 bolts.
| 20. INSTALL NO. 2 ENGINE MOUNTING STAY RH |
Install the No. 2 engine mounting stay RH with the 2 bolts.
| 21. INSTALL AIR CLEANER CASE SUB-ASSEMBLY |
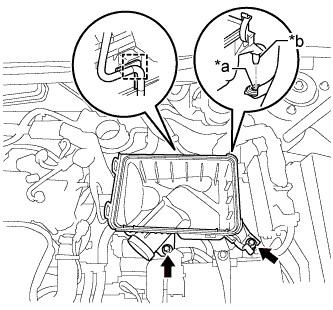 |
Insert the projection of the air cleaner case sub-assembly to the hole of the No. 2 air cleaner bracket as shown in the illustration.
| *a | Hole |
| *b | Projection |
Tighten the 2 bolts.
Connect the wire harness clamp.
| 22. INSTALL AIR CLEANER FILTER ELEMENT SUB-ASSEMBLY |
Install the air cleaner filter element sub-assembly.
| 23. INSTALL AIR CLEANER CAP SUB-ASSEMBLY |
Install the air cleaner cap sub-assembly with the 2 clamps.
Install the air cleaner hose with the hose clamp.
Connect the ventilation hose to the cylinder head cover.
Install the fuel vapor feed hose to the air cleaner hose.
Connect the mass air flow meter connector and 2 wire harness clamps to the air cleaner cap sub-assembly.
Connect the vacuum switching valve assembly to the air cleaner hose.
| 24. INSTALL INLET AIR CLEANER ASSEMBLY |
Install the inlet air cleaner with the 2 bolts.
| 25. CONNECT CABLE TO NEGATIVE BATTERY TERMINAL |
Connect the negative (-) battery terminal.
| 26. INSPECT FOR OIL LEAK |
| 27. INSTALL FRONT FENDER APRON SEAL RH |
| 28. INSTALL ENGINE UNDER COVER RH |
| 29. INSTALL FRONT WHEEL OPENING EXTENSION PAD RH |
| 30. INSTALL NO. 1 ENGINE COVER SUB-ASSEMBLY |
Fit the 3 retainers and install the No. 1 engine cover sub-assembly.
| 31. INSTALL COOL AIR INTAKE DUCT SEAL |
Install the cool air intake duct seal with the 7 clips.
| 32. INSTALL FRONT WHEEL RH |